Table of Contents
Using Single board computers (SBC) with myCNC
myCNC software can be used with a number of ARM CPU based single board computers. We have compiled myCNC software for
- Asus Tinkerboard
- Odroid-XU4
- Odroid-C2
- Raspberry Pi2/3
- Pine Rock64
Single Board Computer (SBC) performance issue
We have found an issue with OpenGL-ES driver implementation for single board computers (Tinker Board, Odroid-C2 etc).
According to our experiments, the OpenGL drivers implementation is not completely “hardware” and takes a lot of CPU resources to render an OpenGL-ES scene.
For example, on a screenshot below g-code file for 3D jewellery mill, about 400 000 g-code blocks, 8M size.

SBC CPU is loaded in full when this job is running. Htop utility shows a core loading 147% and other cores are about 16% each.

This CPU overloading might lead to CPU overheat, keyboard event delays, job stops (due to command buffer feed lags in the controller) and other system faults.
To test what is the reason of CPU overloading we added “Disable Cursor” checkbox in 3D visualisation setting.

If this checkbox is checked, the visualisation widget ignores position messages from the myCNC controller, does not update new work position on visualisation widget (a red cursor) and does not refresh a complete scene.
The result is shown in a screenshot below. CPU loading drops about 5 times. Only 1 core is loaded to 40%, the rest cores are loaded less. myCNC loads just 1 core mostly, the rest is taken by the Linux system.

Conclusion: If you need to work with heavy g-code files and use 3D visualization, then please consider
- Disable work position cursor in OpenGL-ES visualisation widget on Single Board Computer (TinkerBoard), or
- Switch to Intel-based Linux PC. Even low-cost Intel CPU with built-in graphics have performance good enough to handle all the visualisation.
Odroid-C2
Login: operator
Password: operator

Root password: operator
Change IP address of Single Board Computer (SBC)
Change IP address of Single Board Computer (SBC) - Odroid-C2
We provide single board computers (Odroid-C2, Raspberry Pi2/3, NanoPi K2) based on Ubuntu Linux with MATE Desktop environment.
Notice: Network settings in Linux attached to MAC address of Network controller (wired or wireless).
You may need to re-setup Network settings in case you insert new Wifi dongle (new MAC address) or
update SD card image from our FTP (Network configured for tor MAC addresses of computer we prepared
the image.
There are many ways to change IP address of computer board. Linux users can do it easily without our how-to. For those who need it:
- Hide or Close Full screen windows to open Desktop screen
- Find Network Icon in top Taskbar
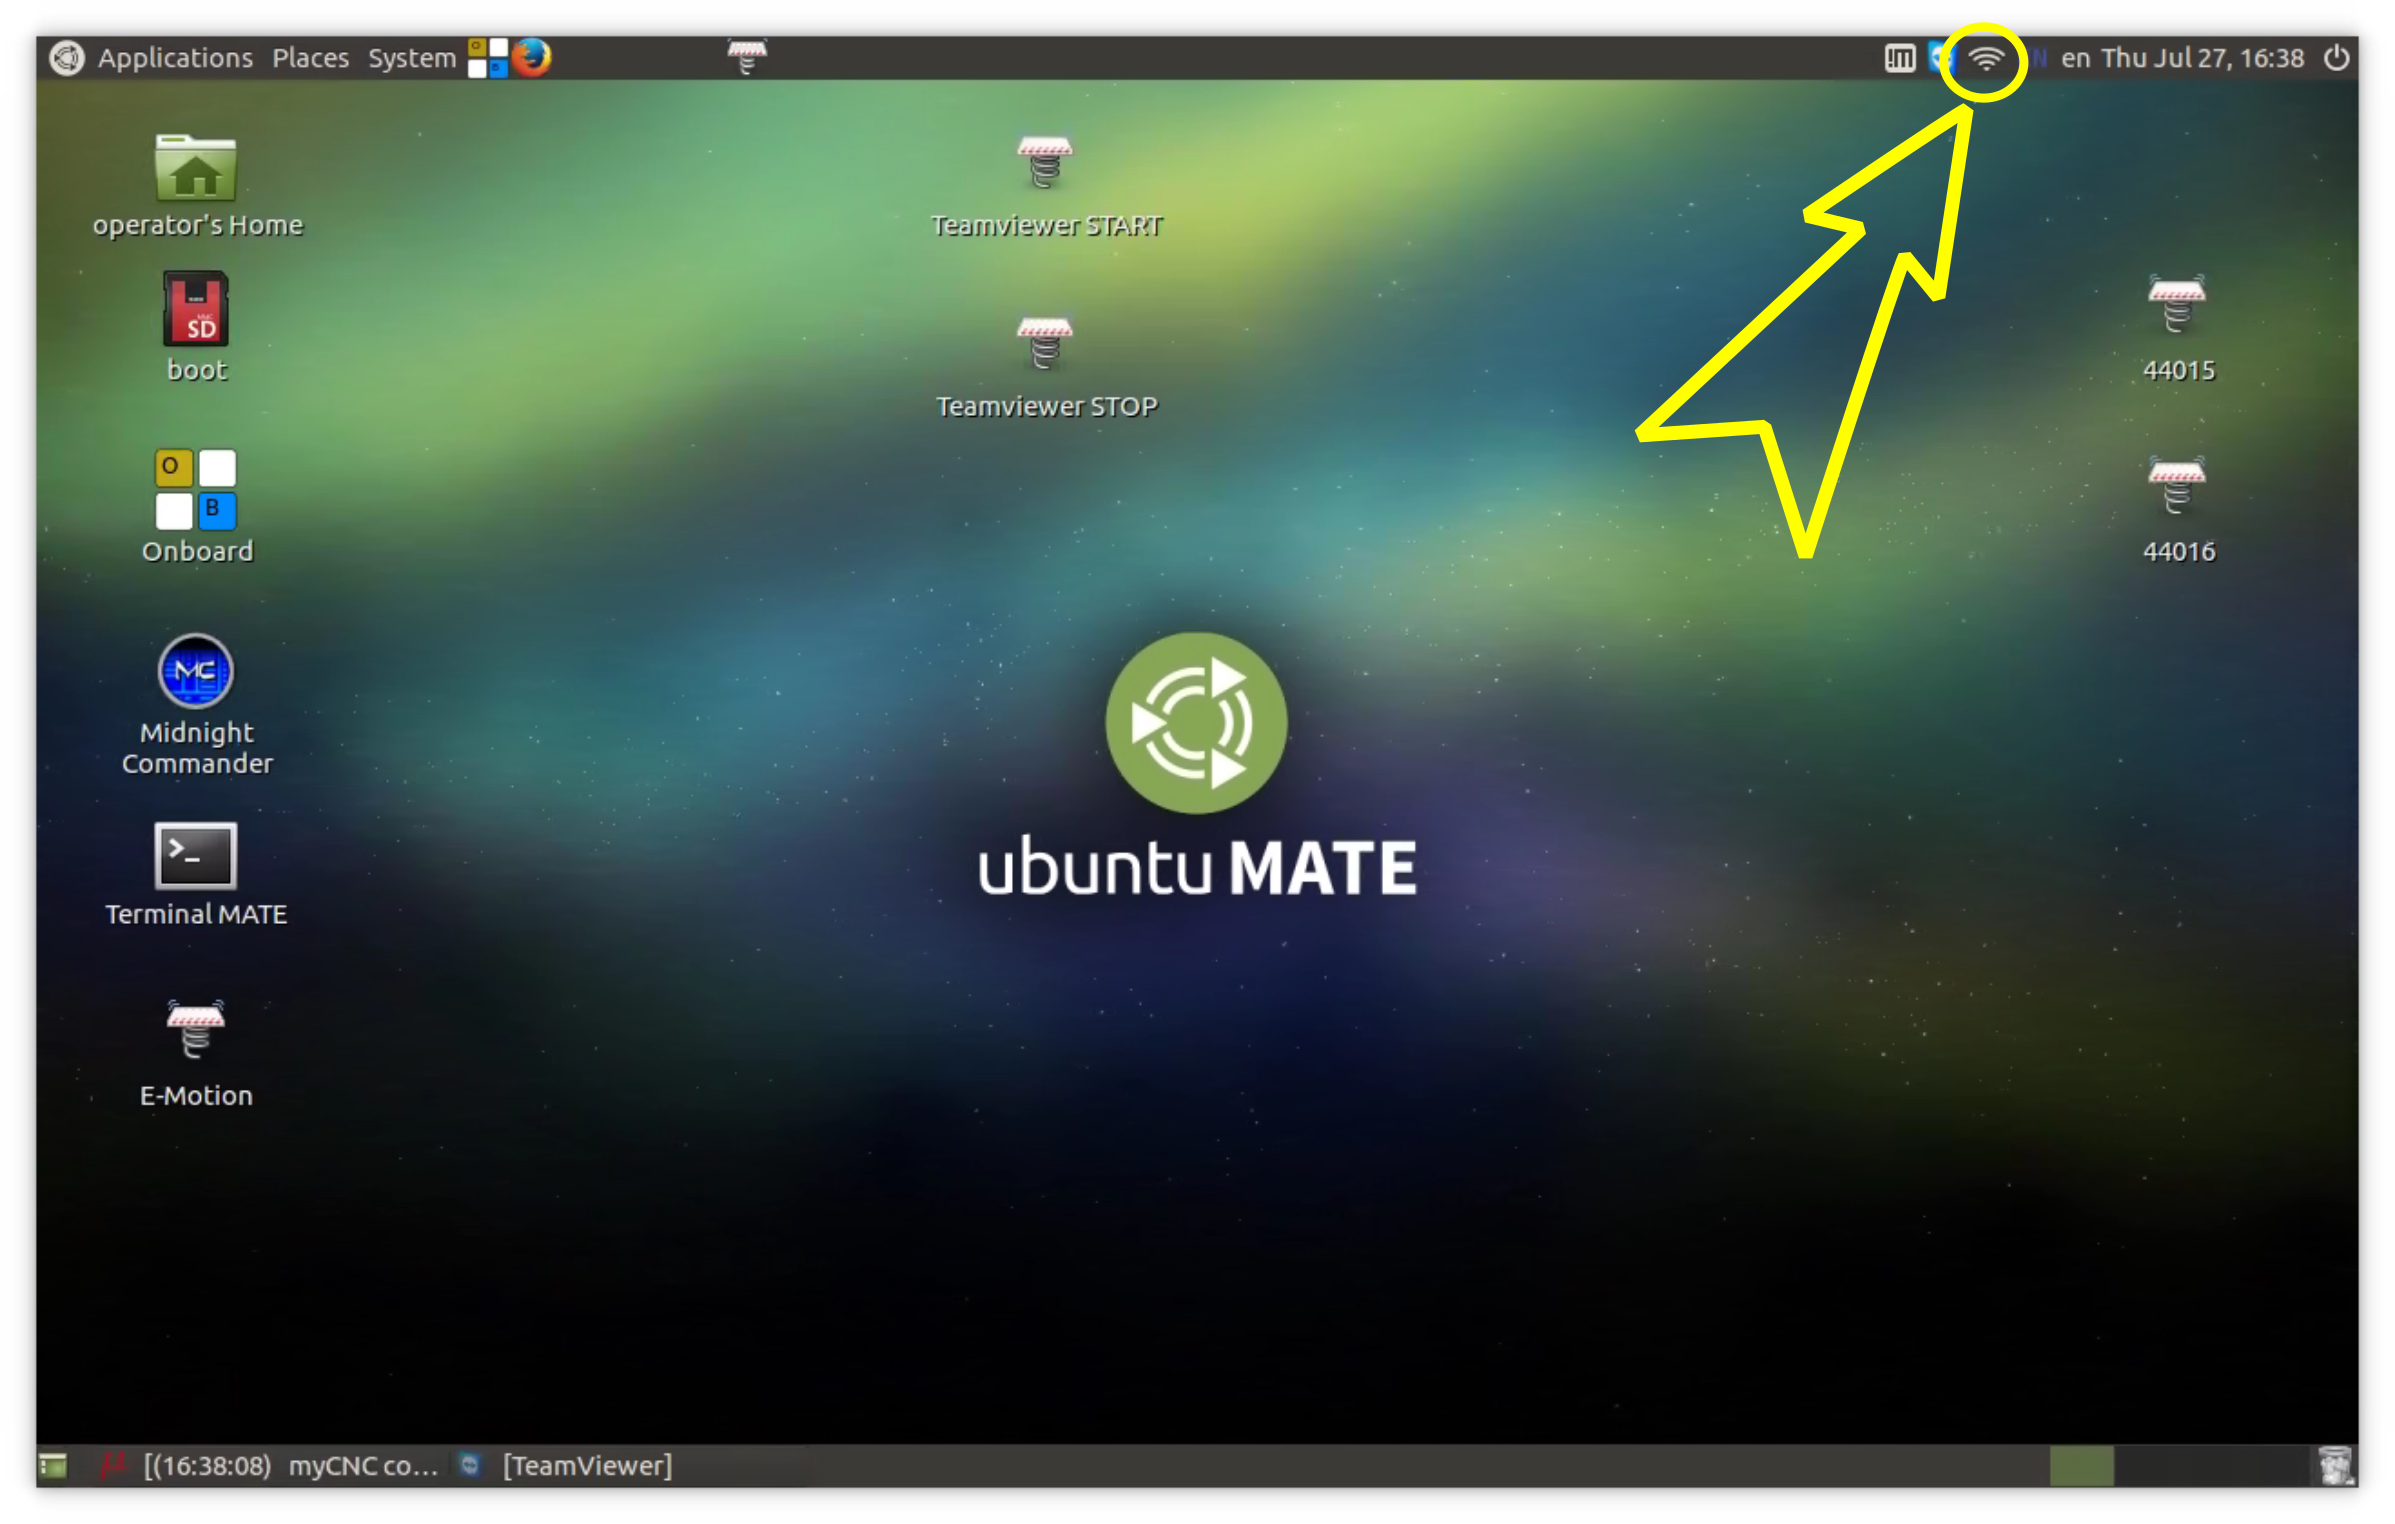
- Press Right Mouse button on the icon, select “Edit Connections” menu and click on it
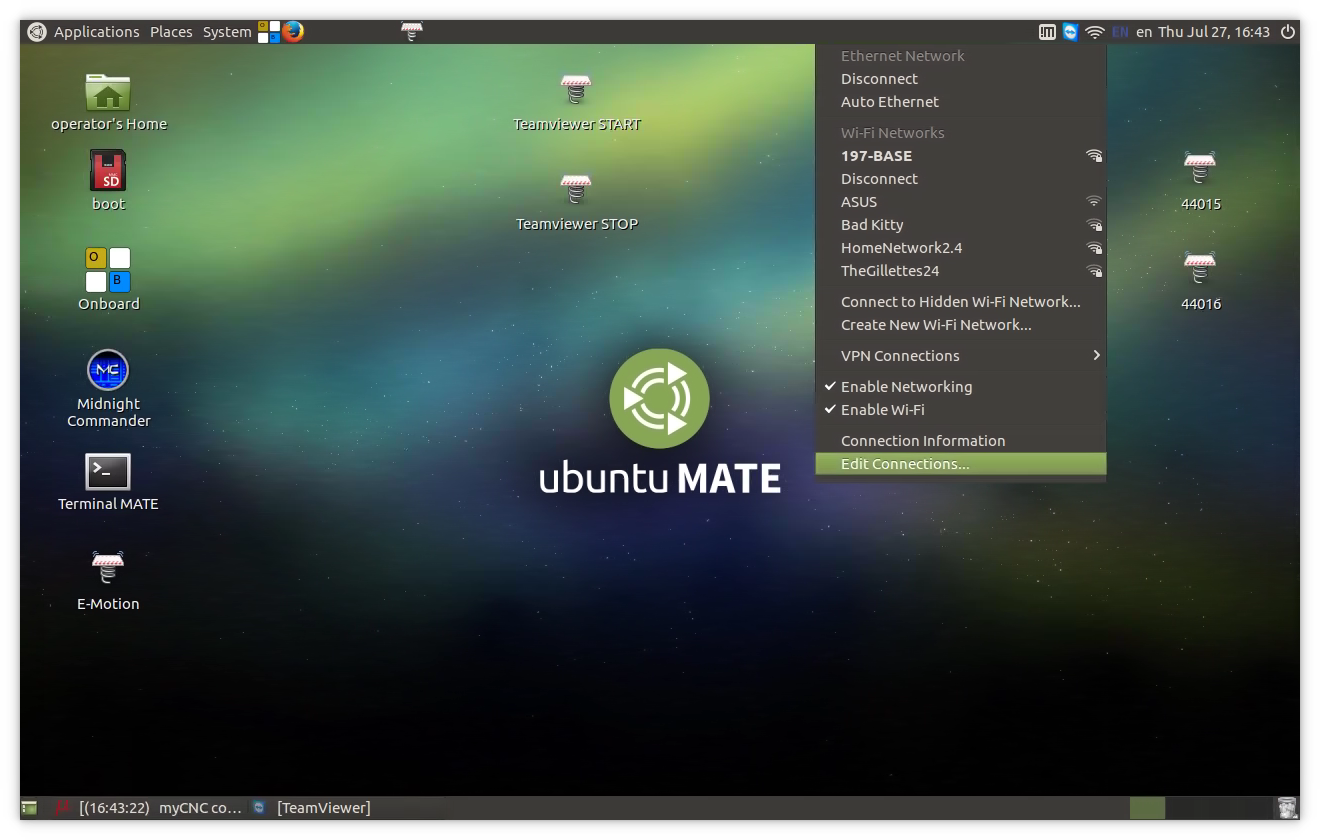
- Network Connections setup window will be opened. Select Ethernet Connection you have in the list, press “Delete” button, confirm “Delete”.


- Goto again to Network Icon in top Taskbar, press right mouse button and select “Auto Ethernet”
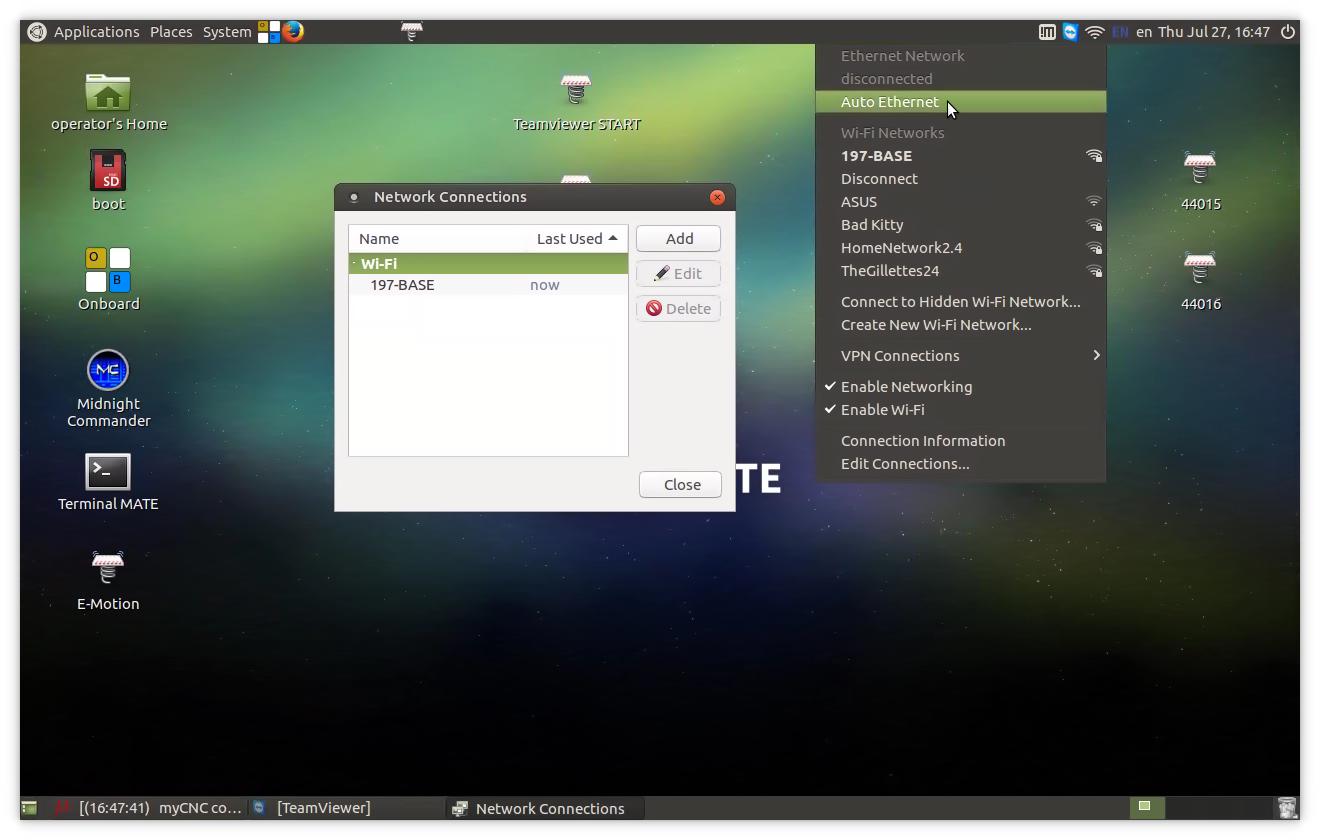
- “Auto Ethernet” Connection will appear in “Network Connections” setup Window. Click on it and press “Edit” button
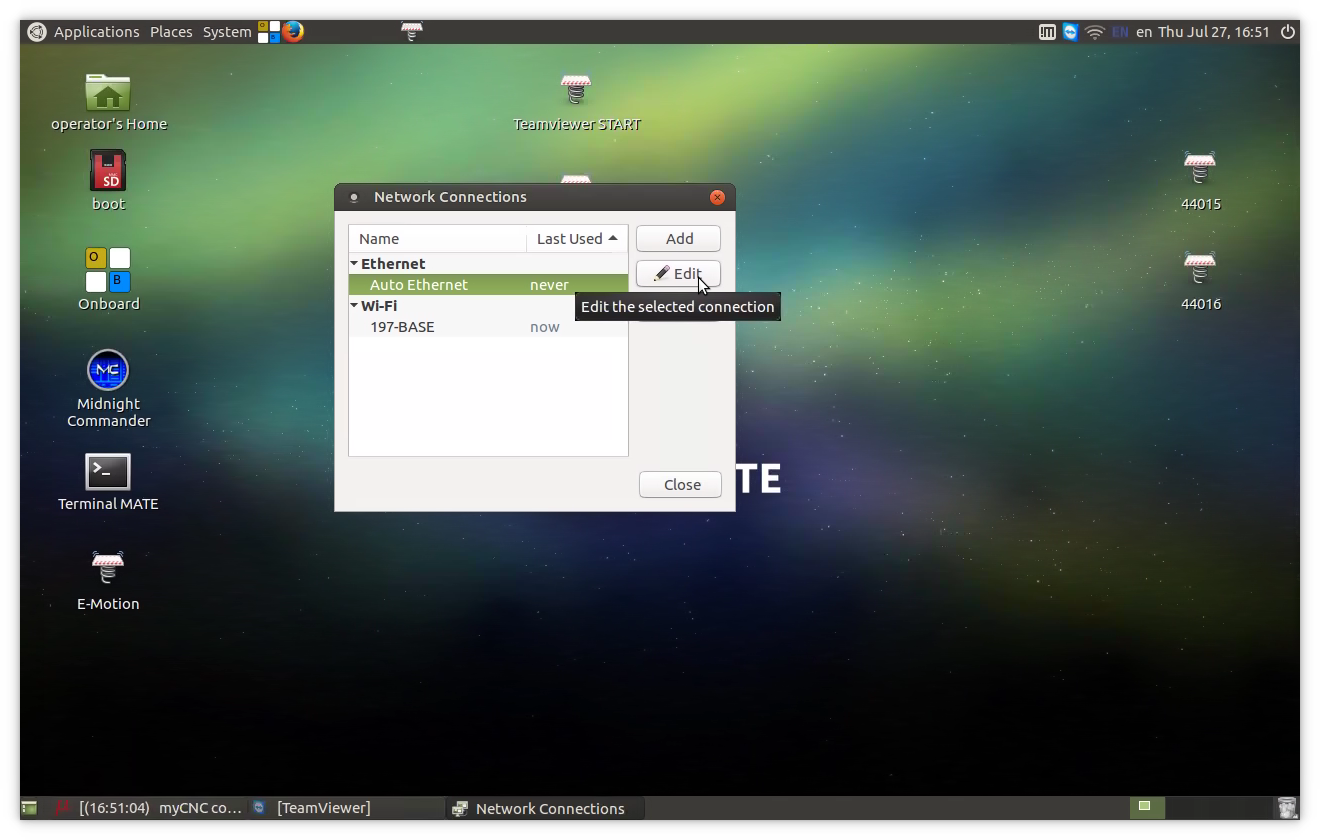
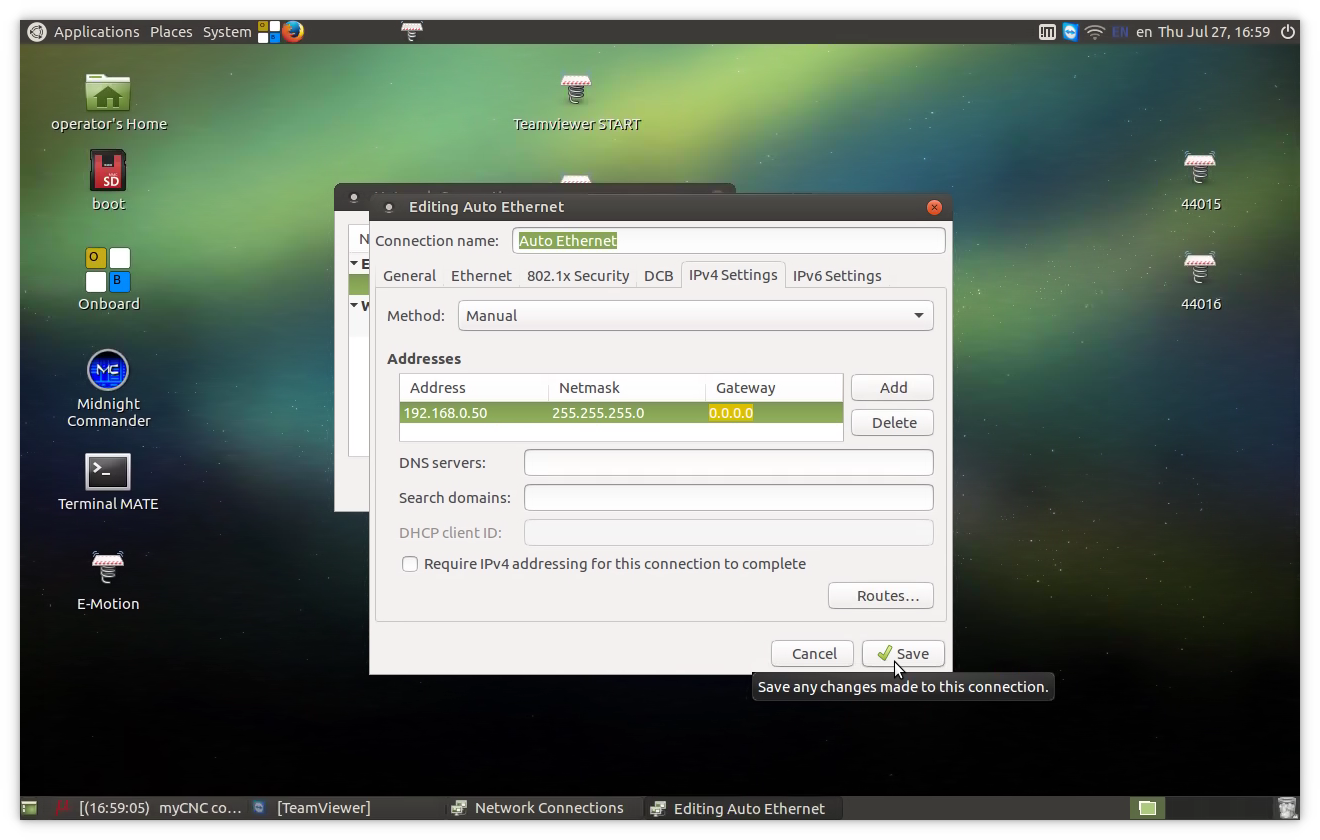
- “Editing Auto Ethernet” window will appear. Select “IPv4 Settings” Tab
- Select Method: Manual
- Address: 192.168.0.50
- Netmask: 255.255.255.0
- Gateway: 0.0.0.0
- Press Save button
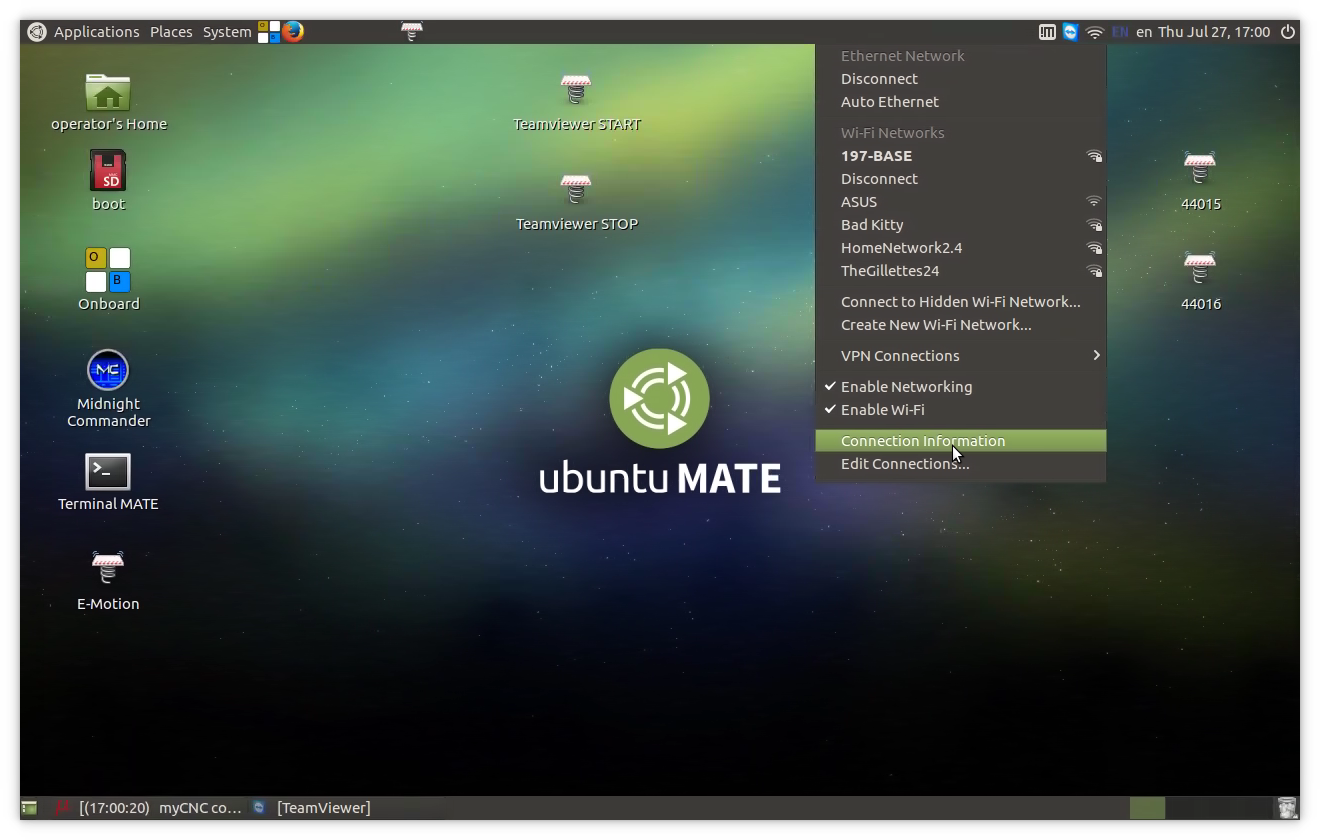
- Close Network Settings windows, reboot Computer
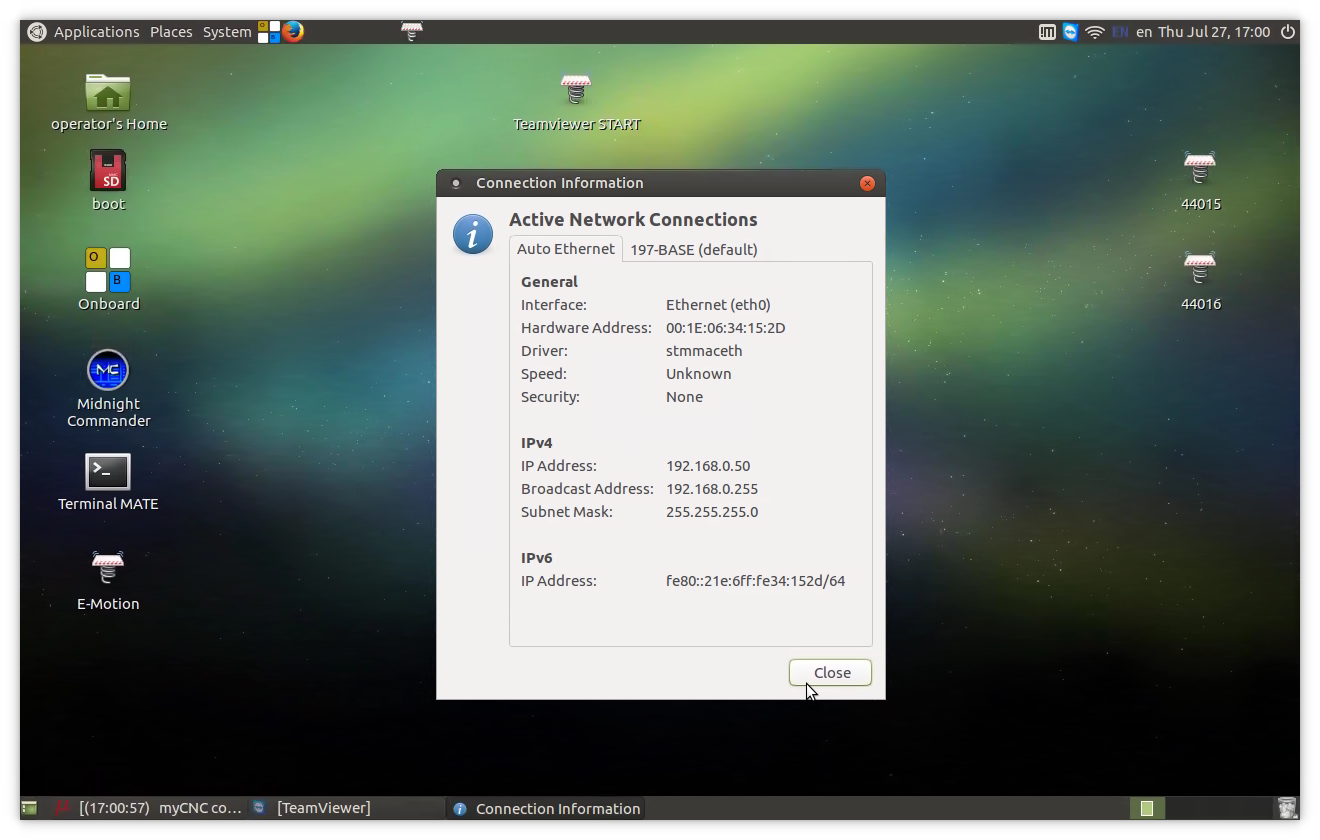
- After Reboot goto Network Icon in top Taskbar, press Left Mouse button on it, select Connection information
- Connection Information window will be opened. Check “Auto Ethernet” Tab is present and you have IPv4 address 192.168.0.50 (or address you setup in the settings)


Change Screen Resolution for Single Board Computer (SBC) - Odroid-C2
Touch Screen calibration on Ubuntu Mate - Odroid-C2
Change Screen Resolution for Single Board Computer (SBC) - Odroid-C2
Asus Tinker Board
Login: operator
Password: operator

Root password: operator
How to add new screen resolution for Tinkerboard
Add New Screen Resolution TinkerBoard SBC
Screen resolution for Tinkerboard can be changed in Settings»Display configuration dialog.

Default resolution list in the dialog does not include popular resolutions like
- 1280×800
- 1368×768
- 1600×900
Utility CVT can be used add new resolution modes to the list
1. Open console window (konsole icon)

2. Type command
cvt 1368 768 [Enter]

The utility will print modesettings parameters that should be included in modesettings configuration
operator@tinkerboard:~$ cvt 1368 768
# 1368x768 59.88 Hz (CVT) hsync: 47.79 kHz; pclk: 85.25 MHz
Modeline "1368x768_60.00"   85.25  1368 1440 1576 1784  768 771 781 798 -hsync +vsync
operator@tinkerboard:~$

3. Open for edit modesettings configuraion file “/etc/X11/xorg.conf.d/20-modesettings.conf” with administrator permissions (sudo)
sudo mcedit /etc/X11/xorg.conf.d/20-modesettings.conf
4. Add modesettings for 1368×768 resolution into “Monitor” Section. There can be several Modeline lines for different screen resolution you like to add. Add “PreferredMode” Option for resolution you like to have by default. Press “F2” button to save the changes.
- 20-modesettings.conf
  Section "Monitor".

    Identifier "HDMI-1".

    Modeline "1280x800_60.00"   83.50  1280 1352 1480 1680  800 803 809 831 -hsync +vsync
    Modeline "1368x768_60.00"   85.25  1368 1440 1576 1784  768 771 781 798 -hsync +vsync
    Modeline "1600x900_60.00"  118.25  1600 1696 1856 2112  900 903 908 934 -hsync +vsync

    Option "PreferredMode" "1368x768_60.00"

  EndSection


5. Reboot the computer and check if new resolutions appear in the Display settings
Change IP Address for TinkerBoard SBC
Change IP address for TinkerBoard SBC
1. Open Konsole (Click on Konsole Desktop shortcut or select Menu → Application → Terminal Emulator)


2. Open Network settings in editor with Administrator permissions. Type in the konsole
sudo mcedit /etc/network/interfaces
and press Enter.


There are 2 IP addresses setup on the Tinkerbboard by default
192.168.1.50
192.168.4.50
Configuration sections are
iface eth0 inet static
#    address 192.168.0.50
    netmask 255.255.255.0
    address 192.168.1.50

iface eth0 inet static
    address 192.168.4.50
    netmask 255.255.255.0

Symbol “#” is used as a line comment.
3. Edit Address to fix LAN IP Address as you need. Press F2, Enter keys to save changes. Reboot computer.

| We noticed that the last address only is configured if LAN connector is disconnected from Network while computer boot. All IP addresses in the interfaces configuration file should be set up correctly if LAN connector is connected to Network while booting. We don't know if this is a bug or “feature”, just share this information. |
Touch Screen Calibration for TinkerBoard SBC
Touch Screen calibration for TinkerBoard, XFCE Window manager
1. Open Konsole (Click on Konsole Desktop shortcut or select Menu → Application → Terminal Emulator)
2. Run xinput_calibrator in the konsole. Type in the konsole
xinput_calibrator
and press Enter.

 3. Follow instructions and Tap the red crosses to make calibration. After calibration done the xinput_calibrator will offer new calibration data to add to the system calibration settings

Calibration settings should be saved into file /etc/X11/xorg.conf.d/99-calibration.conf
4. Open new konsole window. Open file /etc/X11/xorg.conf.d/99-calibration.conf with administrator permissions from Editor.
sudo mcedit /etc/X11/xorg.conf.d/99-calibration.conf


5. Copy Calibration settings from xinput_calibrator output to the Editor window.

5. Press F2, Enter to save the settings. Reboot the computer to apply the changes.
