Table of Contents
myCNC-ET10 CNC controller (Revision 3)
This page is for the latest revision of the myCNC-ET10 control board (revision 3). To find out more about revision 2, please consult the myCNC-ET10-R2 manual.
Note: The ET12 board is the new updated version of the ET10 controller, which requires unique firmware due to the use of a different chip.
The new revision of the breakout board is now compatible with both the ET10 and the ET15 (as an option instead of the native ET15 breakout board). Galvanic isolation on the ADC has been added (highly useful for plasma cutting applications).
ET10R3C controller specifications:
- 6 channels pulse/dir high speed differential outputs compatible with RS422 (TIA/EIA-422) standard;
- 6 channels +/-10V DAC outputs for analogue servo-driver control;
- 6 channels incremental encoders inpiuts, 4 full ABC encoder inputs, 2 reduced AB encoder inputs;
- 48 binary inputs (if use with ET10BB breakout - all inputs have galvanic isolation, 12 groups of 4 binary inputs, compatible with NPN & PNP sensors);
- 24 binary outputs (if use with ET10BB breakout - all outputs are open collector, 24V 0.25A);
- 4 PWM outputs (if use with ET10BB breakout - all PWM outputs are open collector, 24V 0.25A);
- 8 ADC inputs (if use with ET10BB breakout - 6 conventional ADC inputs, 1 ADC is differential input 30V, 1 ADC is differential with galvanic isolation for the 0-5V range);
Power supply connection
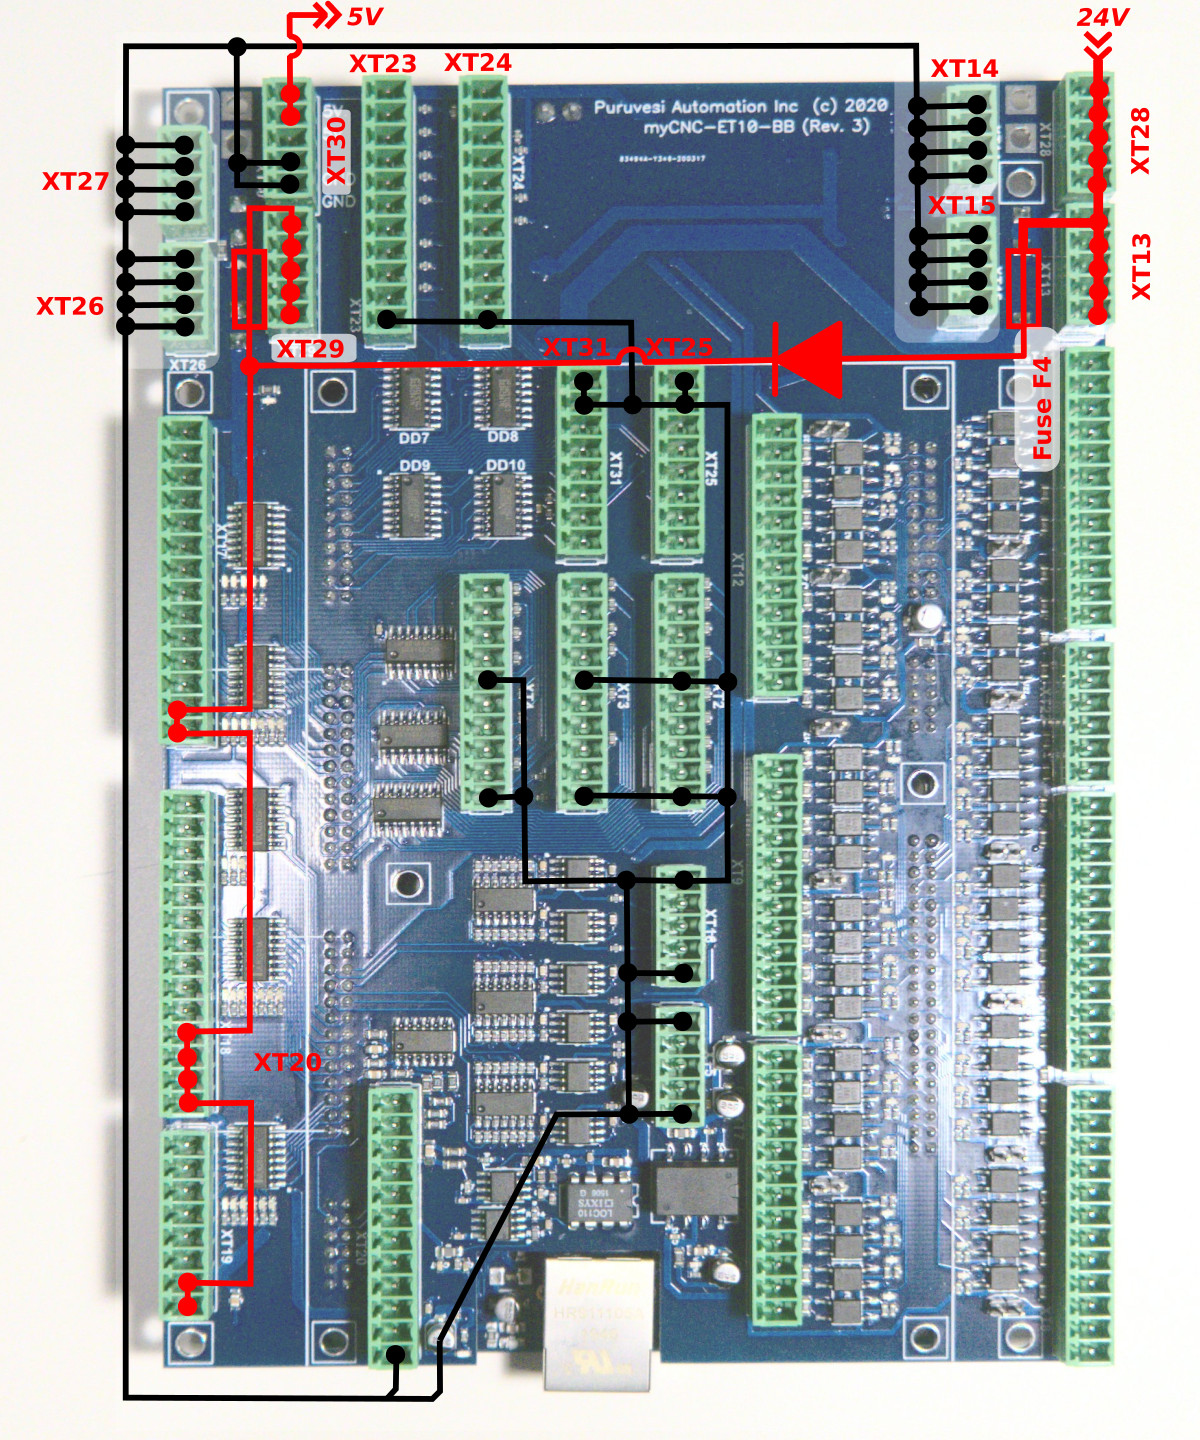
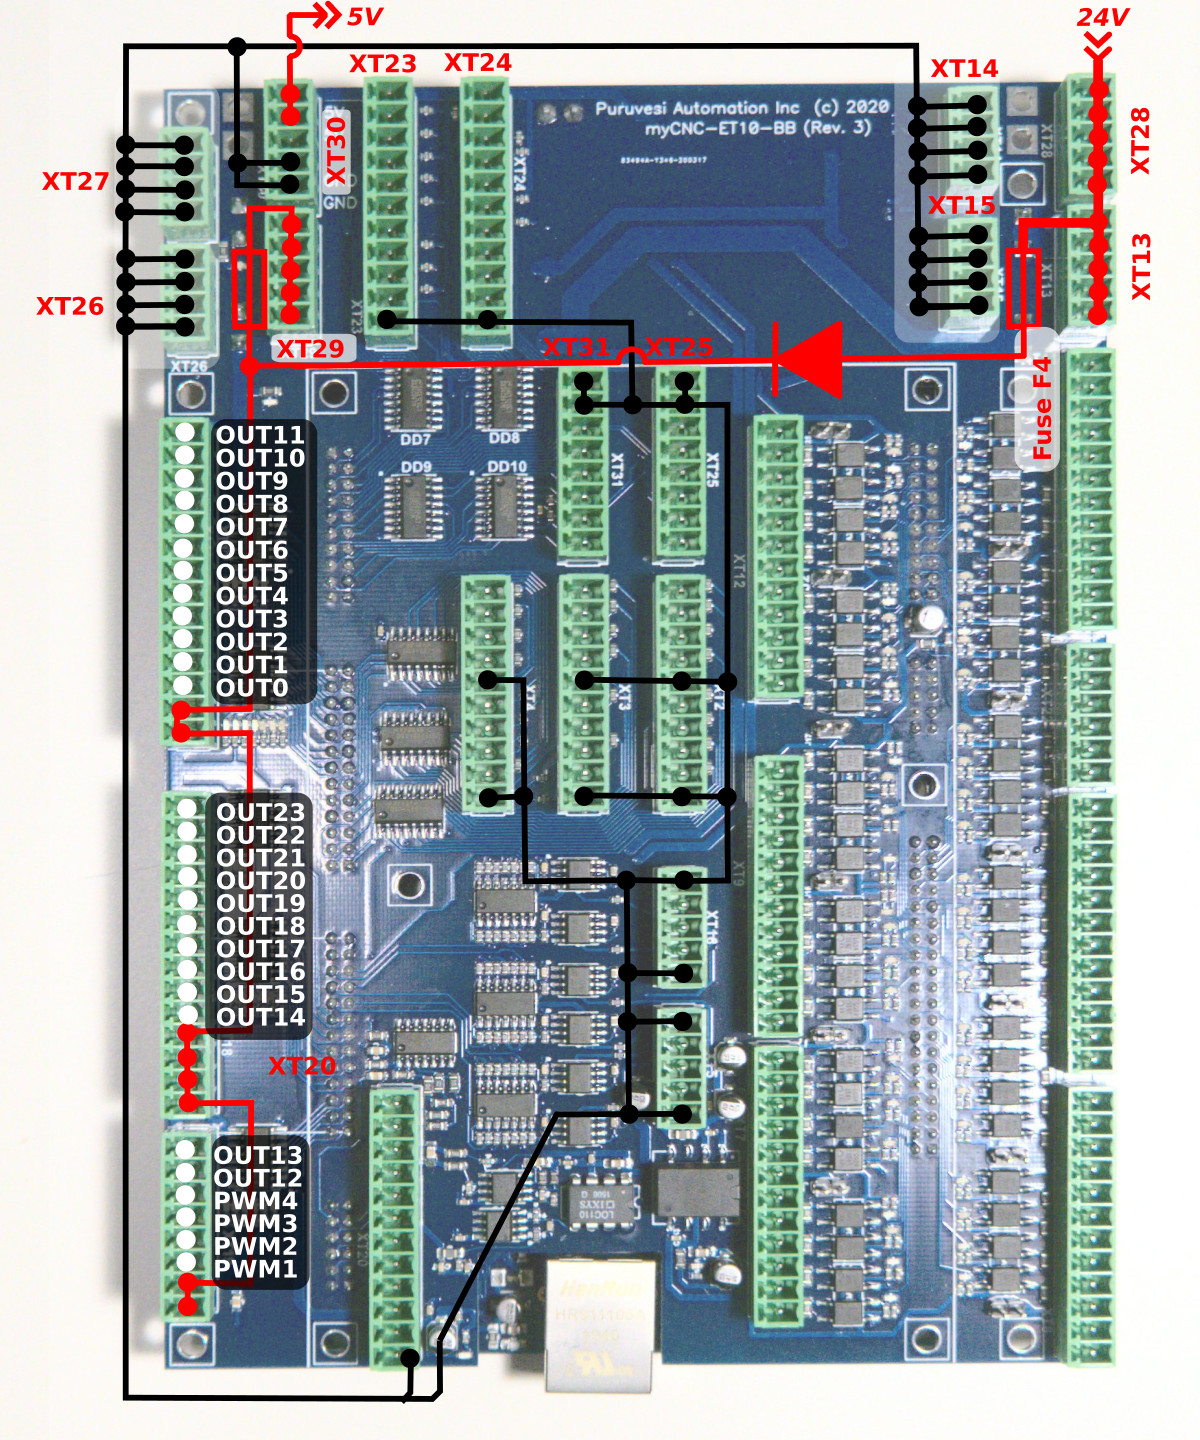
24VDC is used to supply myCNC-ET10 control board. The board contains 4 pins for connection +24V (joined internally) and a number of GND pins for convenient connection of external devices. The 24V DC Power Supply and +24V and GND pins are shown in the picture below.
Pulse-Dir outputs
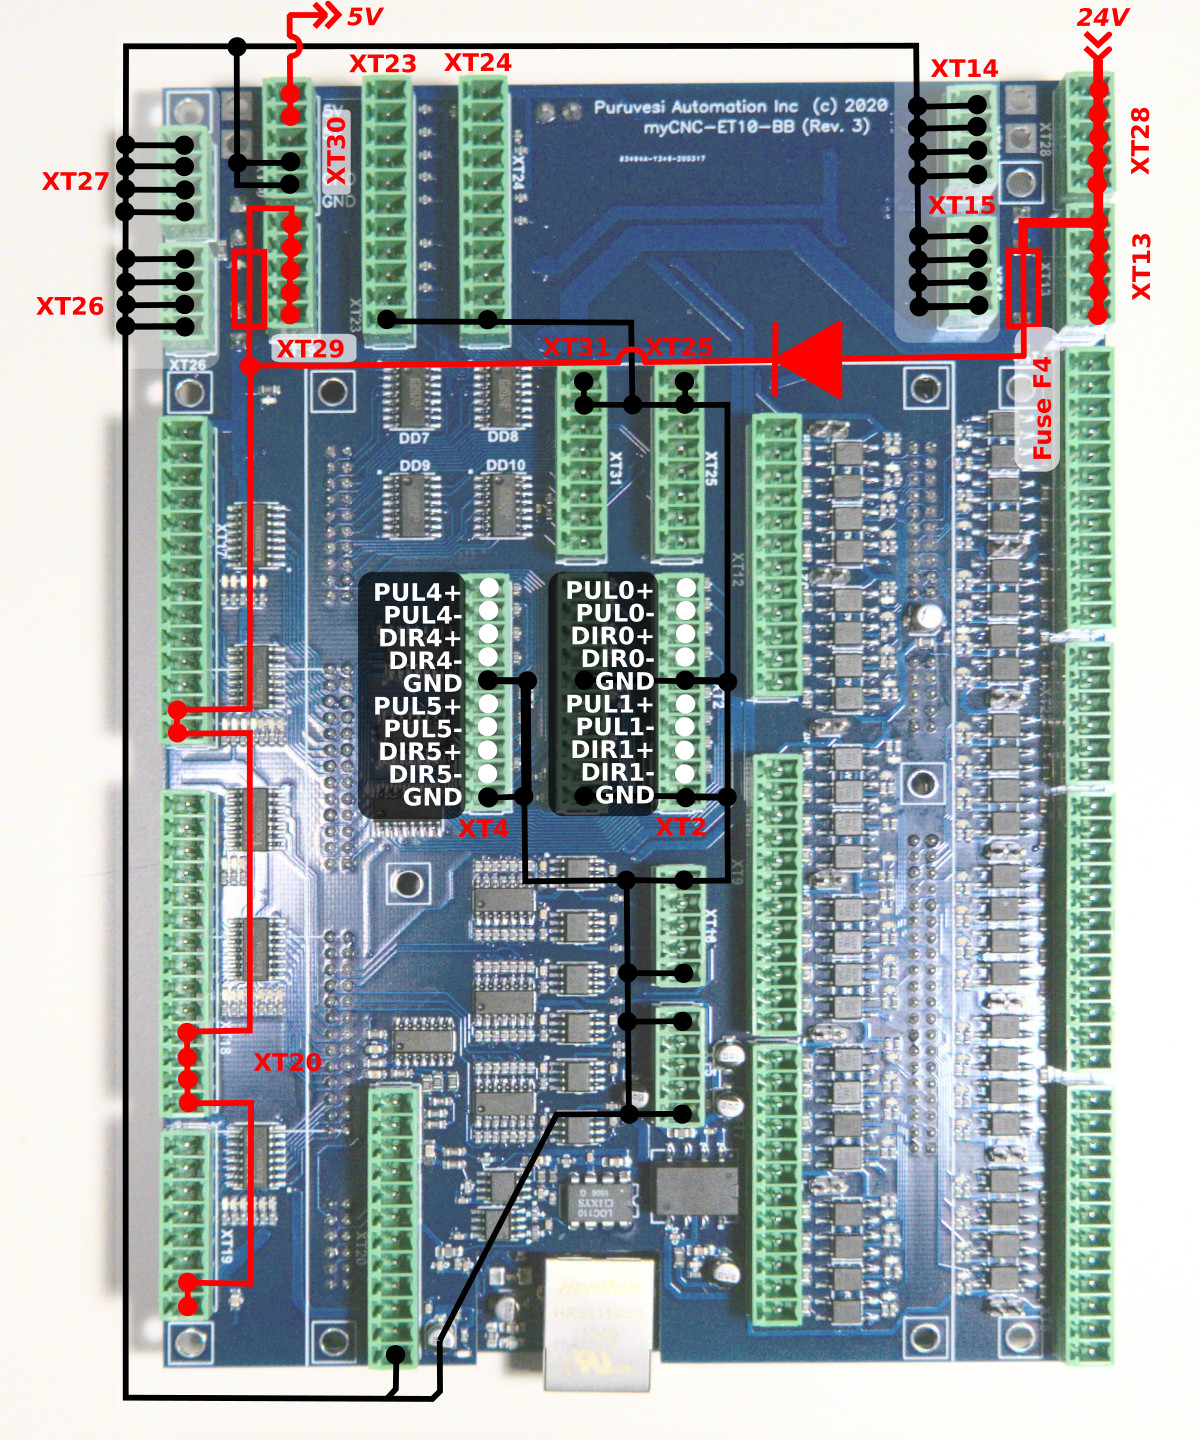
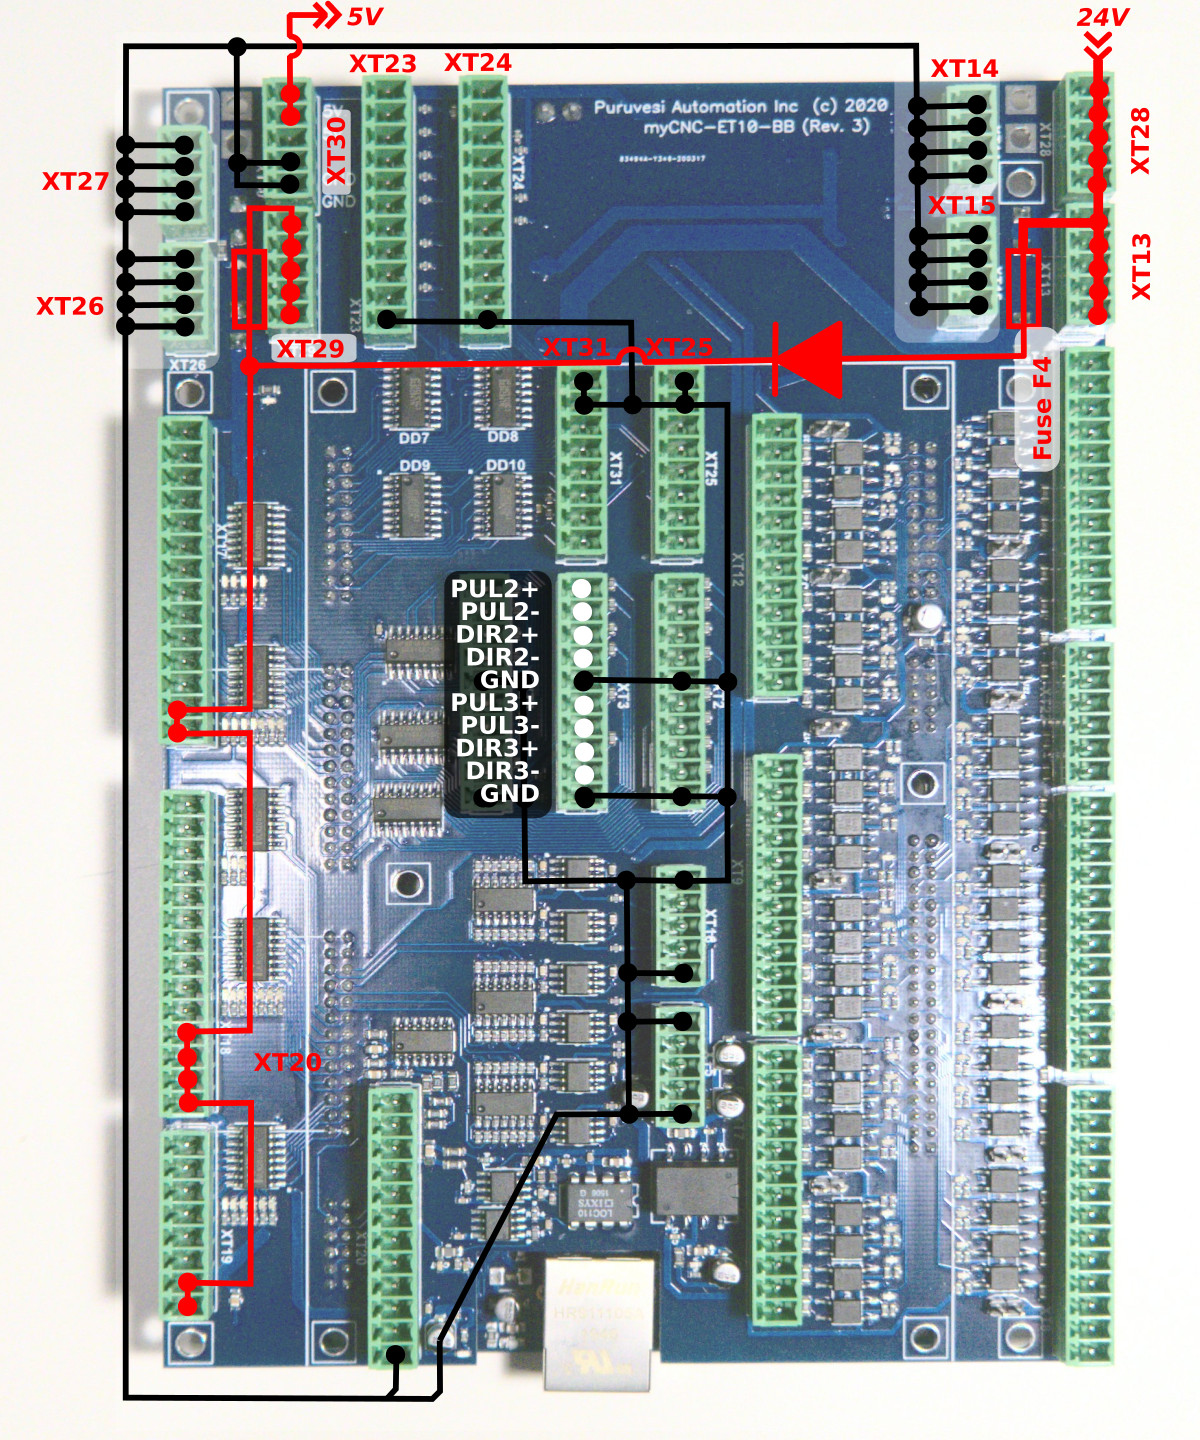
ET10 has 6 channel pulse/dir high speed differential outputs compatible with RS422 (TIA/EIA-422) standard, with the maximum pulse frequency of 3MHz.
ET10 pulse/dir outputs conform to the RS485 standard and are compatible with most of servo and stepper drivers (line driver with paraphase signals positive and negative polarity). Internal schematic for pulse-dir is shown in the picture below:
ET10 Output pins
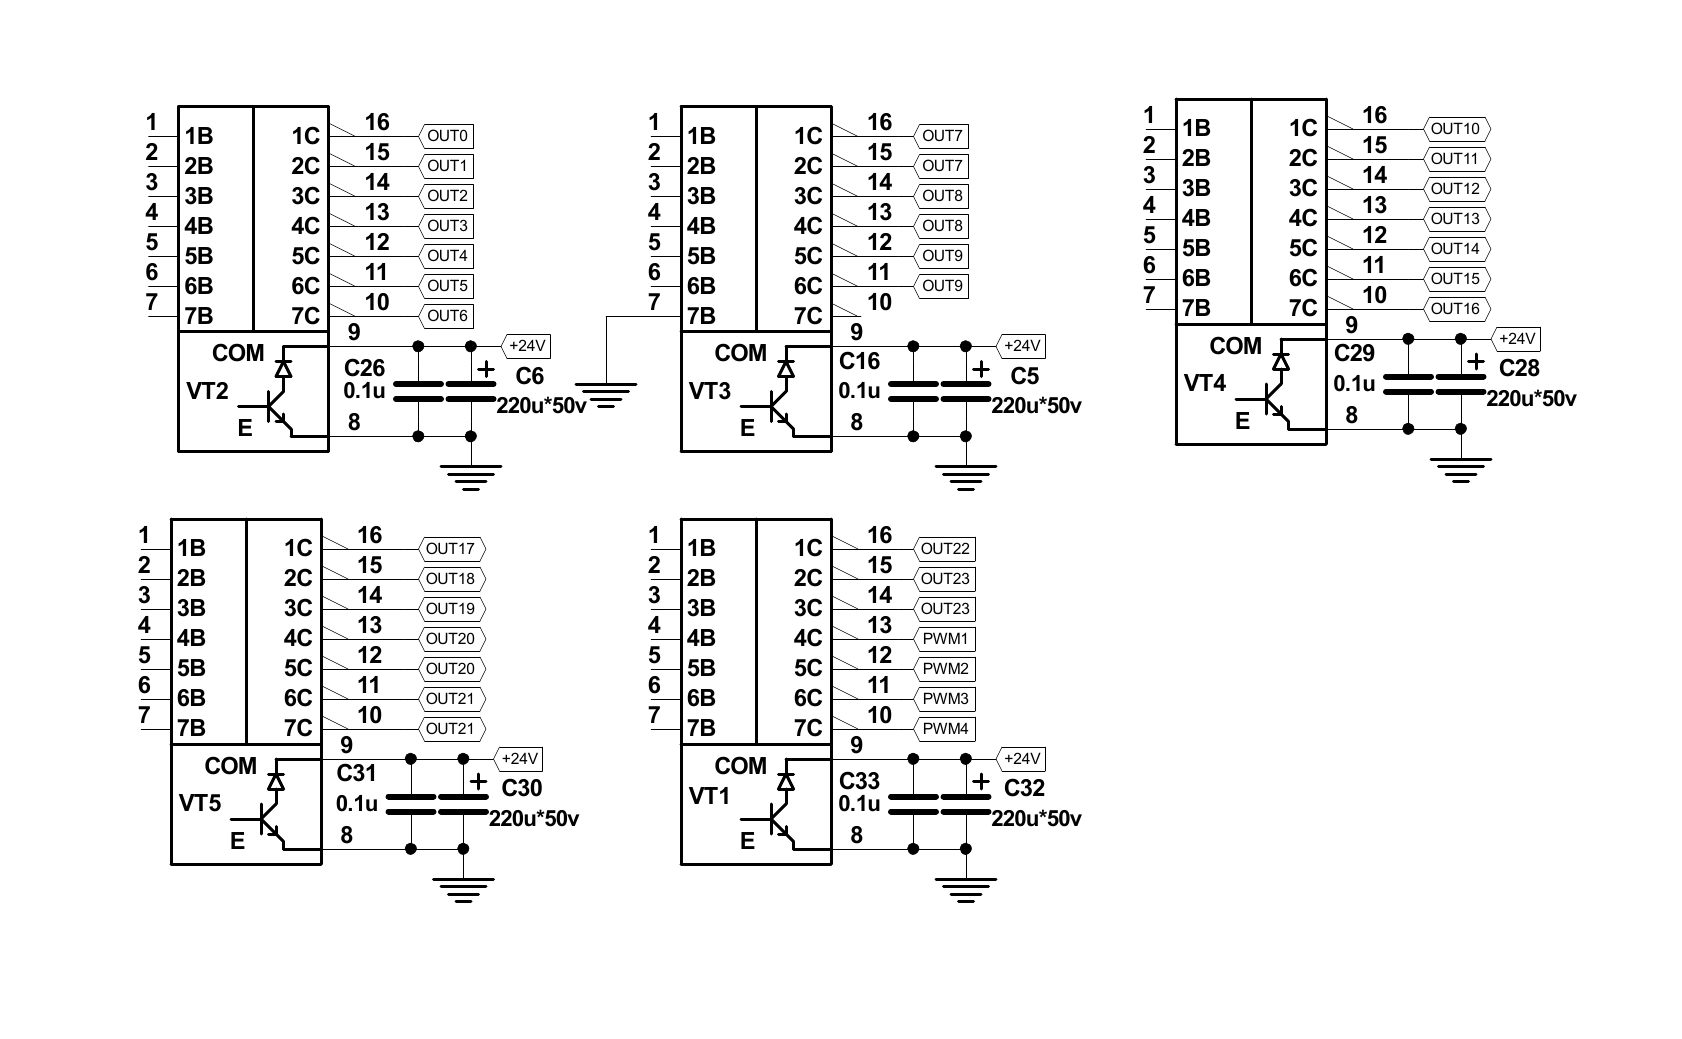
ET10 board contains 28 output pins-
- 24 open collector outputs (OUT#0 … OUT#23)
- 4 PWM outputs (PWM#1, PWM#2, PWM#3, PWM#4)
An internal schematic is shown in the picture below. Darlington transistor array chips ULN2003 are used to buffer binary outputs in ET10. Each chip contains 7 transistors and handles up to 7 binary outputs. We recommend not to exceed 0.25A output current for each output pin (however ULN2003 maximum current is 0.5A according to the datasheet).
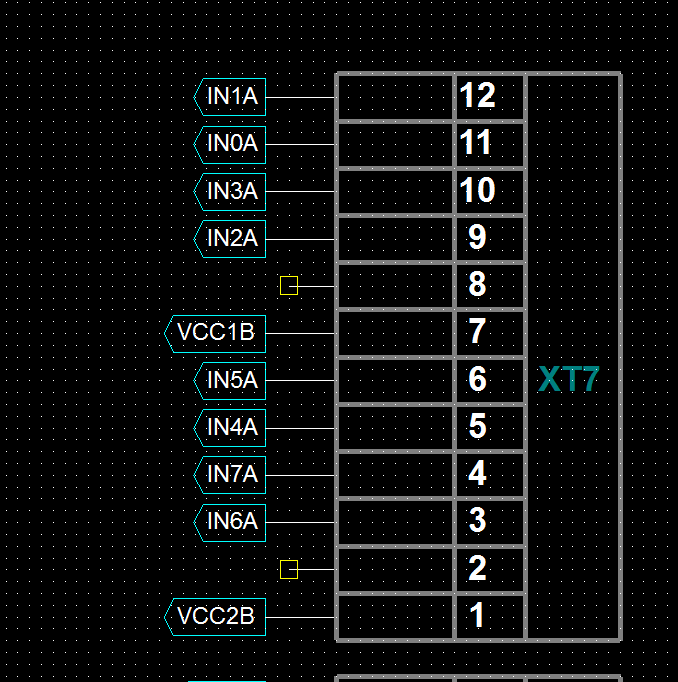
ET10 pinout for the outputs is shown below:
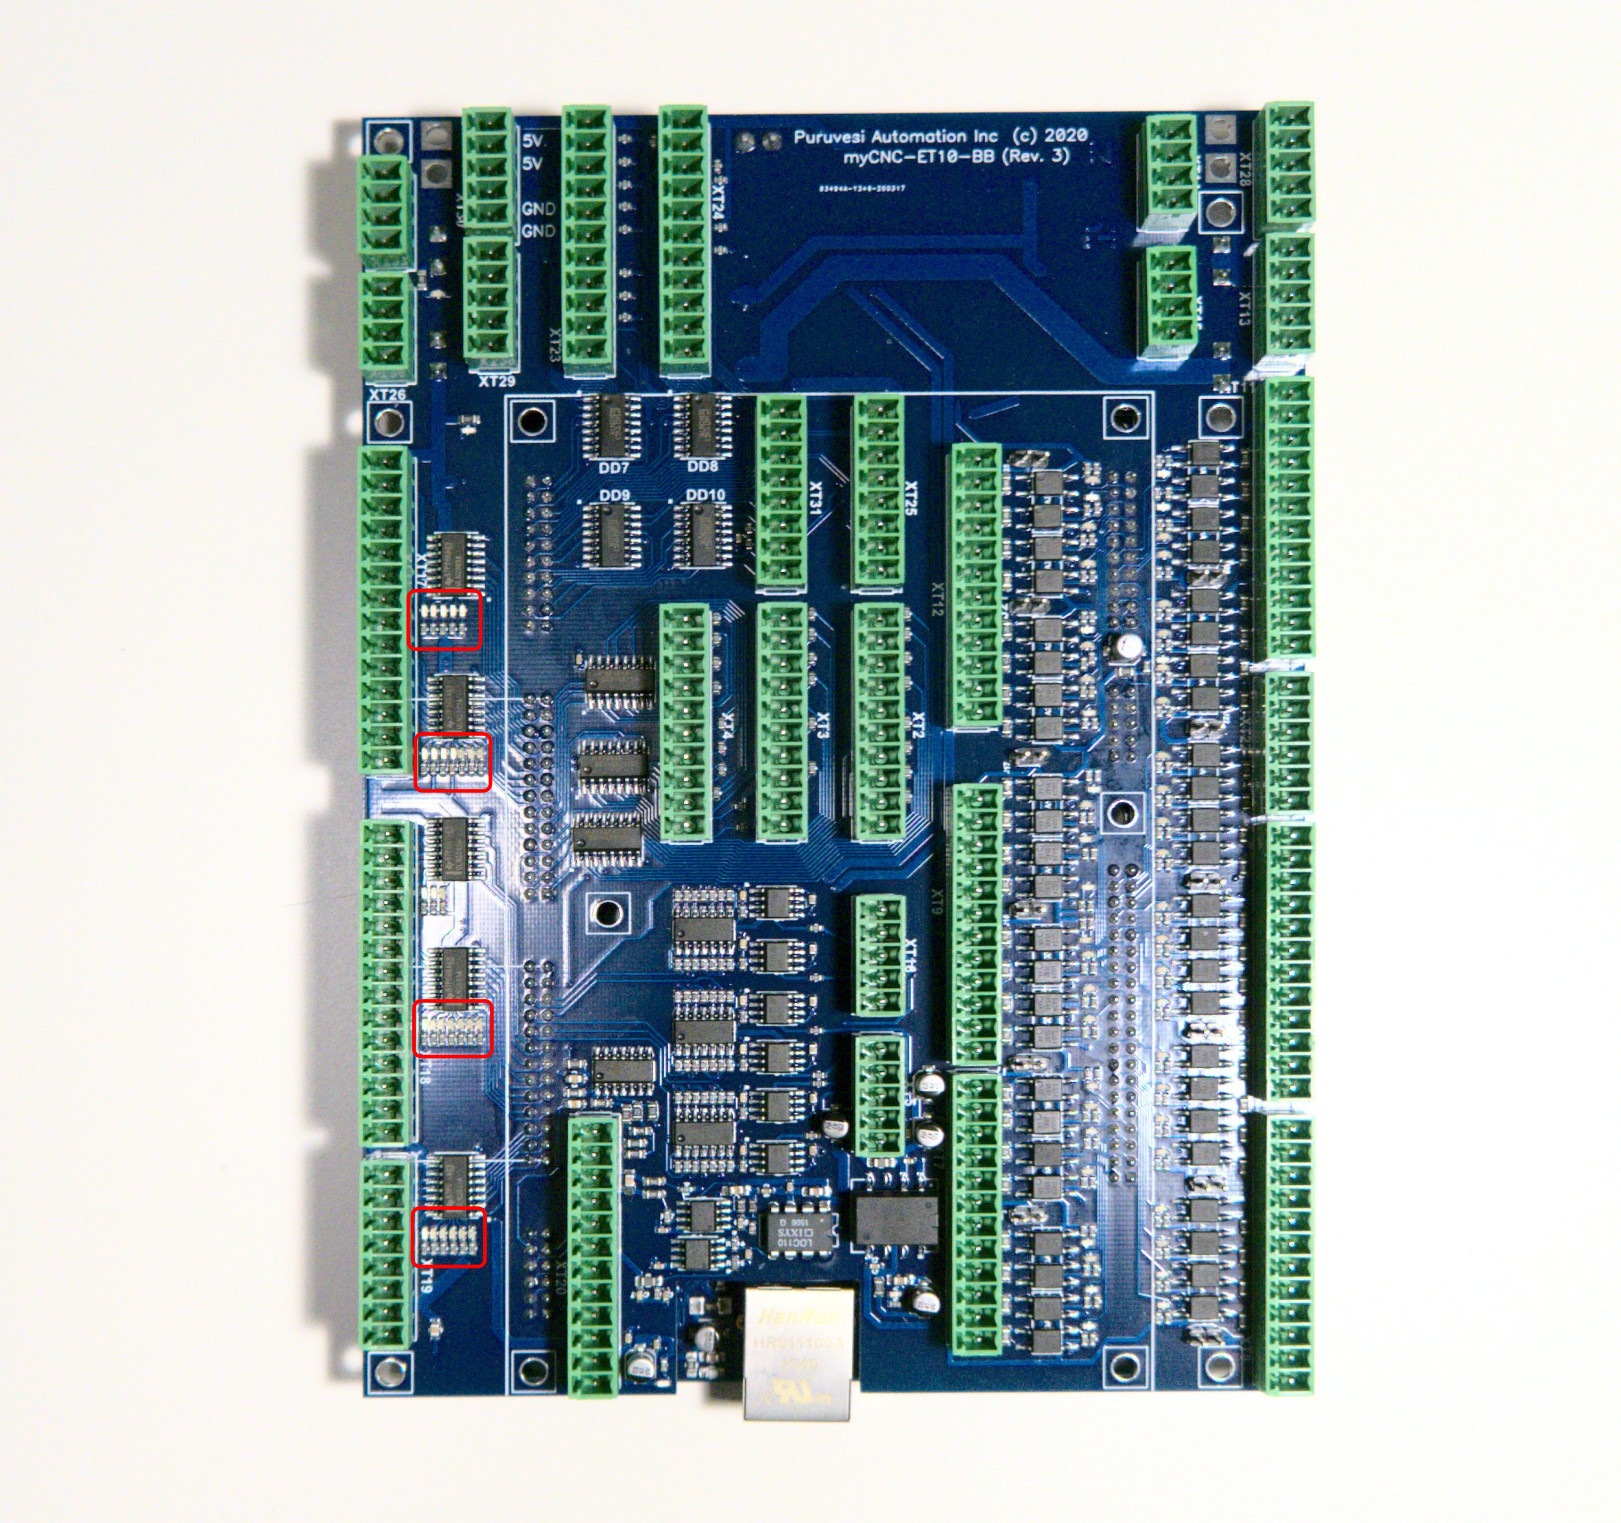
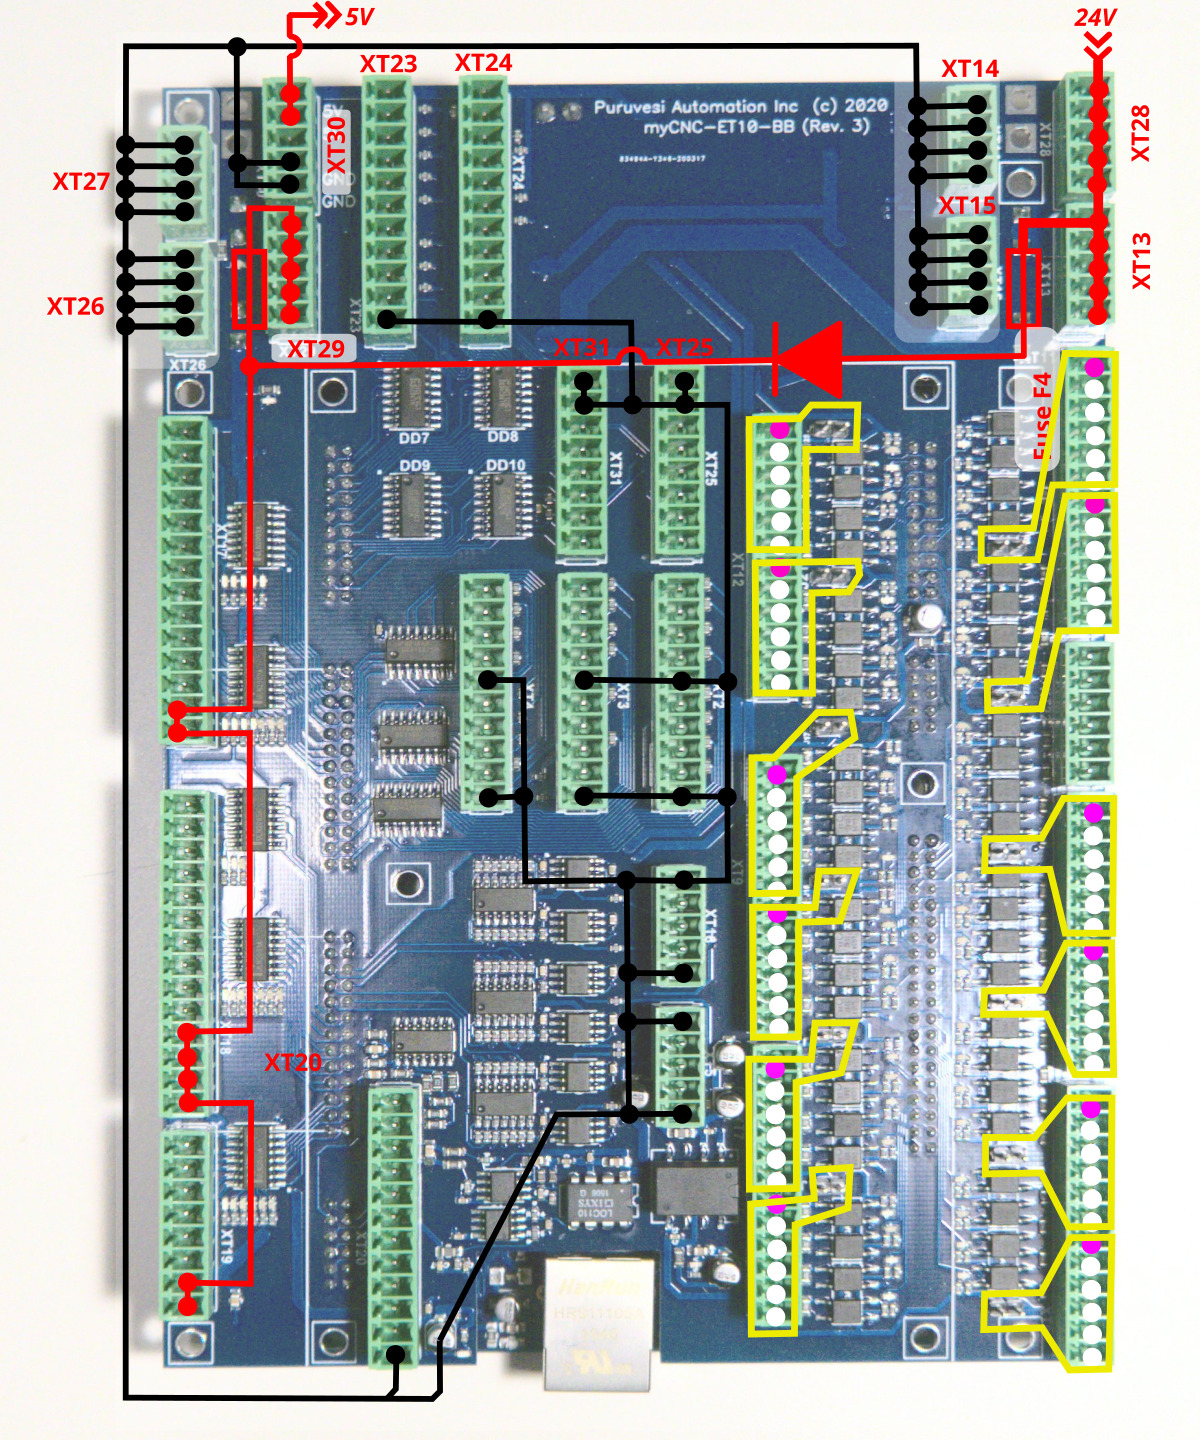
There are LED indicators for each Output and PWM pin on the ET10 board to control actual Output/PWM state. LEDs are highlighted in the picture below.
Galvanic isolated inputs
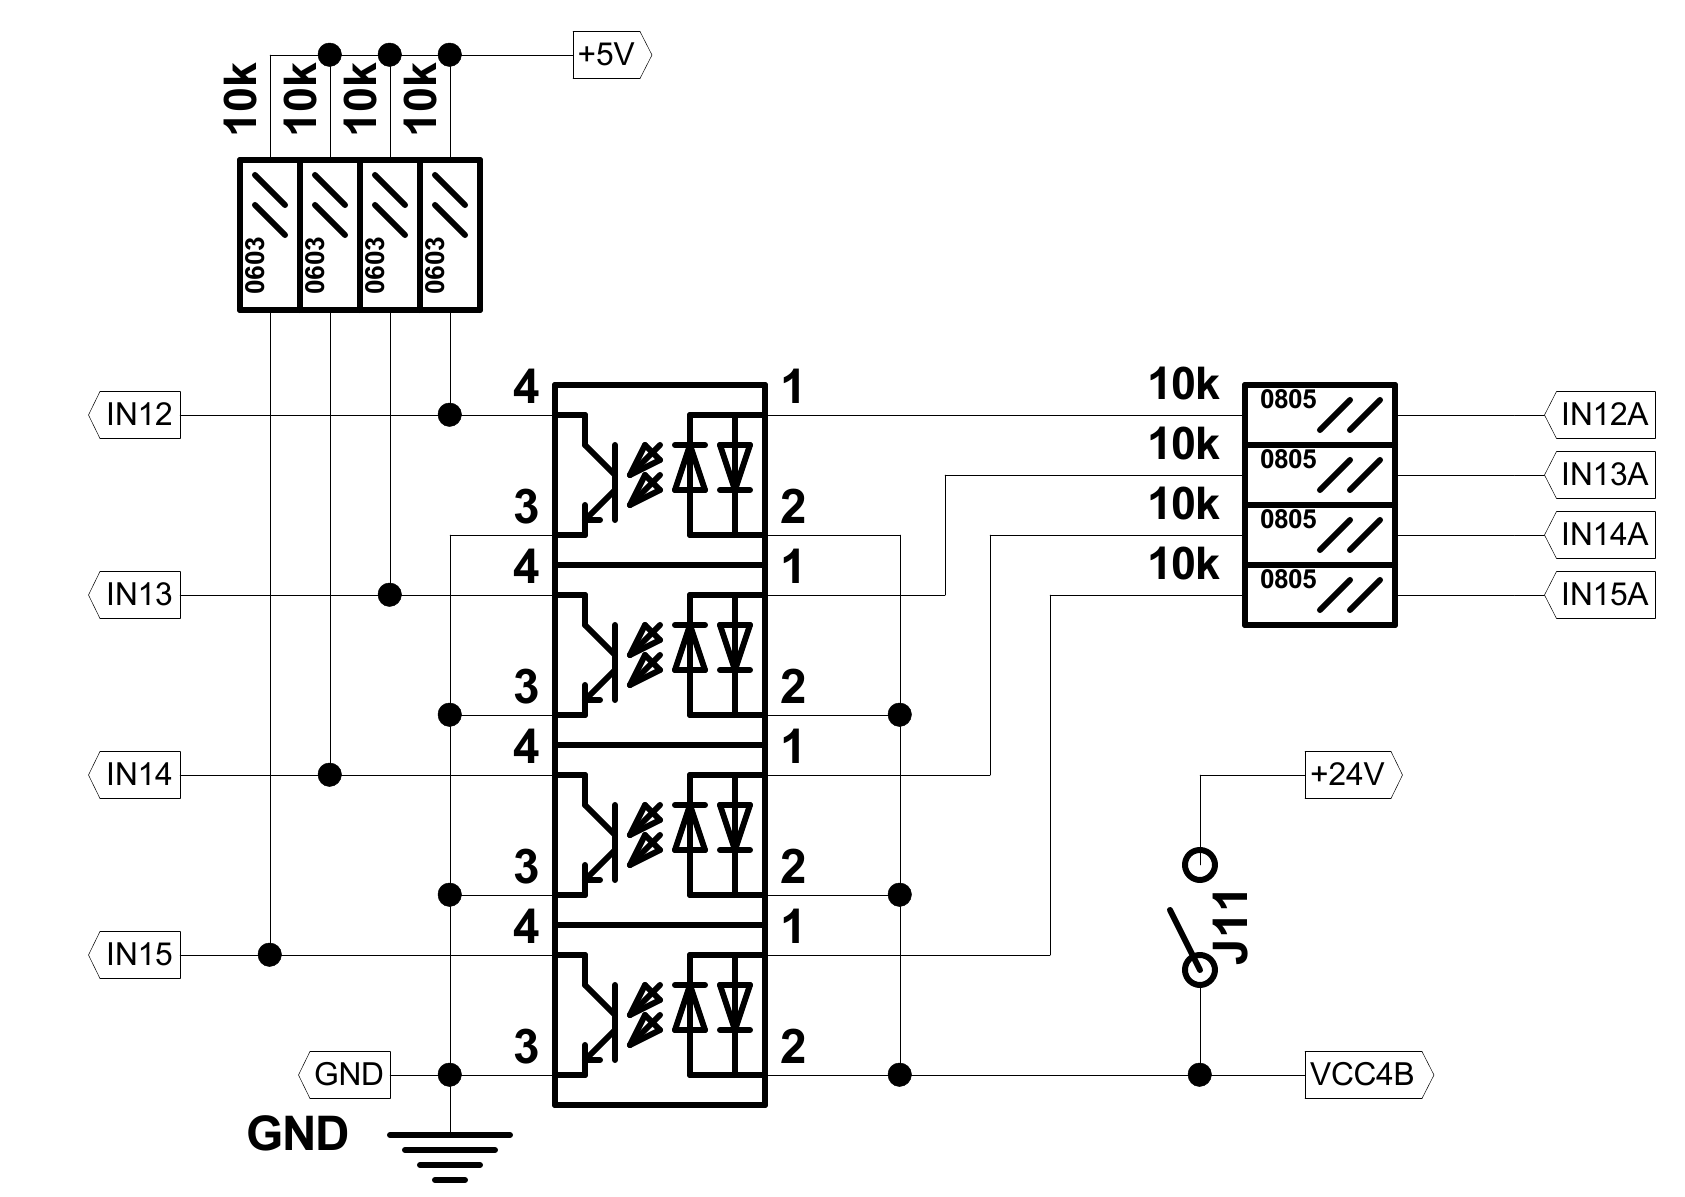
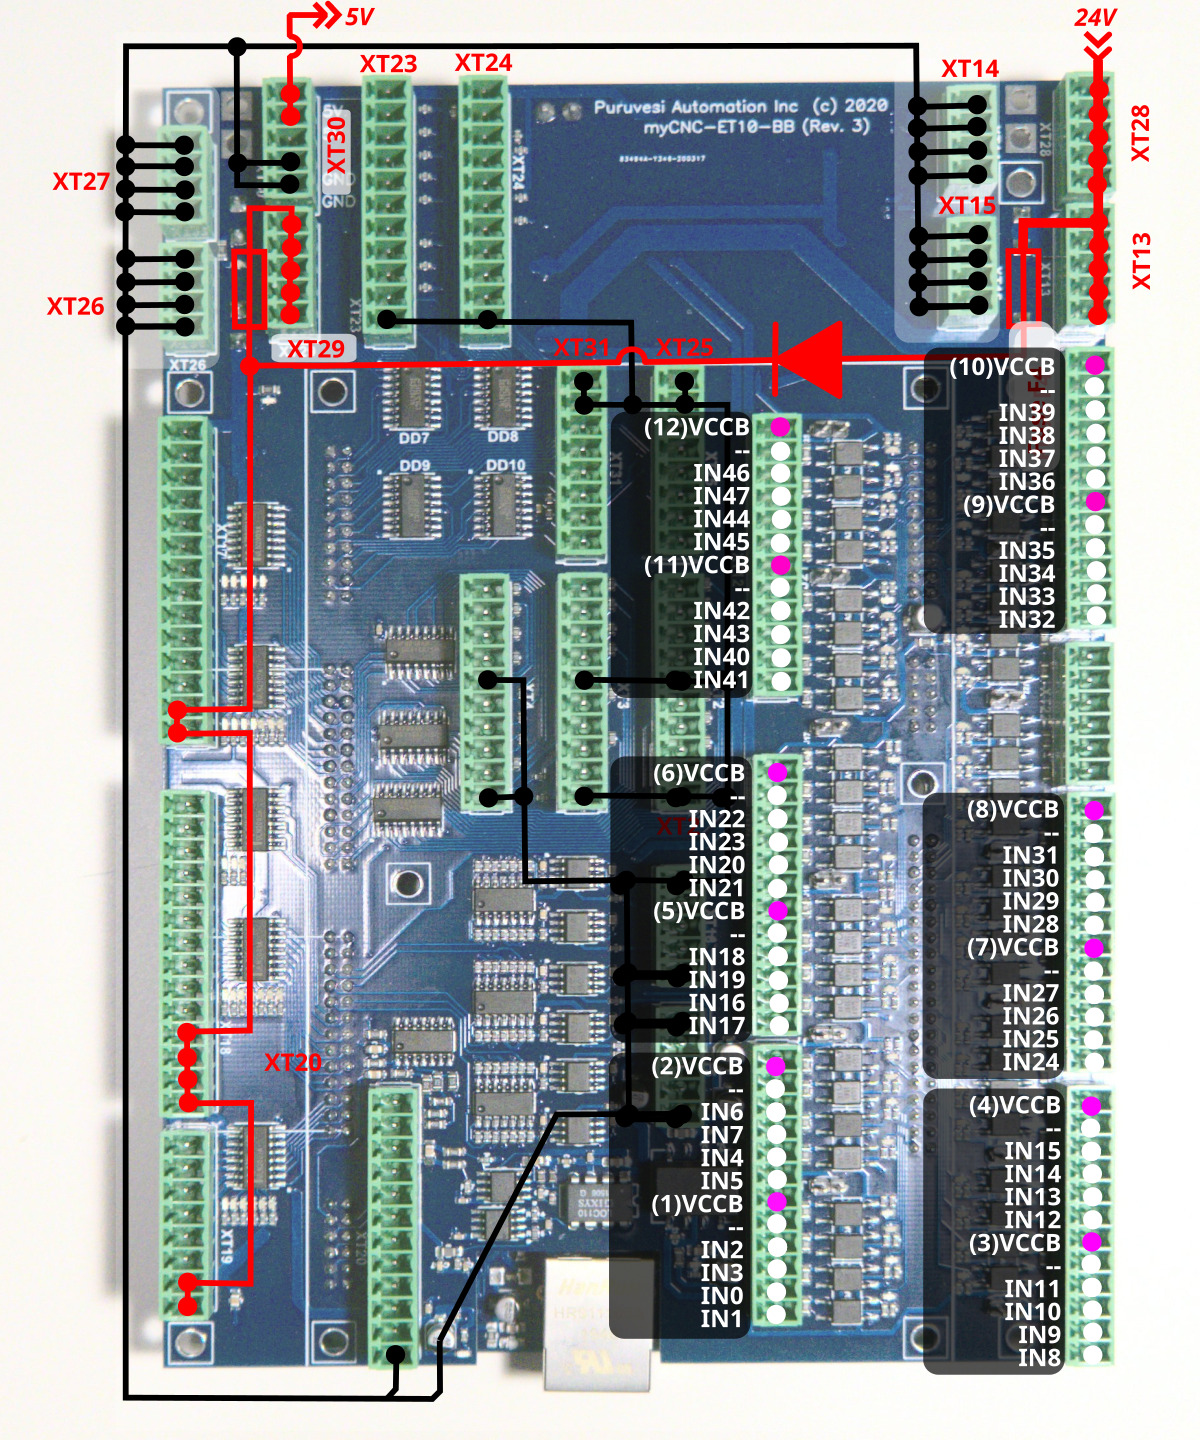
The ET10 control board has 48 galvanic isolated binary inputs, 12 groups of 4 inputs each. Each group has a common LED wire and separate power supply pins so inputs can be powered from different power sources. Using PNP and NPN sensors simultaneously is possible too. Schematic of the 4 inputs group is shown in the picture below.
The VCCB (common wire) is used for external power supply connection. Unlike the ET10R2 controller, the ET10R3 does not have an active VCCA port:
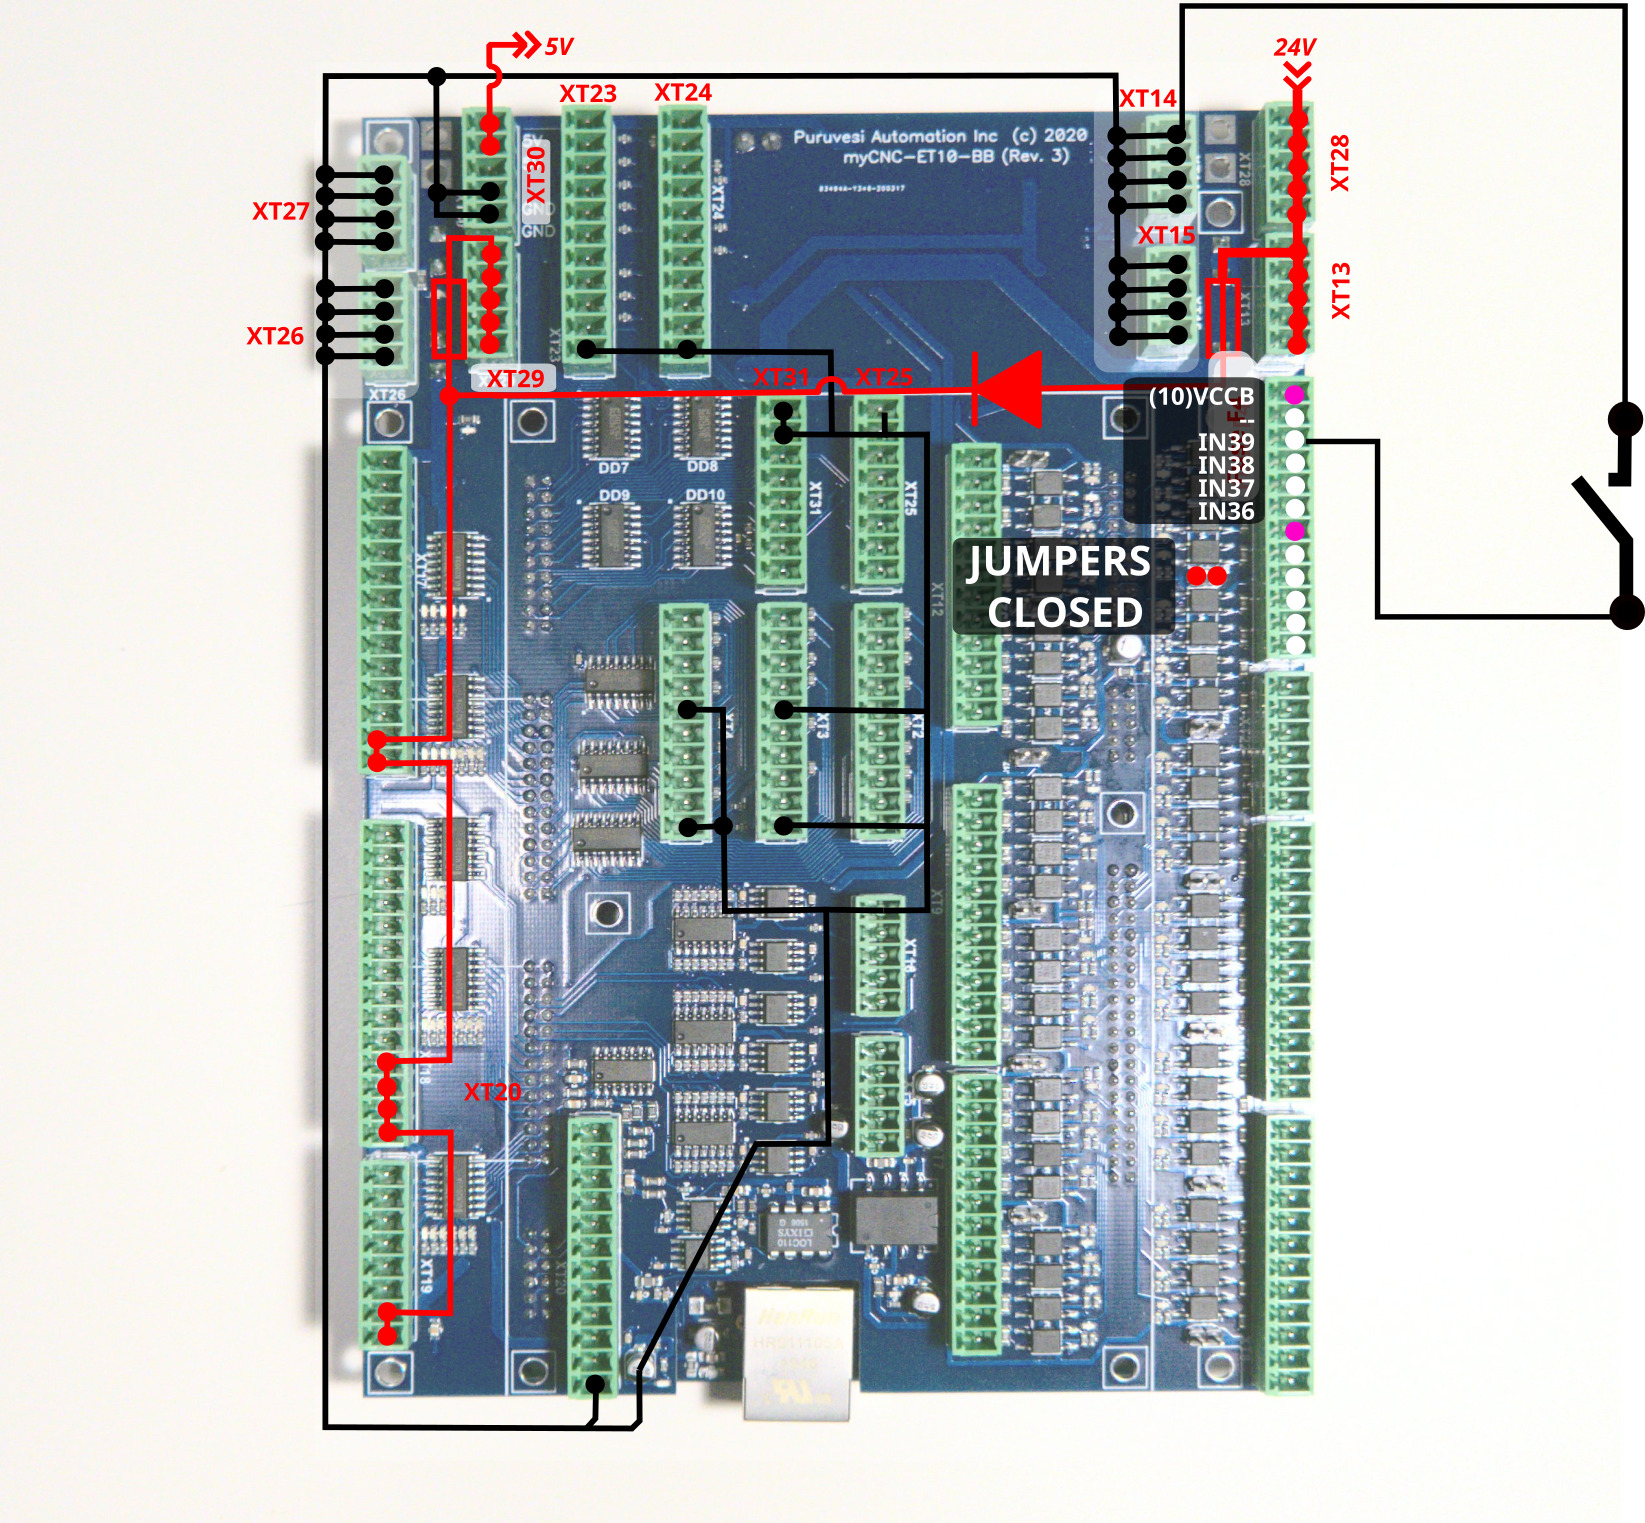
Beside external power supply, internal +24V DC can be used to supply input LEDs, if the correspondent jumpers are closed.
WARNING: If an external Power supply is used, correspondence jumpers for the group should be OPEN
Jumpers to use the internal power supply for each 4-inputs group are shown in the picture below
Connection Examples
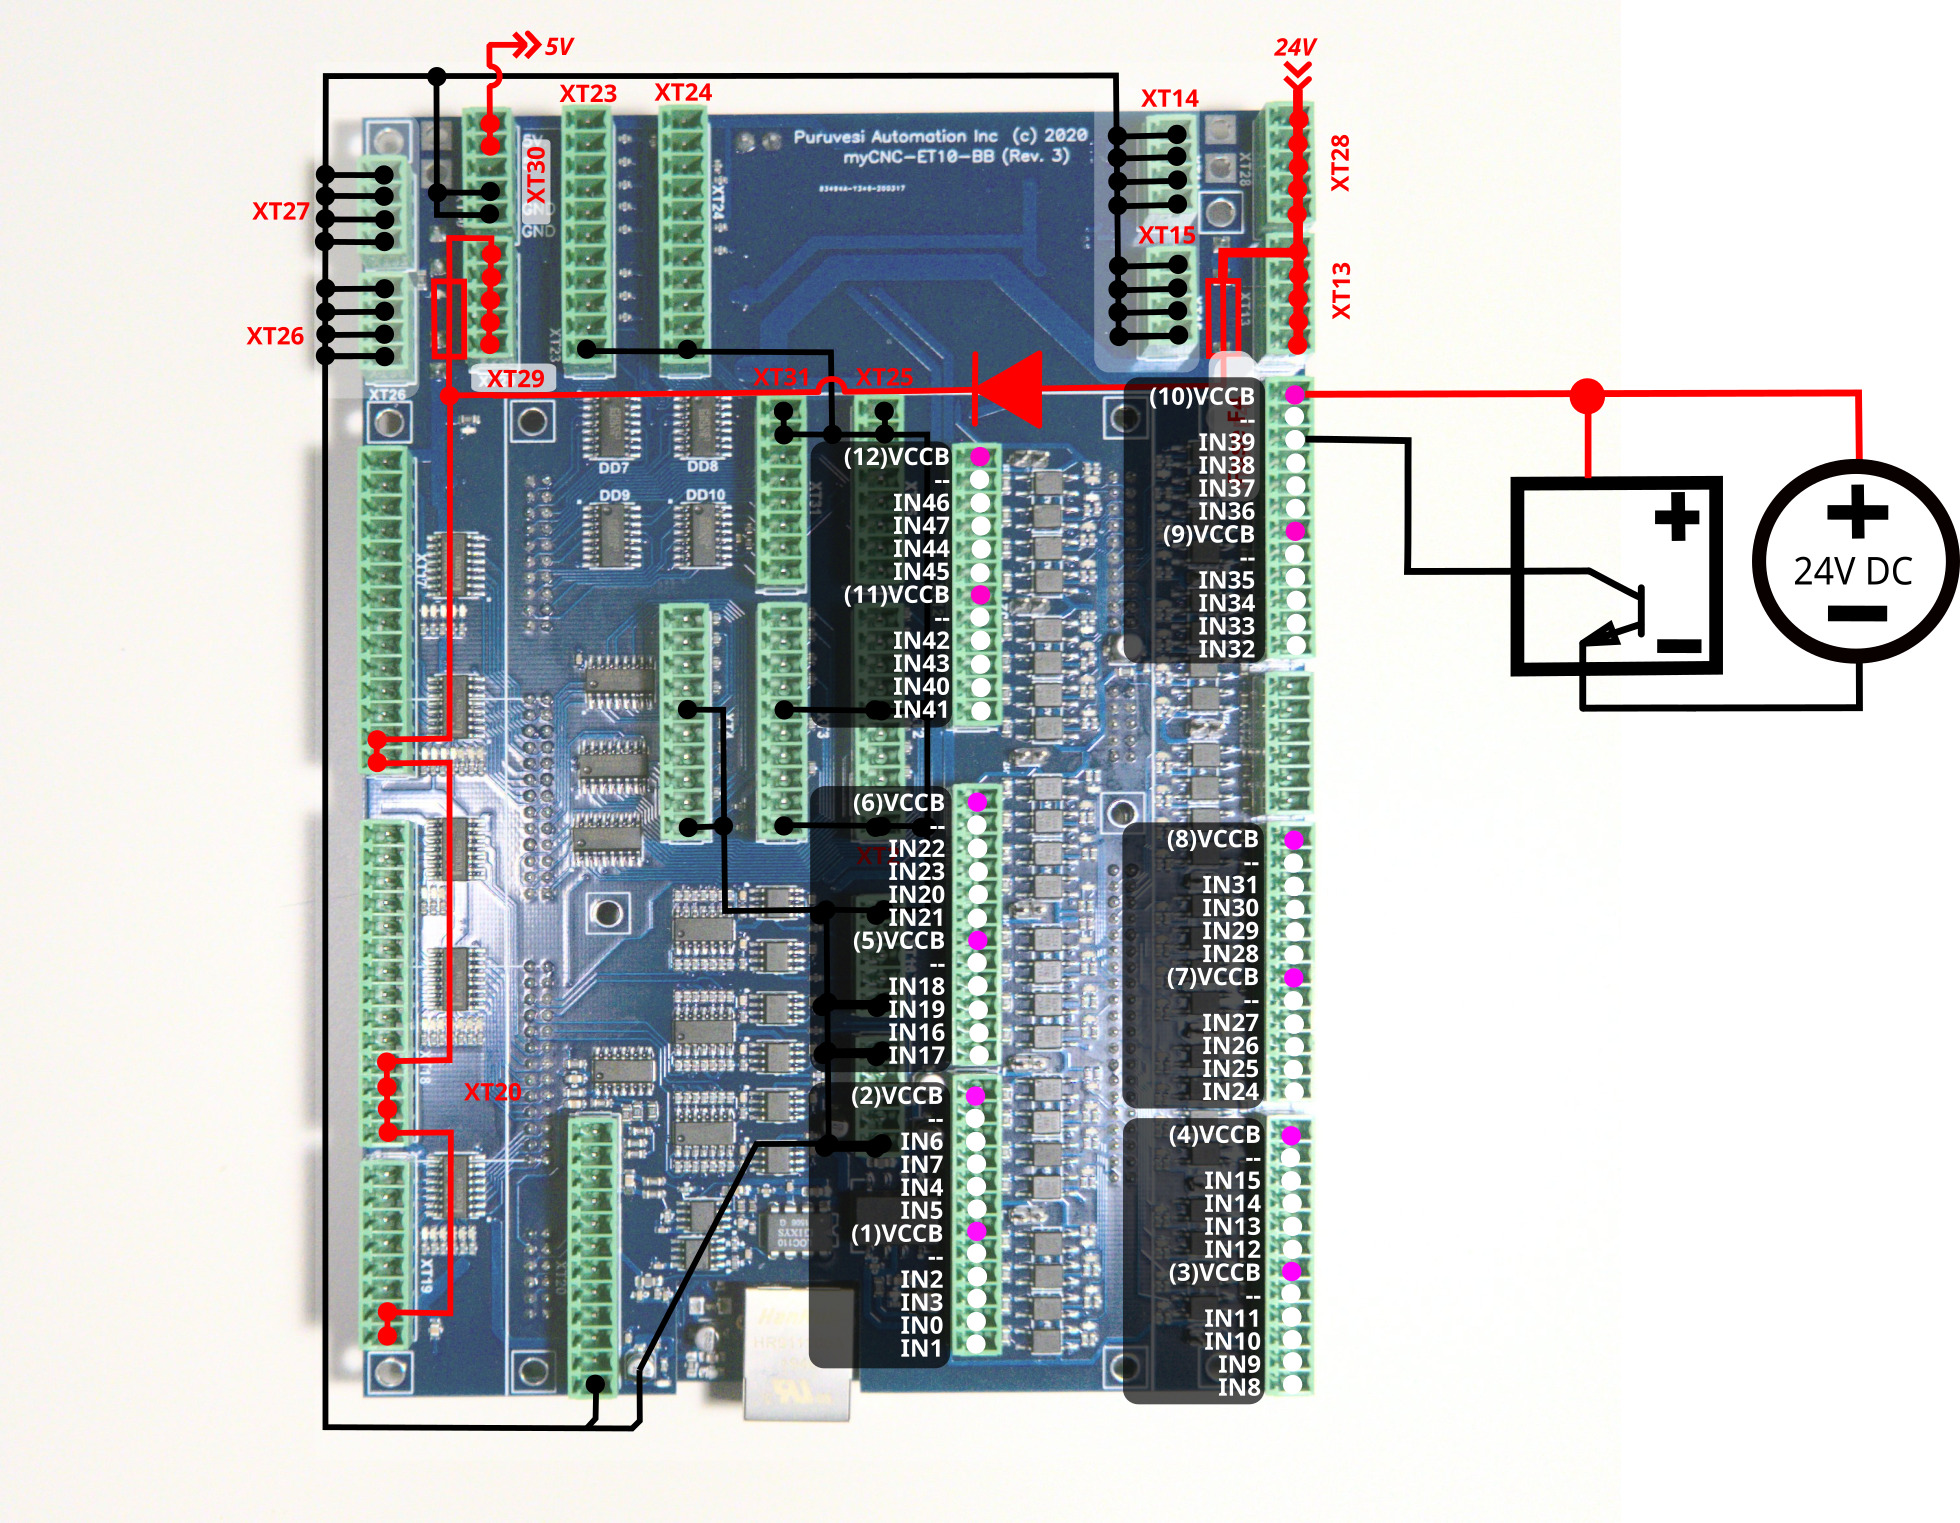
3-wire NPN sensor connection example
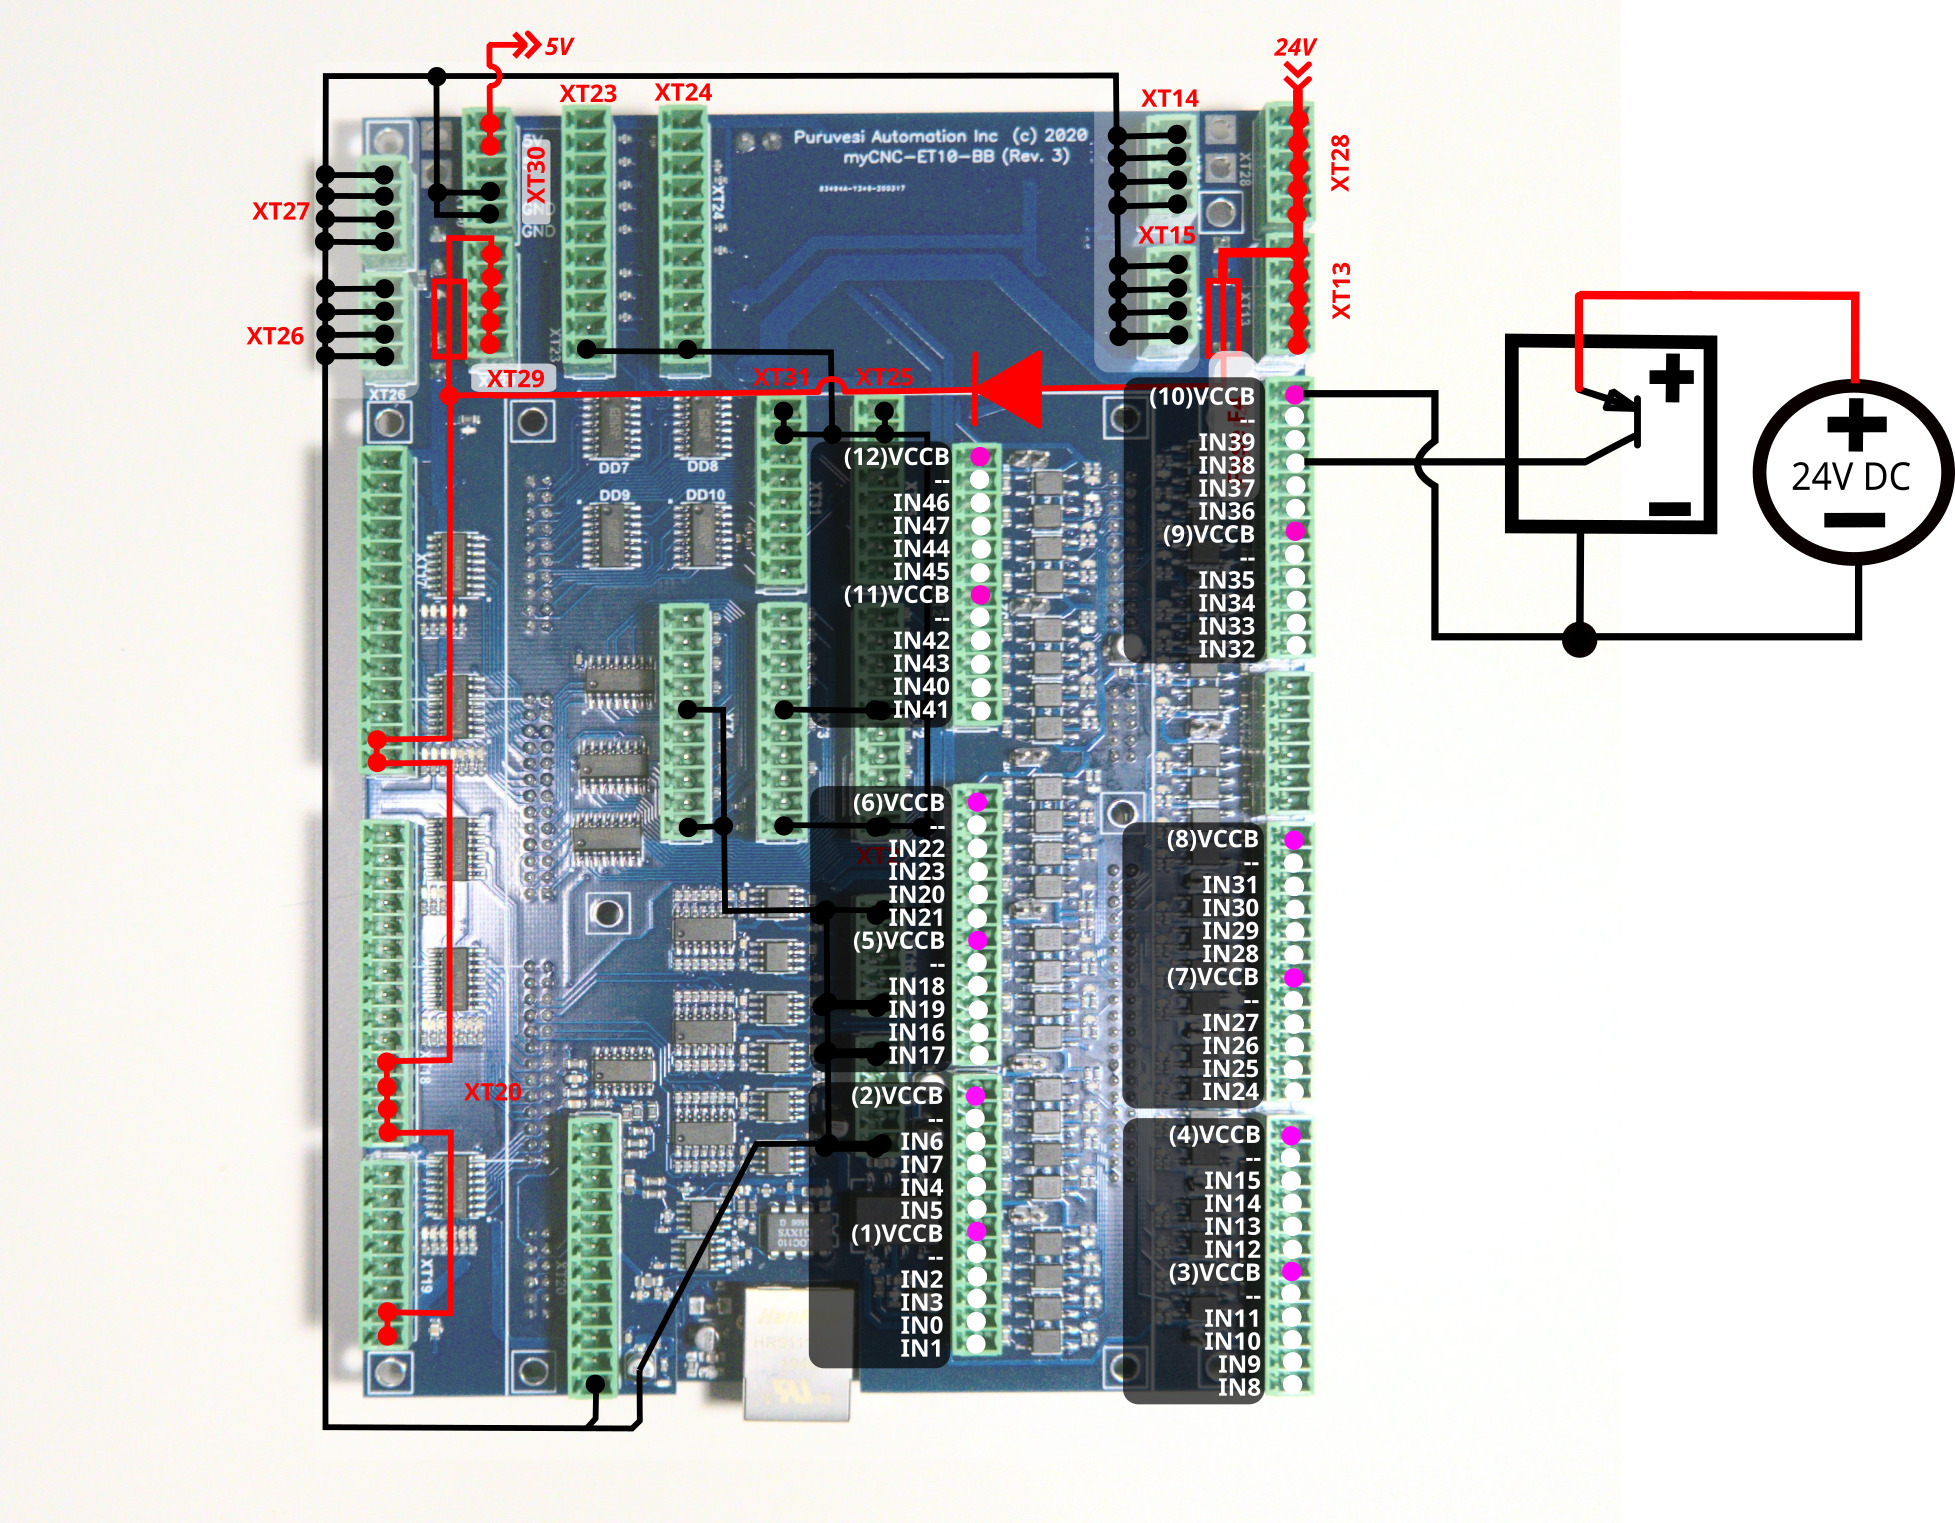
3-wire PNP sensor connection example
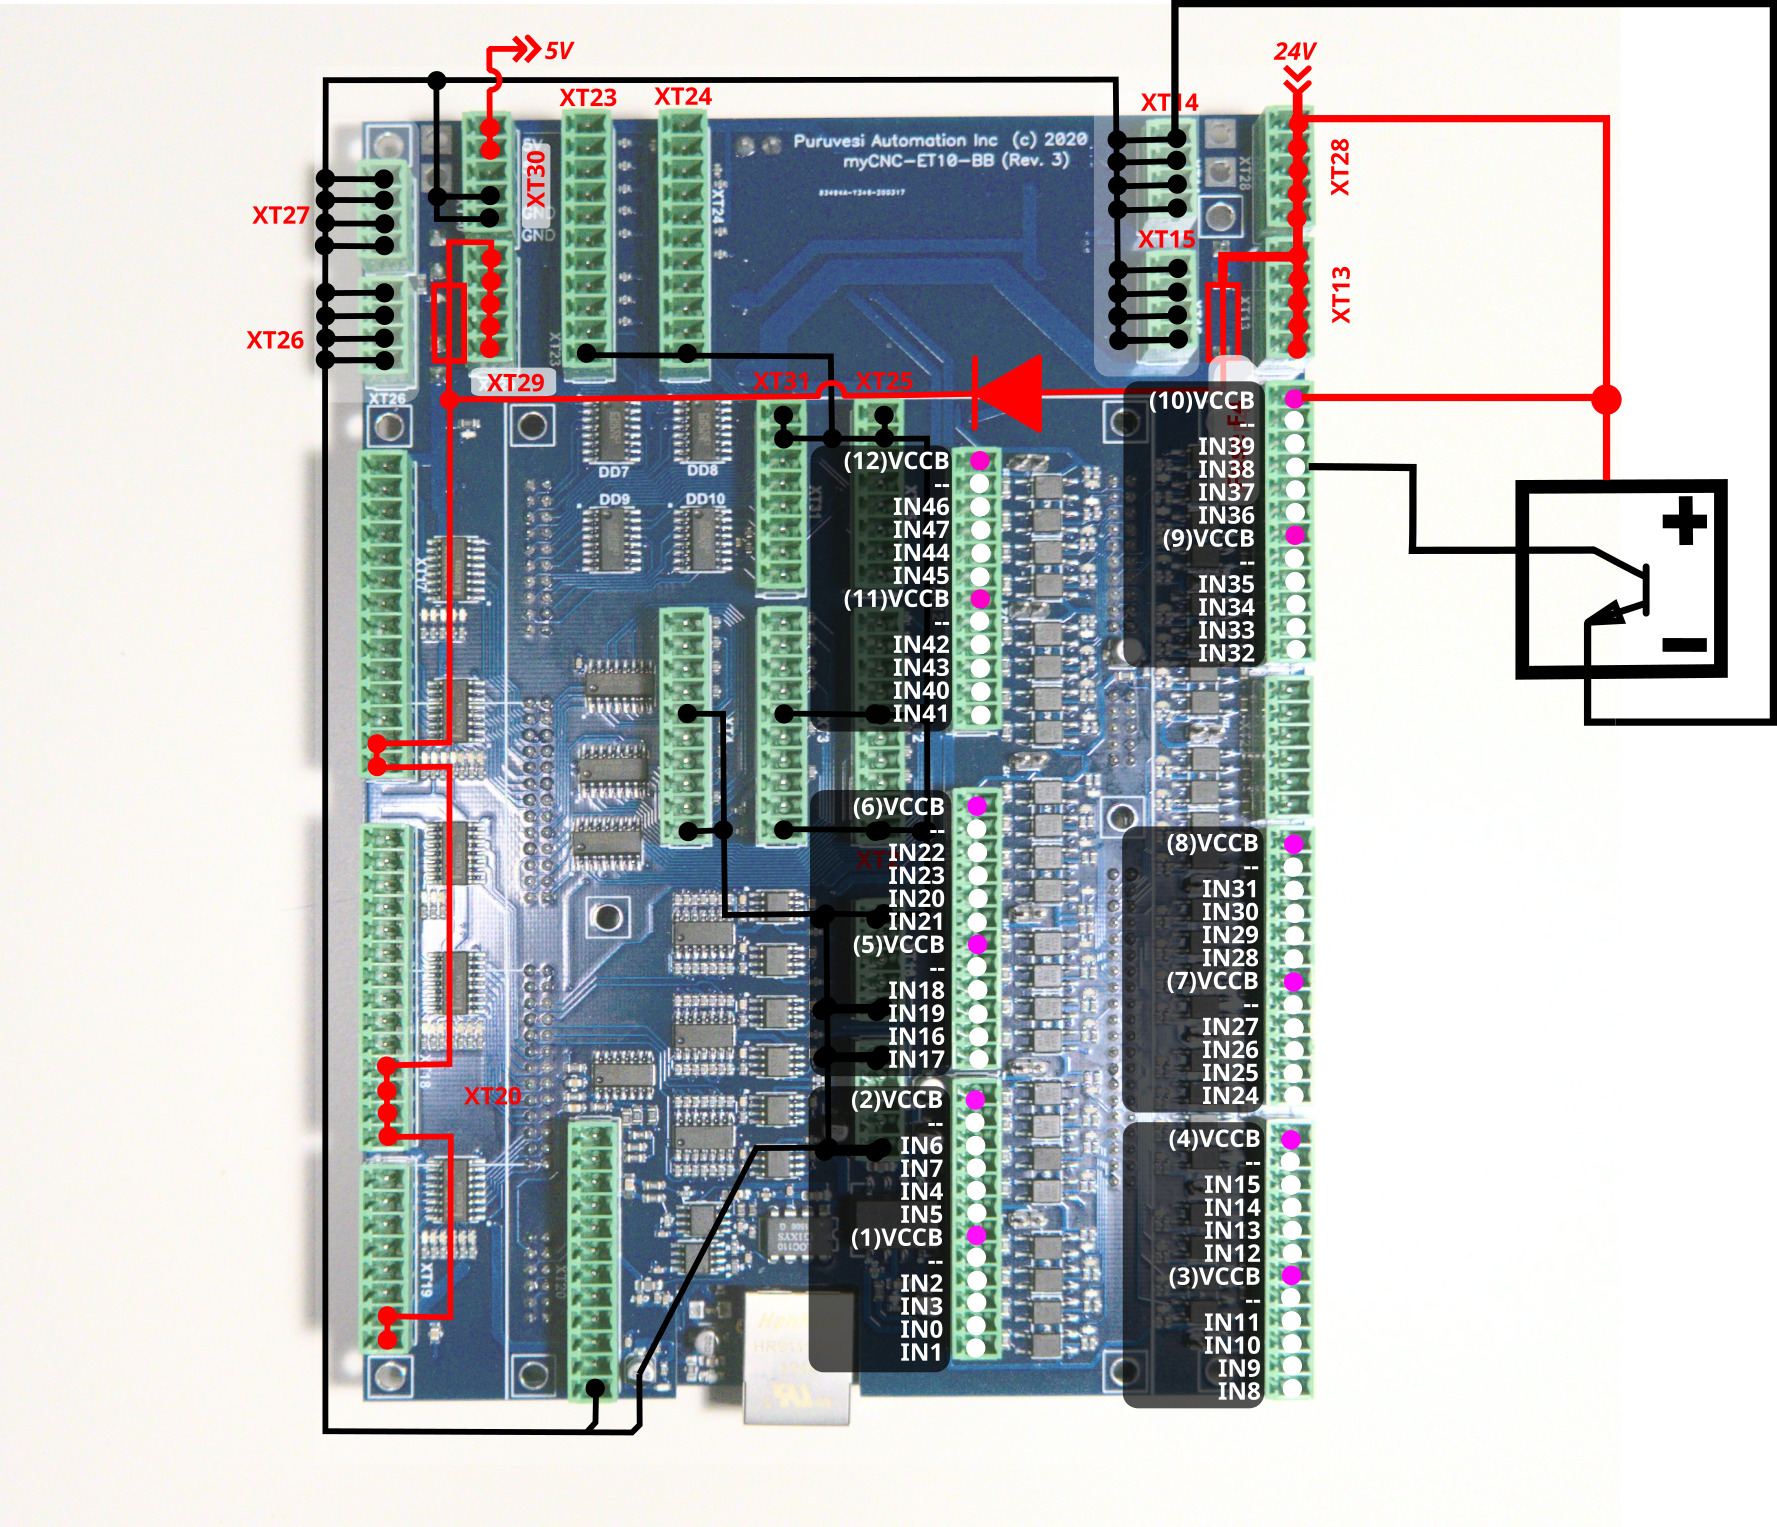
3-wire NPN sensor connection example (internal power supply)
3-wire PNP sensor connection example (internal power supply)
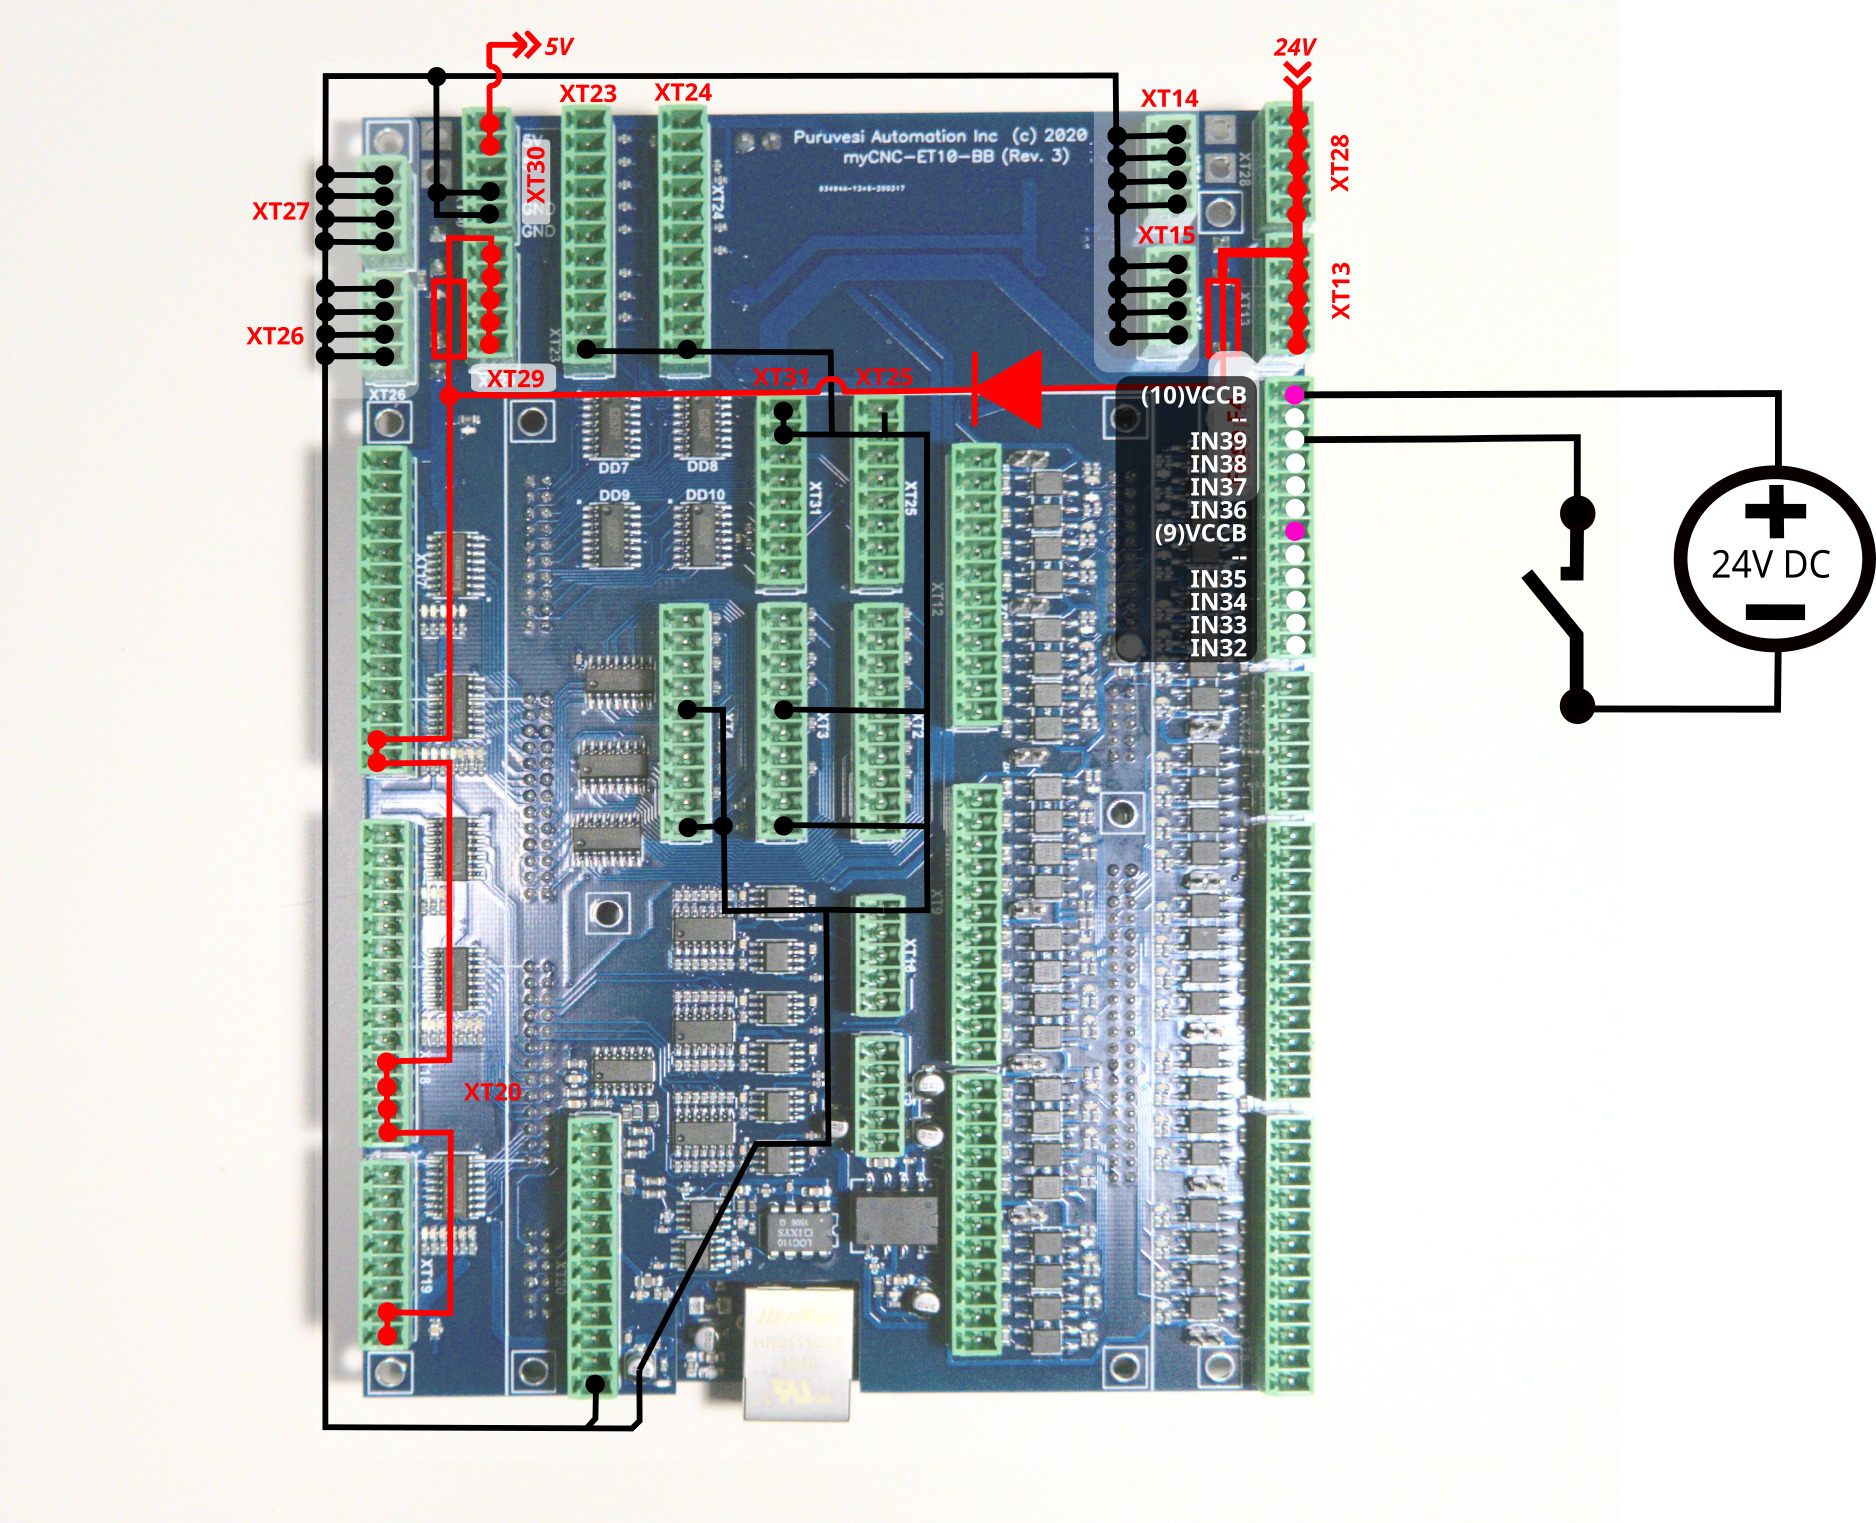
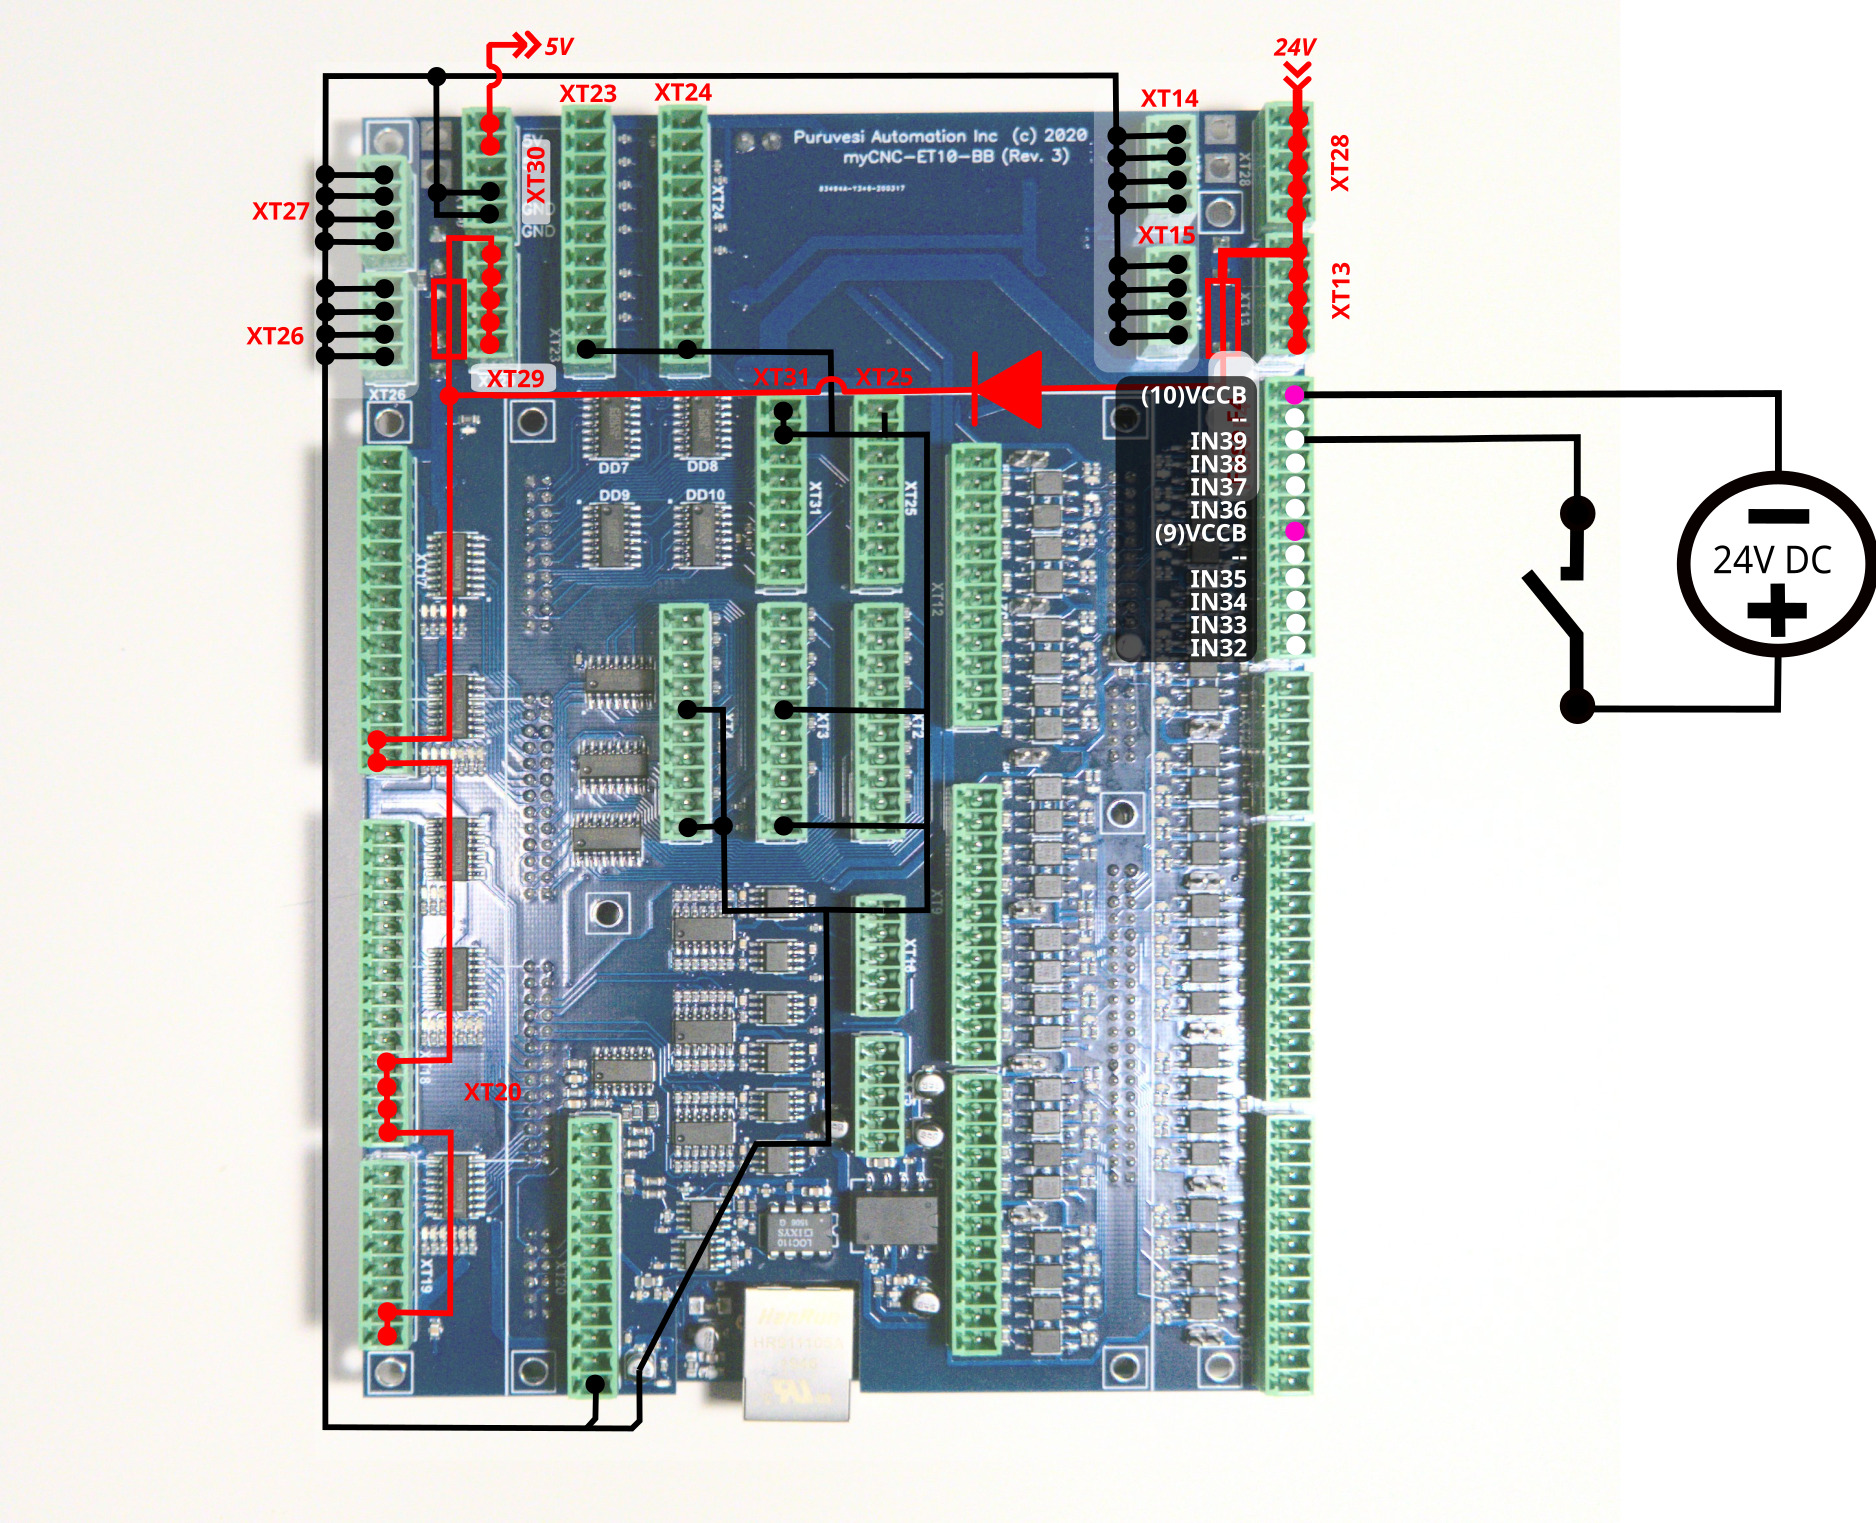
Switch connection example
ET10 Encoder inputs
ET10 board has 6 Incremental encoder inputs. There are 4 complete ABC encoder inputs (A/B quadrature encoder signals and Z signal) and 2 reduced AB encoder inputs. ET10 encoder inputs conform to the RS485 standard and are compatible with most of the servo drivers and line driver incremental encoders. 34C86 chip is used in ET10 as a receiver for the encoder signals. Internal schematic for line driver encoder inputs is shown in the picture below.
INCREMENTAL ENCODER inputs schematic (1 Encoder, ABC signals are shown)
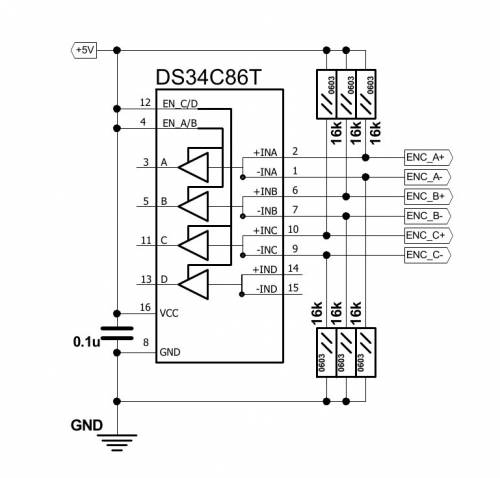
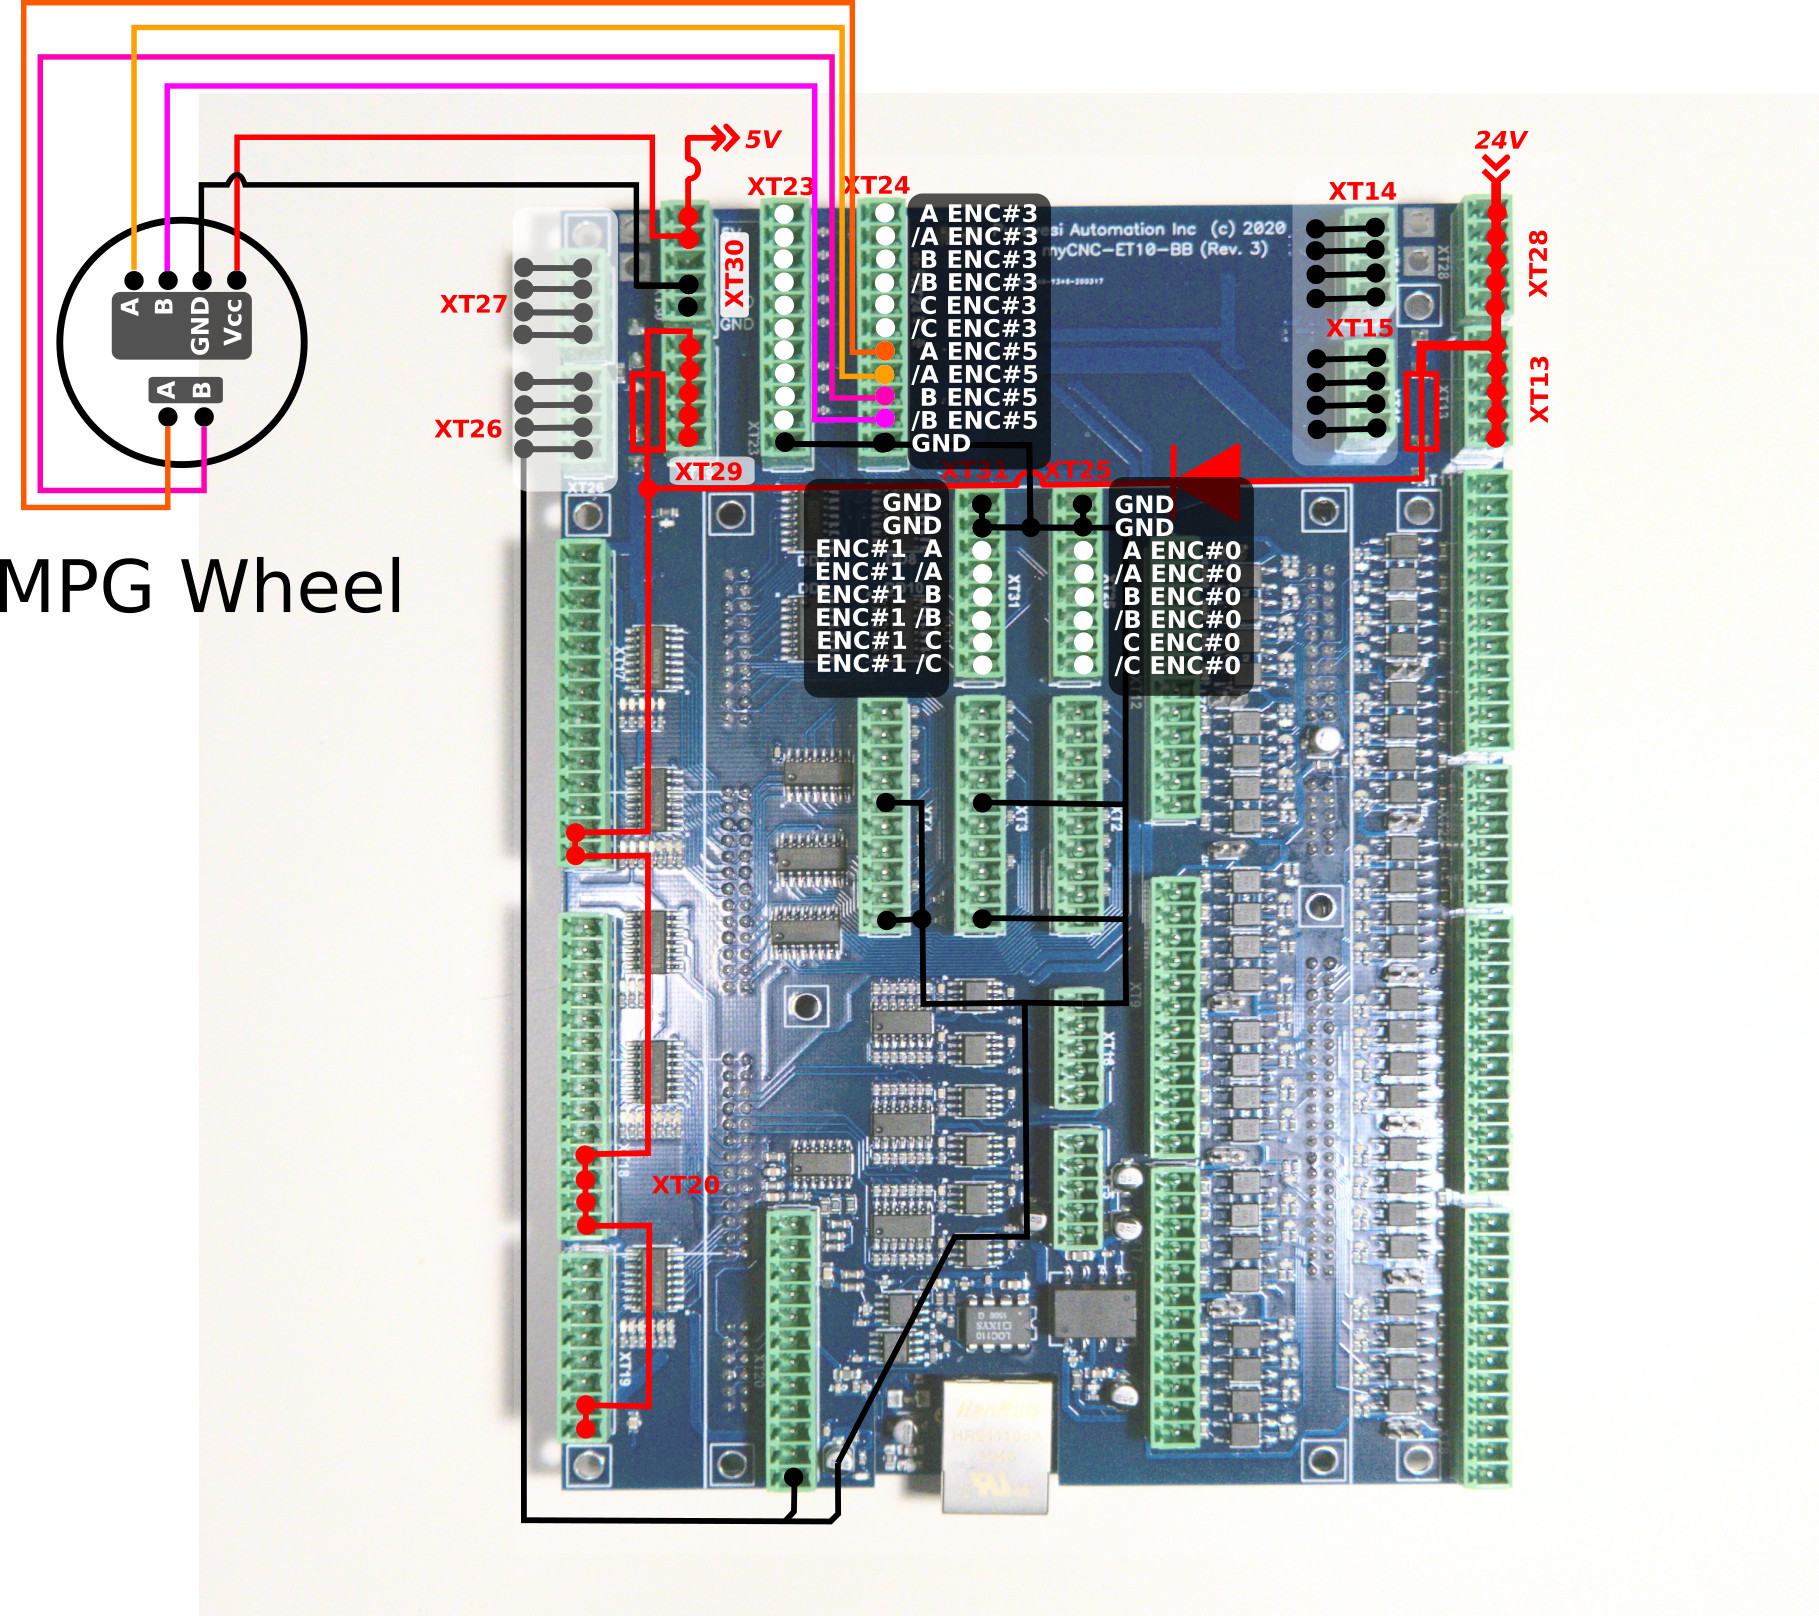
ENCODERS channels 0,1,2,3,4,5 pinout
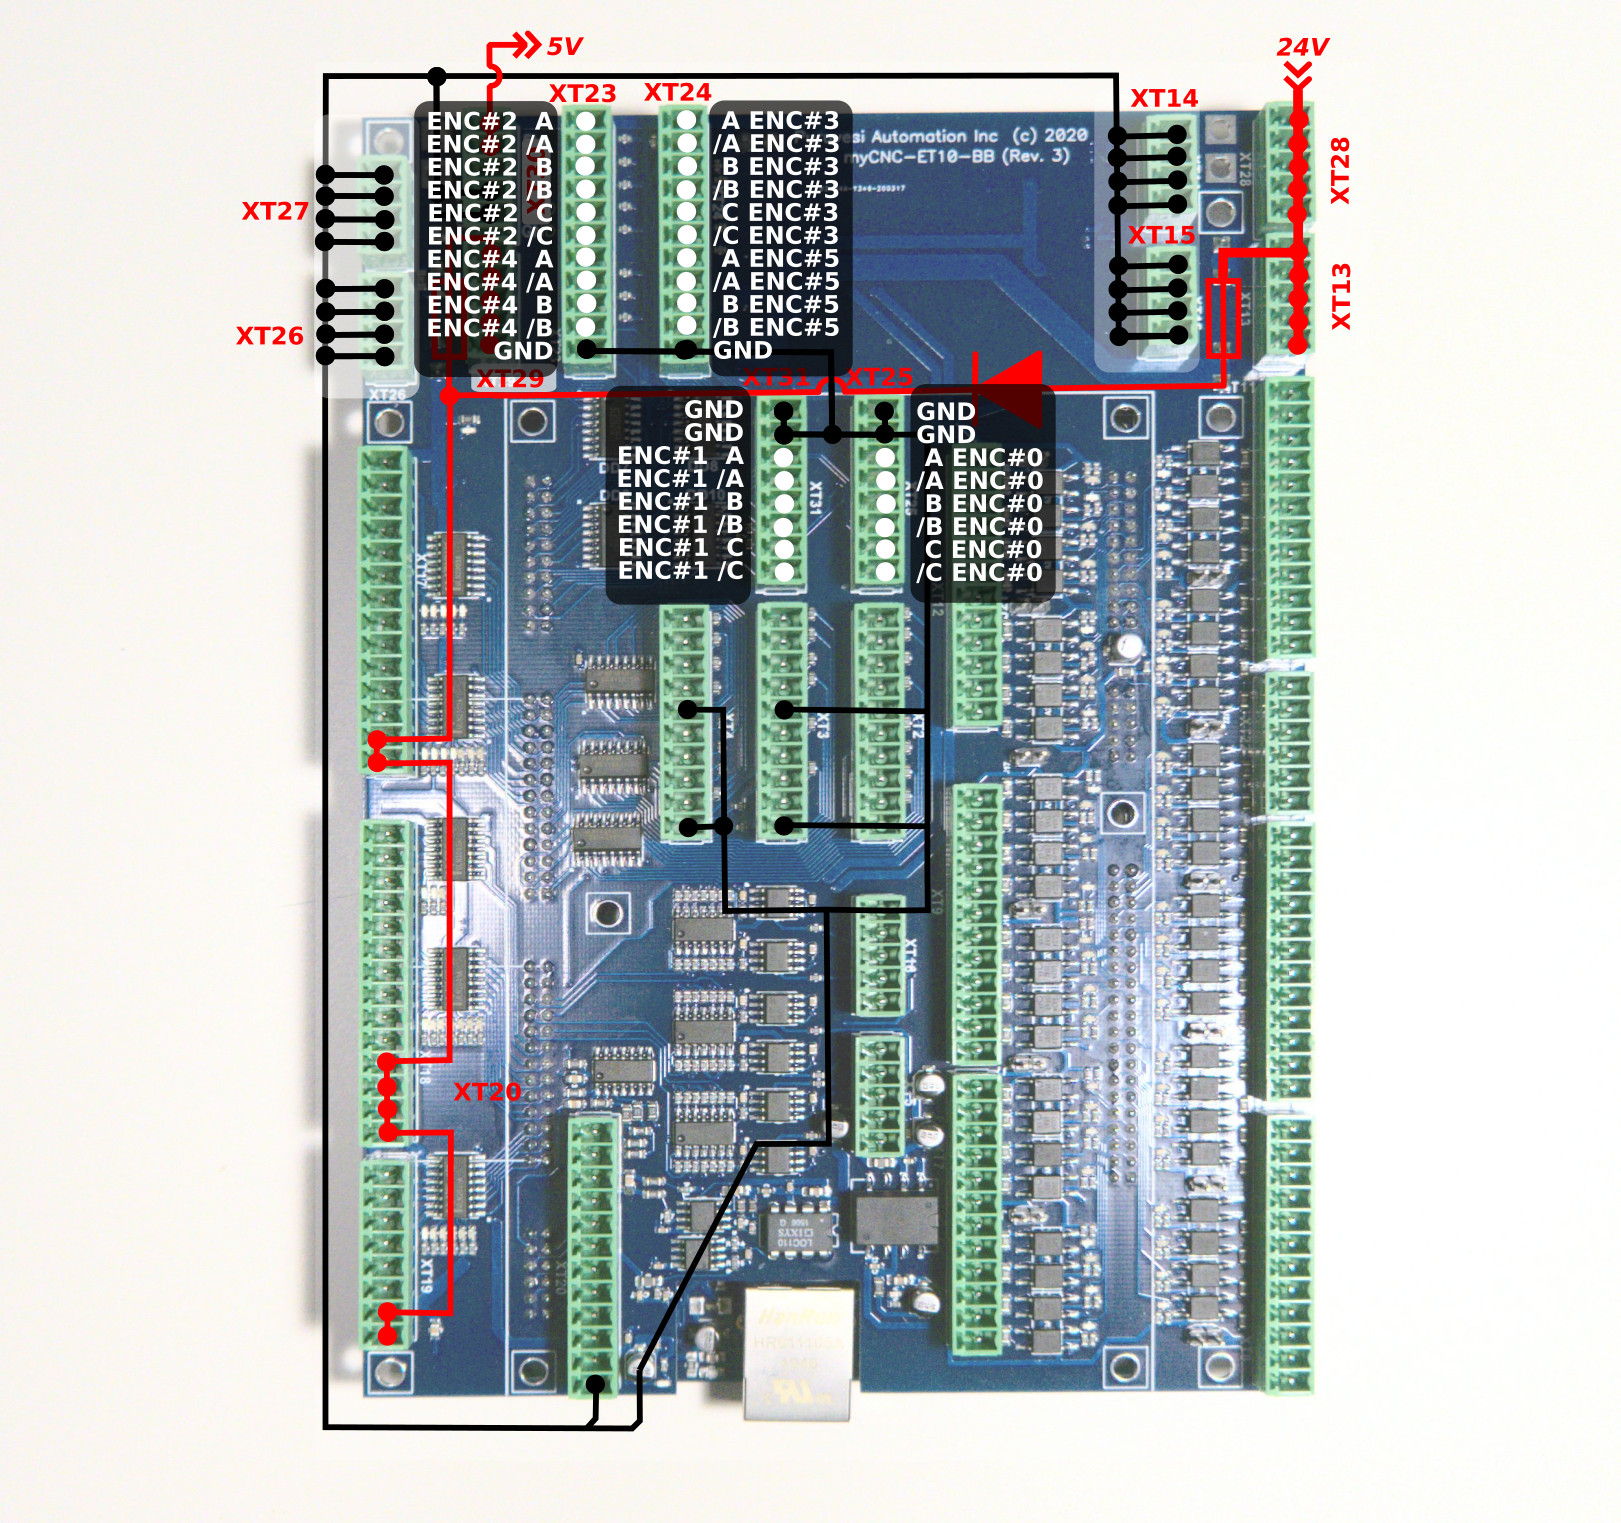
An example below shows an MPG wheel connected to the ET10 encoder ports:
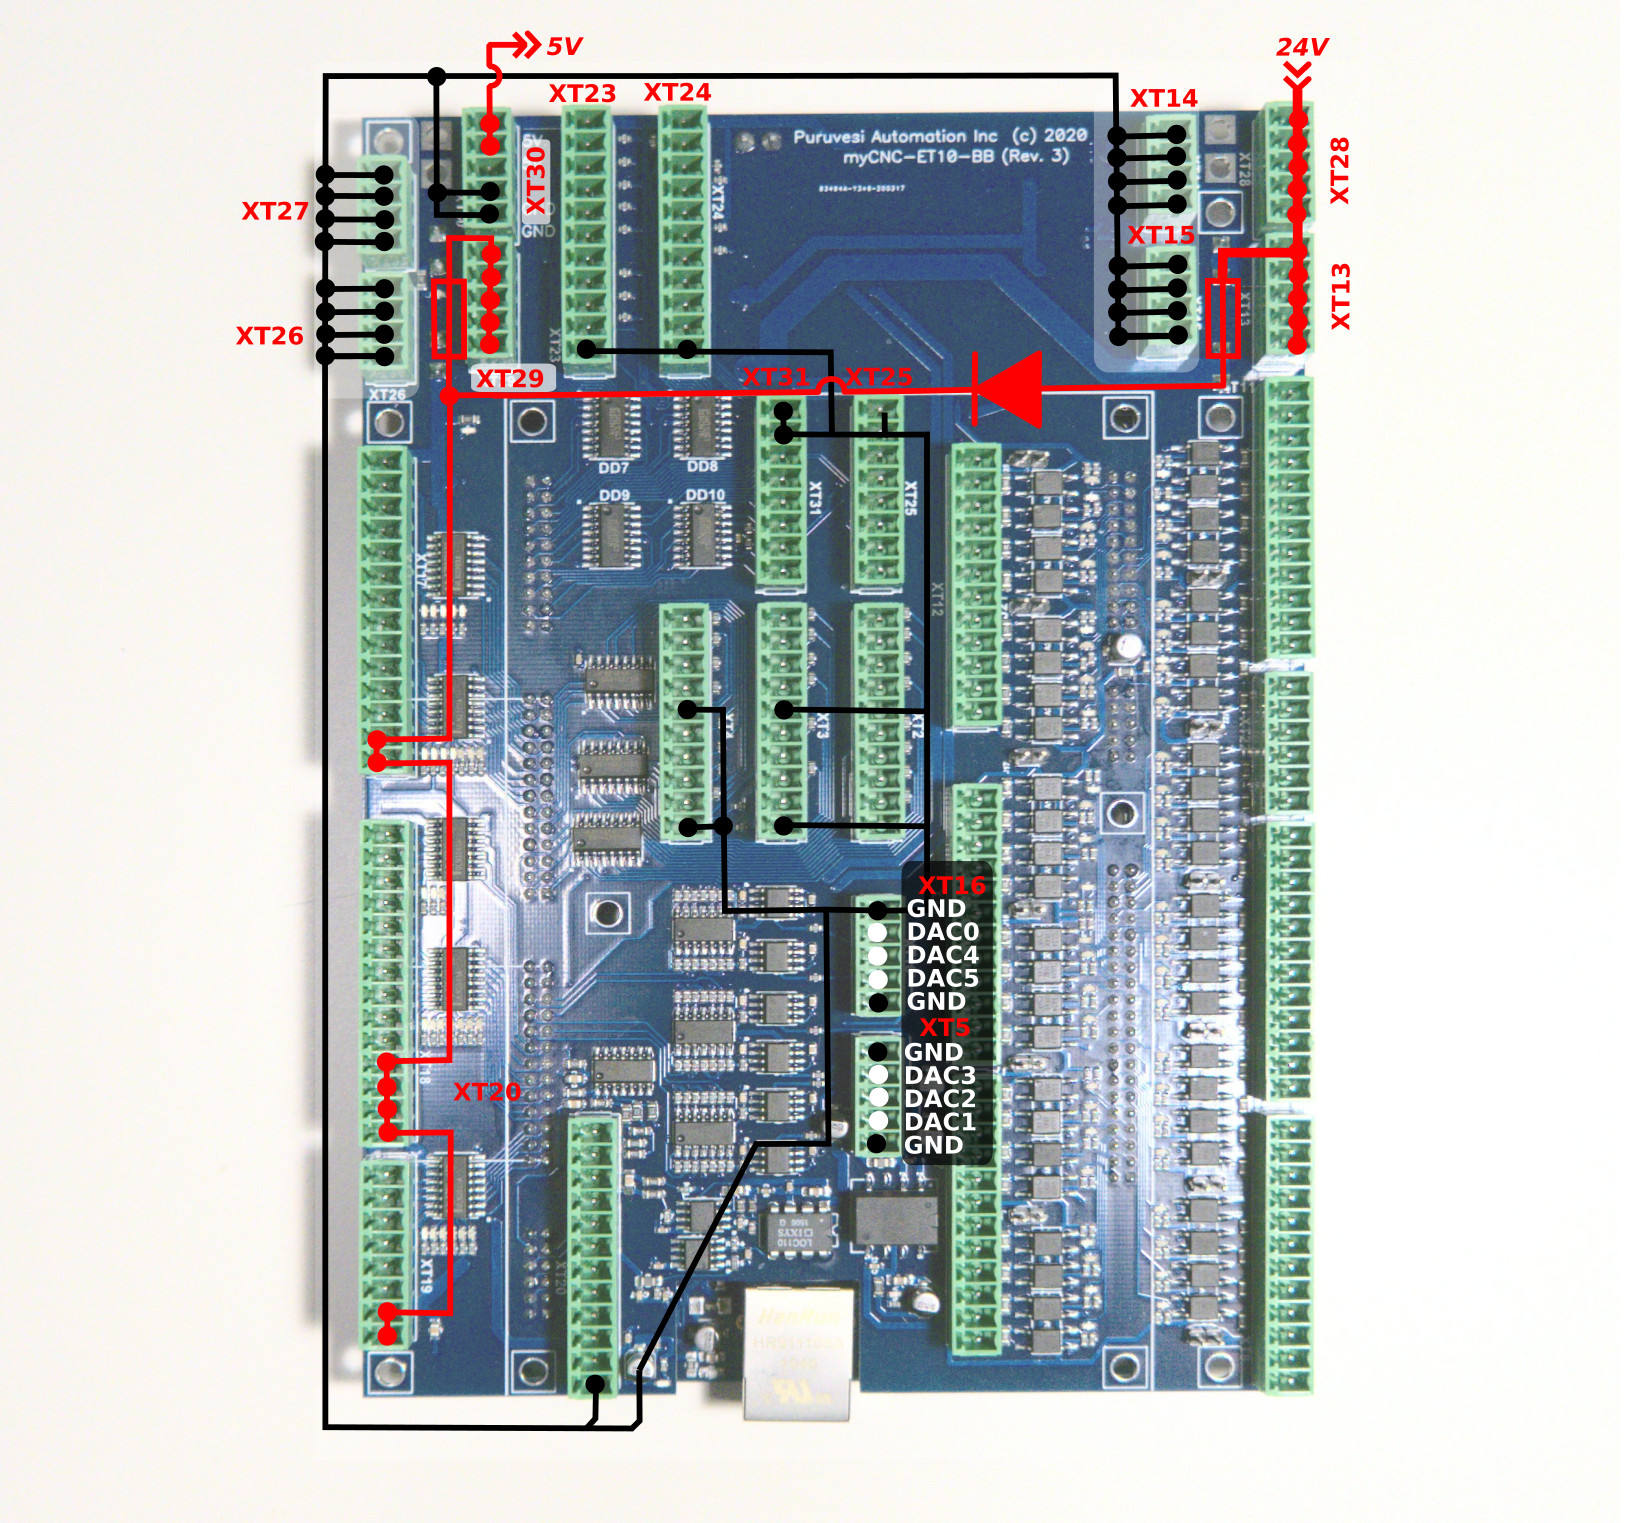
ET10 DAC +/-10V DAC outputs
ET10 control board contains 6 channel +/-10V DAC outputs. This outputs can be used for analogue servo drivers closed-loop control, spindle speed control or any other application that requires IN analog signals in +/-10V range.
Connectors XT16 and XT5 are used to connect DAC outputs. The connectors pinout is shown in the picture below
ADC Inputs
The big difference in the ADC inputs from the ET10R2C board is that the ET10R3C board features an ADC channel with galvanic isolation for usage THC in plasma cutting setups, designed for the 0-5V range.
Below is a table with all available ADC inputs and their descriptions:
| Input | Description |
|---|---|
| #0, #1, #2, #3, #5, #6 | Conventional 3.3V |
| #4 | Differential 5V, galvanically isolated |
| #7 | Differential 30V |
Input schematic of ET10 differential ADC input (Channel#0) is shown below.
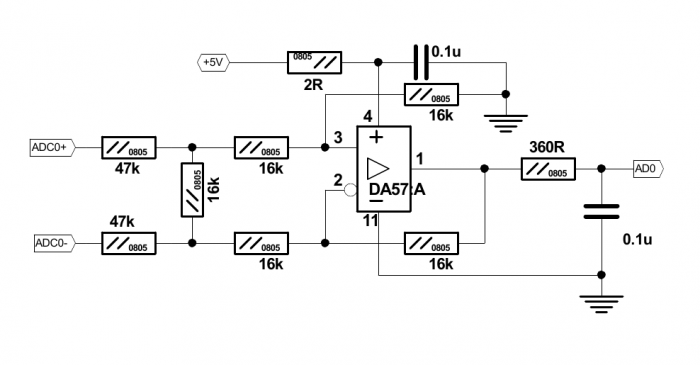
Input schematic for ET10 0-5V ADC inputs (Channels#1…#7)
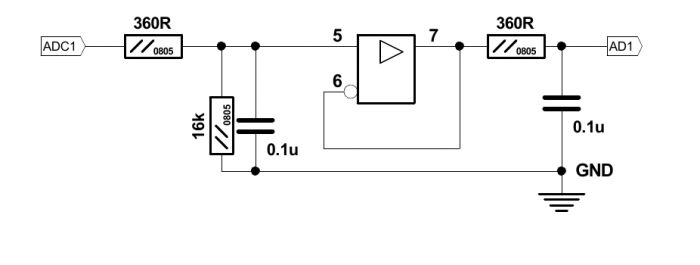
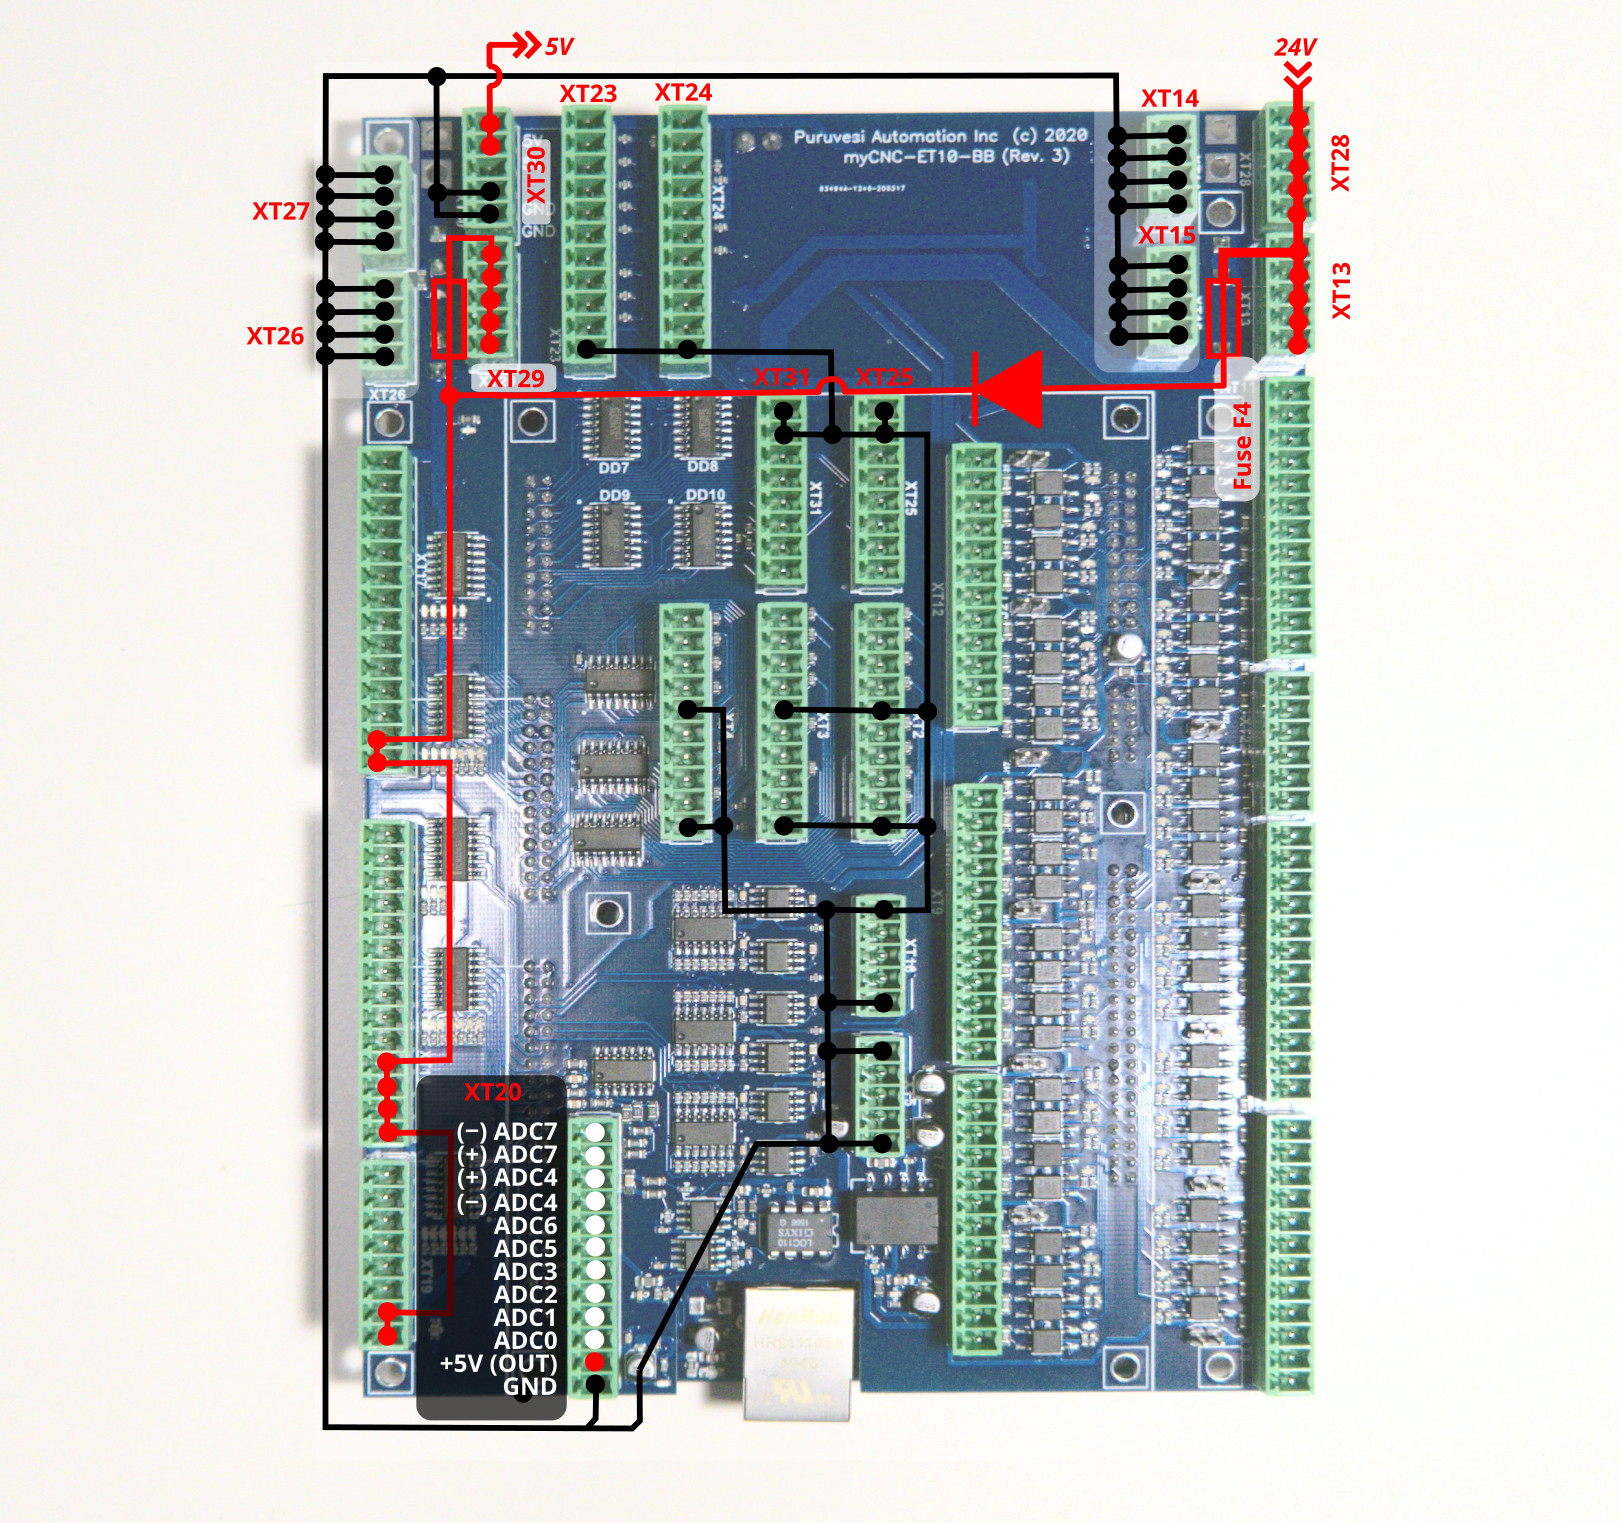
Connectors XT20, XT21 are used to connect ADC inputs. The connector pinout is shown below
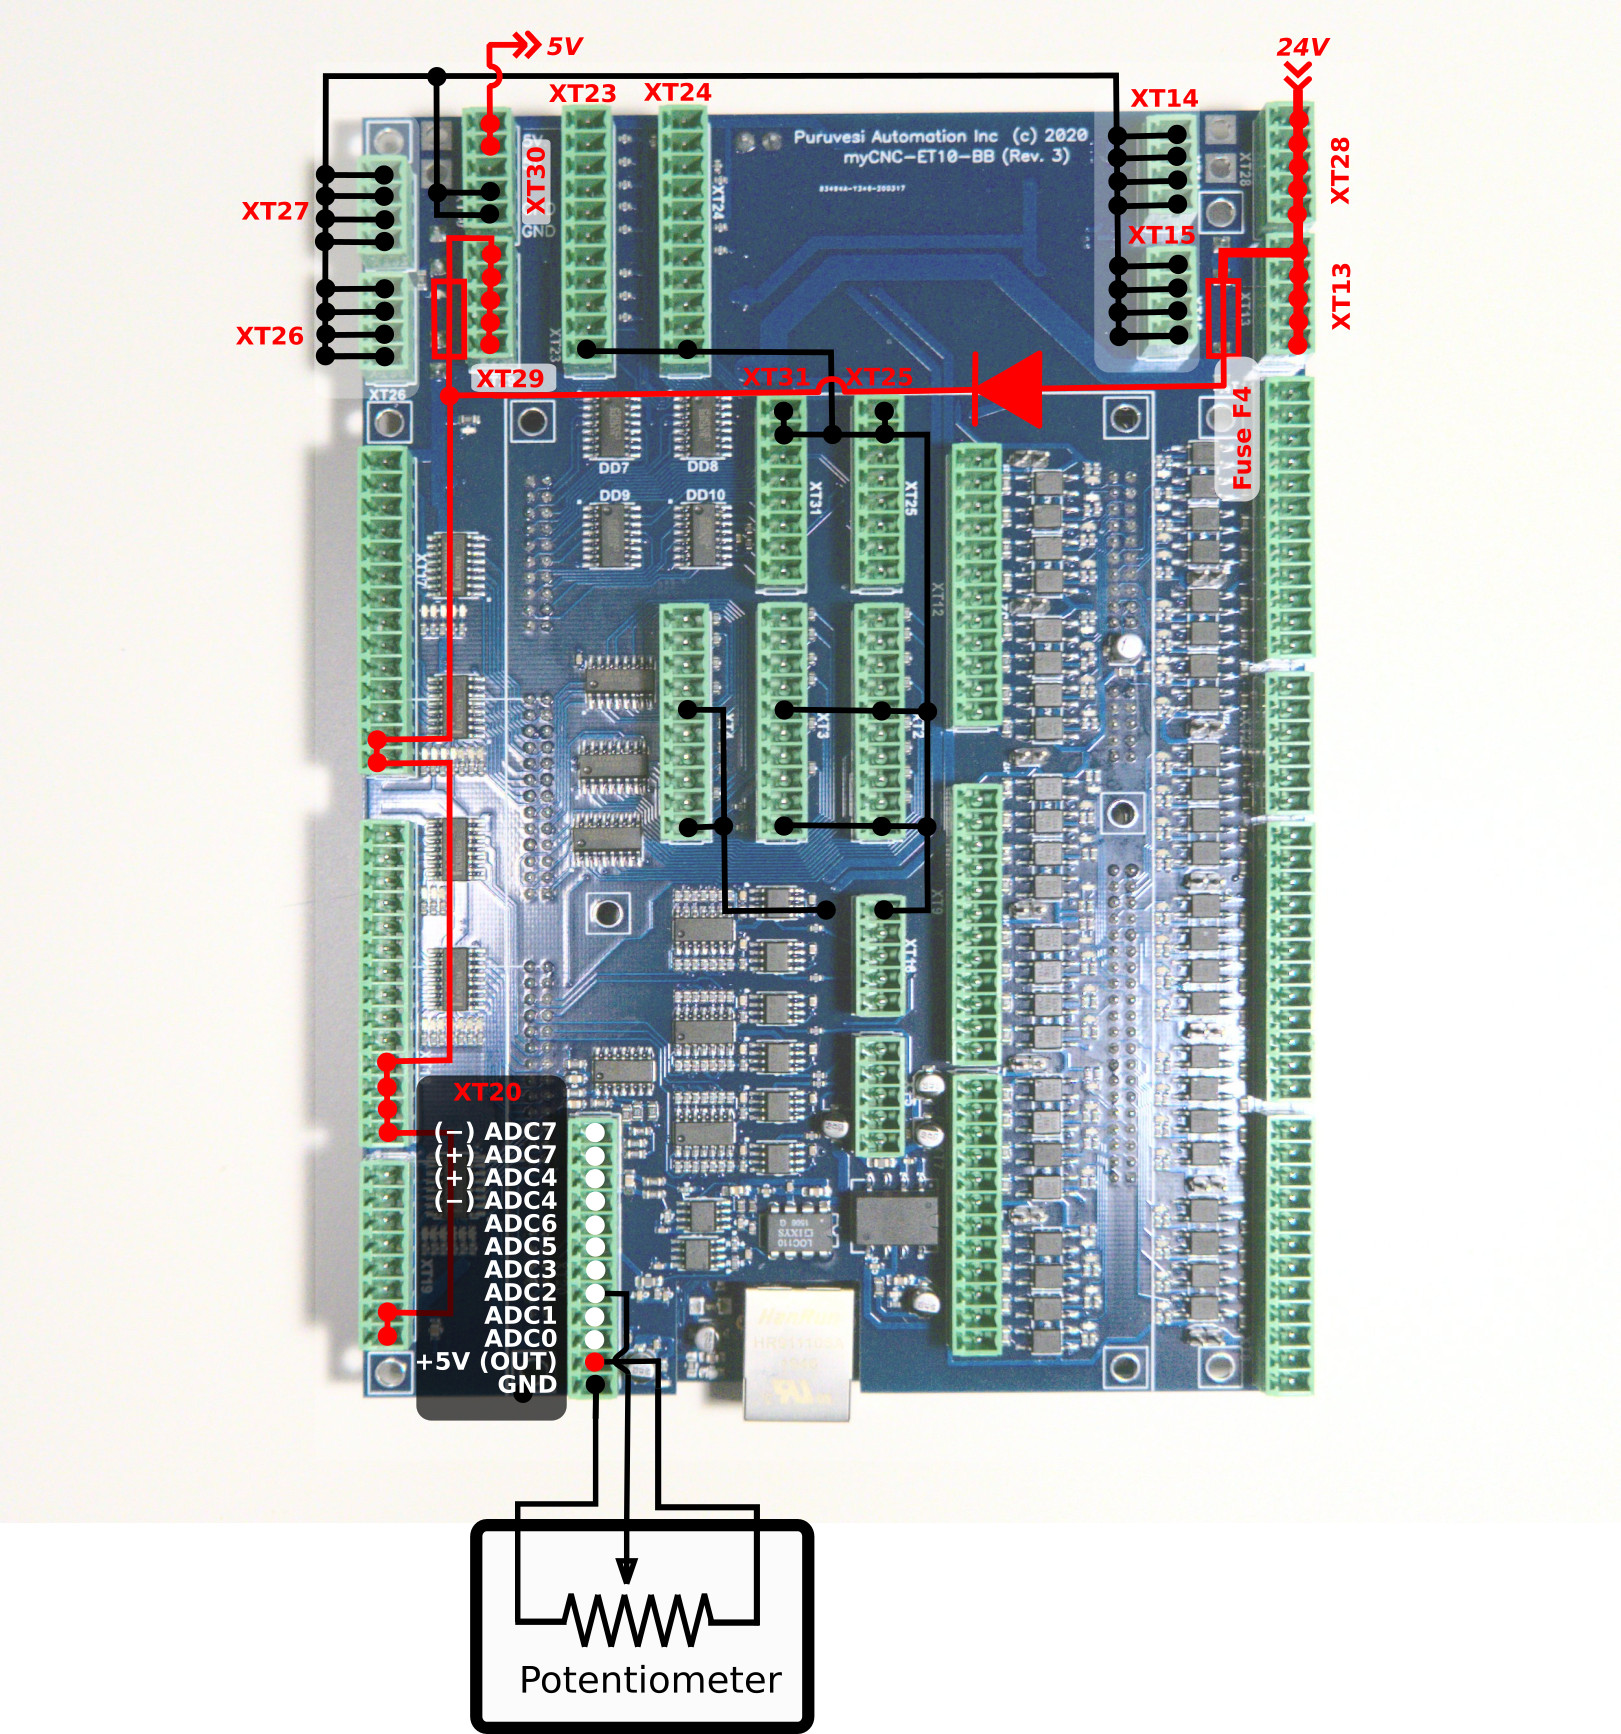
The picture below shows an example of a potentiometer connected to ADC2 input.
RS485 Bus
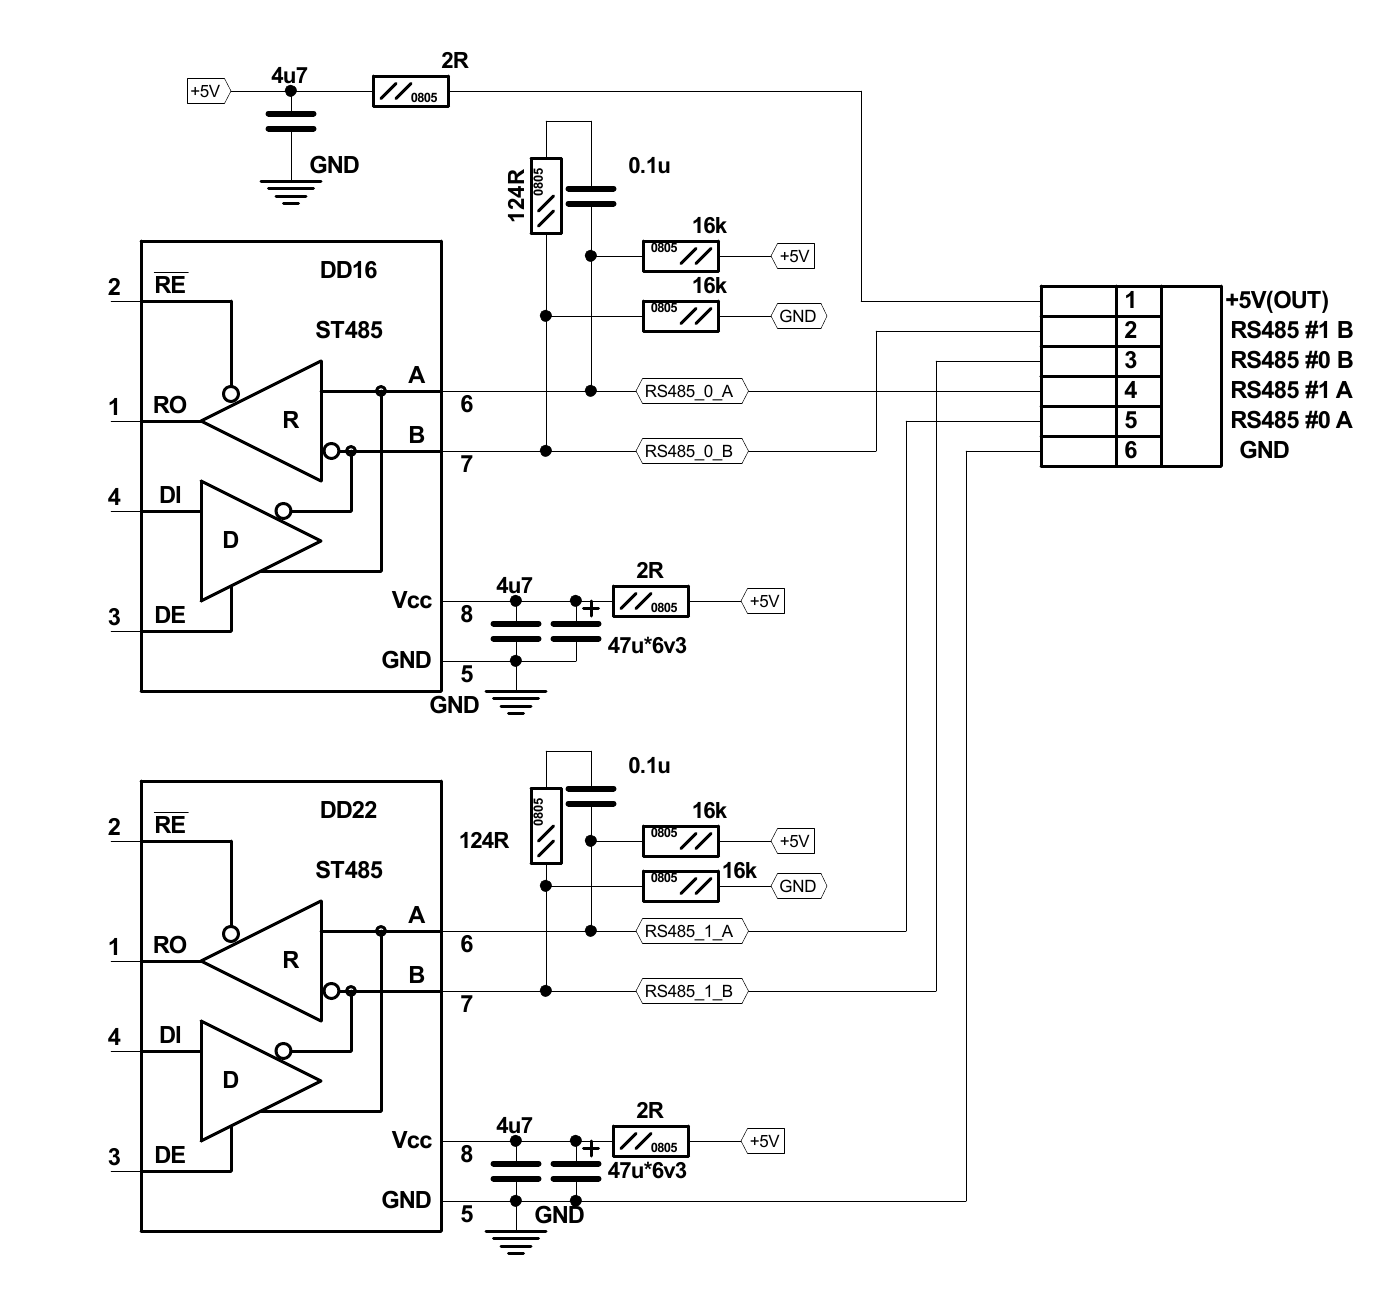
MyCNC-Et10 control board has a RS485 bus connector. Modbus ASCII/RTU and Hypertherm Serial communication interfaces are implemented in myCNC-ET10 control board (please consult the Hypertherm Serial Communication manual for more setup information).
Note that channel #0 is reserved for special purpose applications. Please contact the myCNC development team to implement a special user case. Channel #1 can be used freely by the end user.
RS485 connector pinout is shown below:
ET10 Single-Board Computer connection
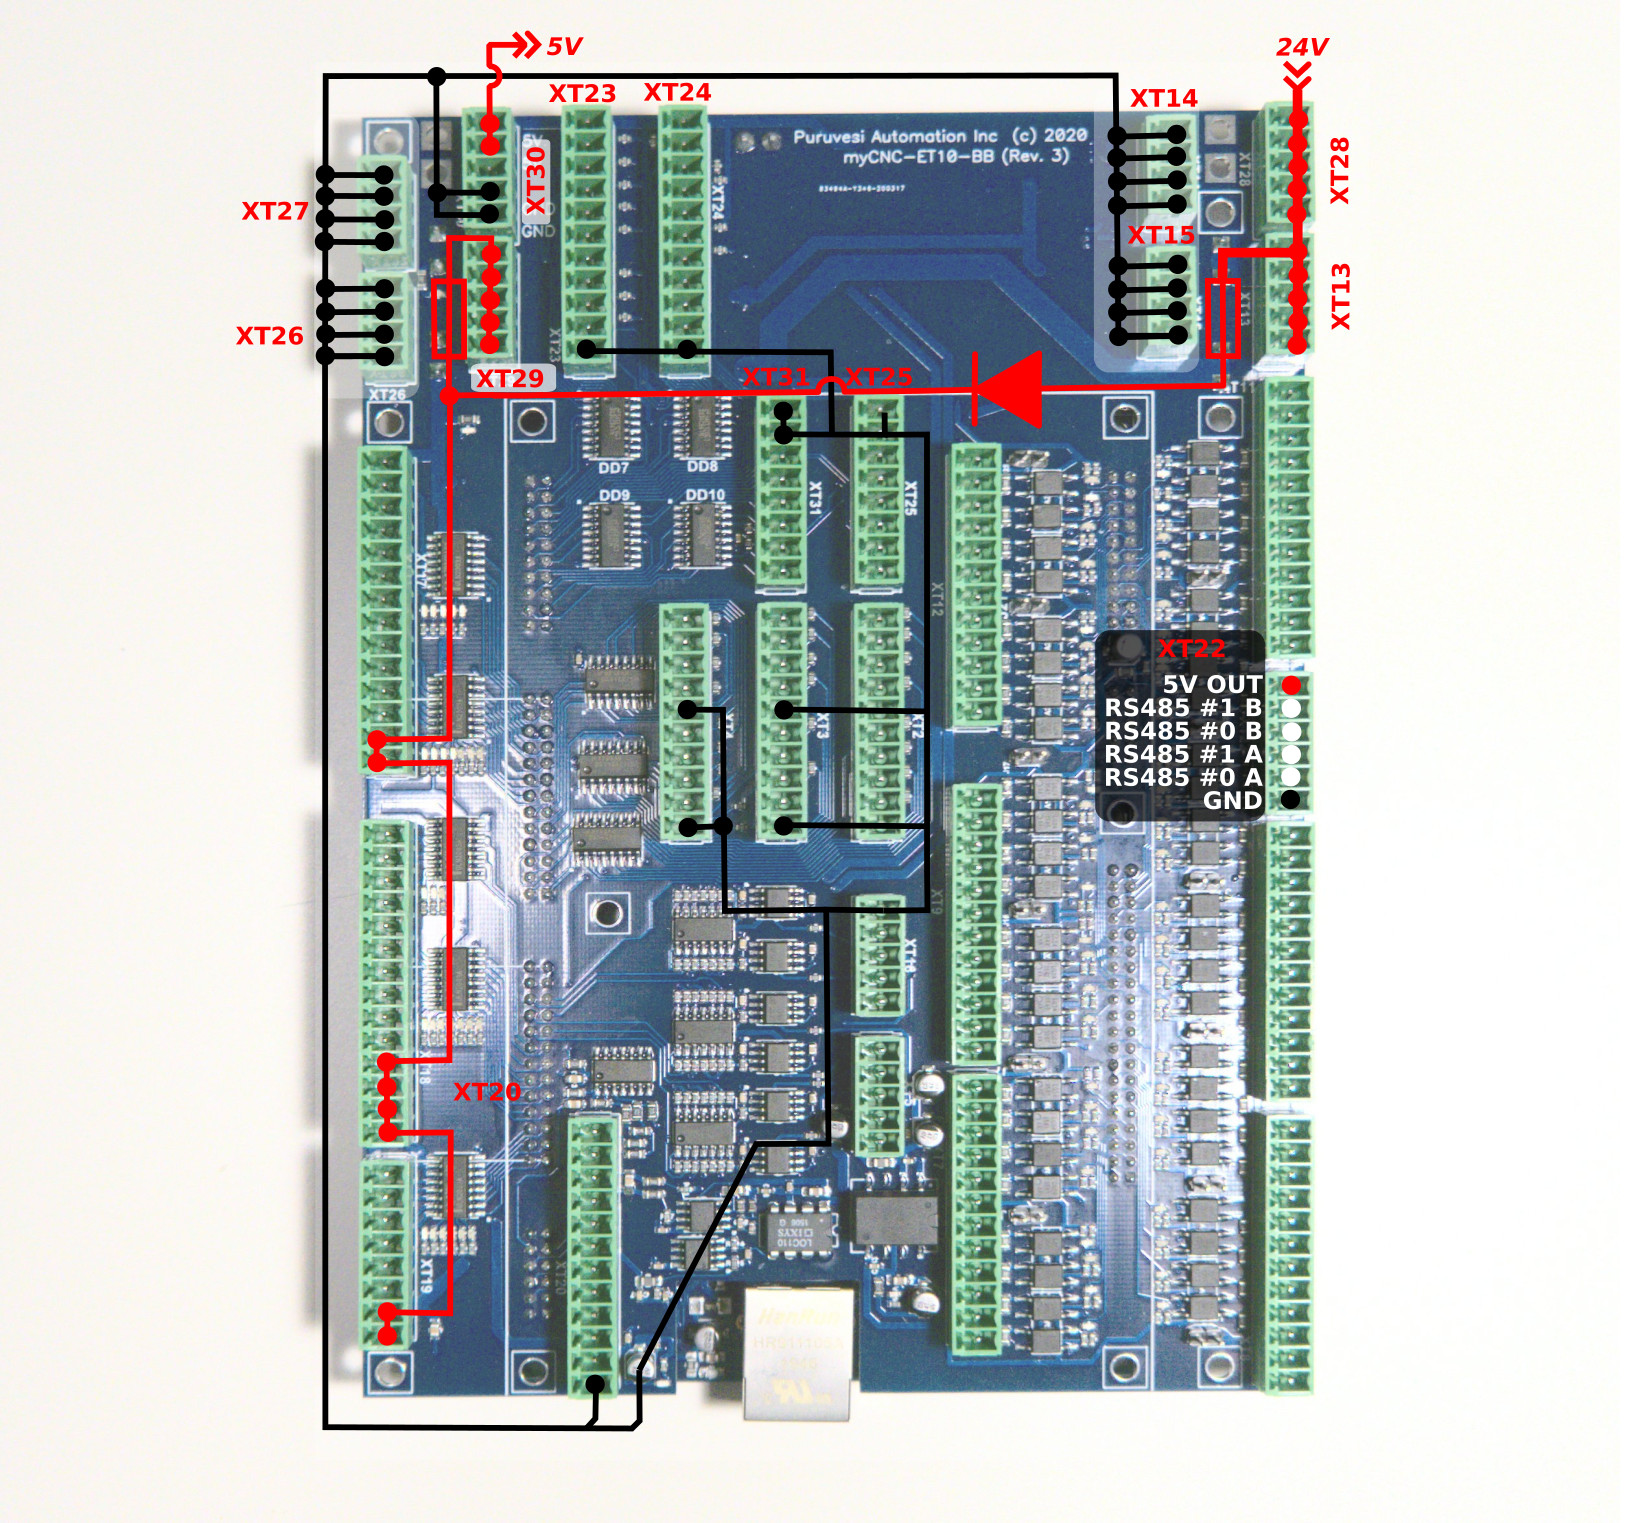
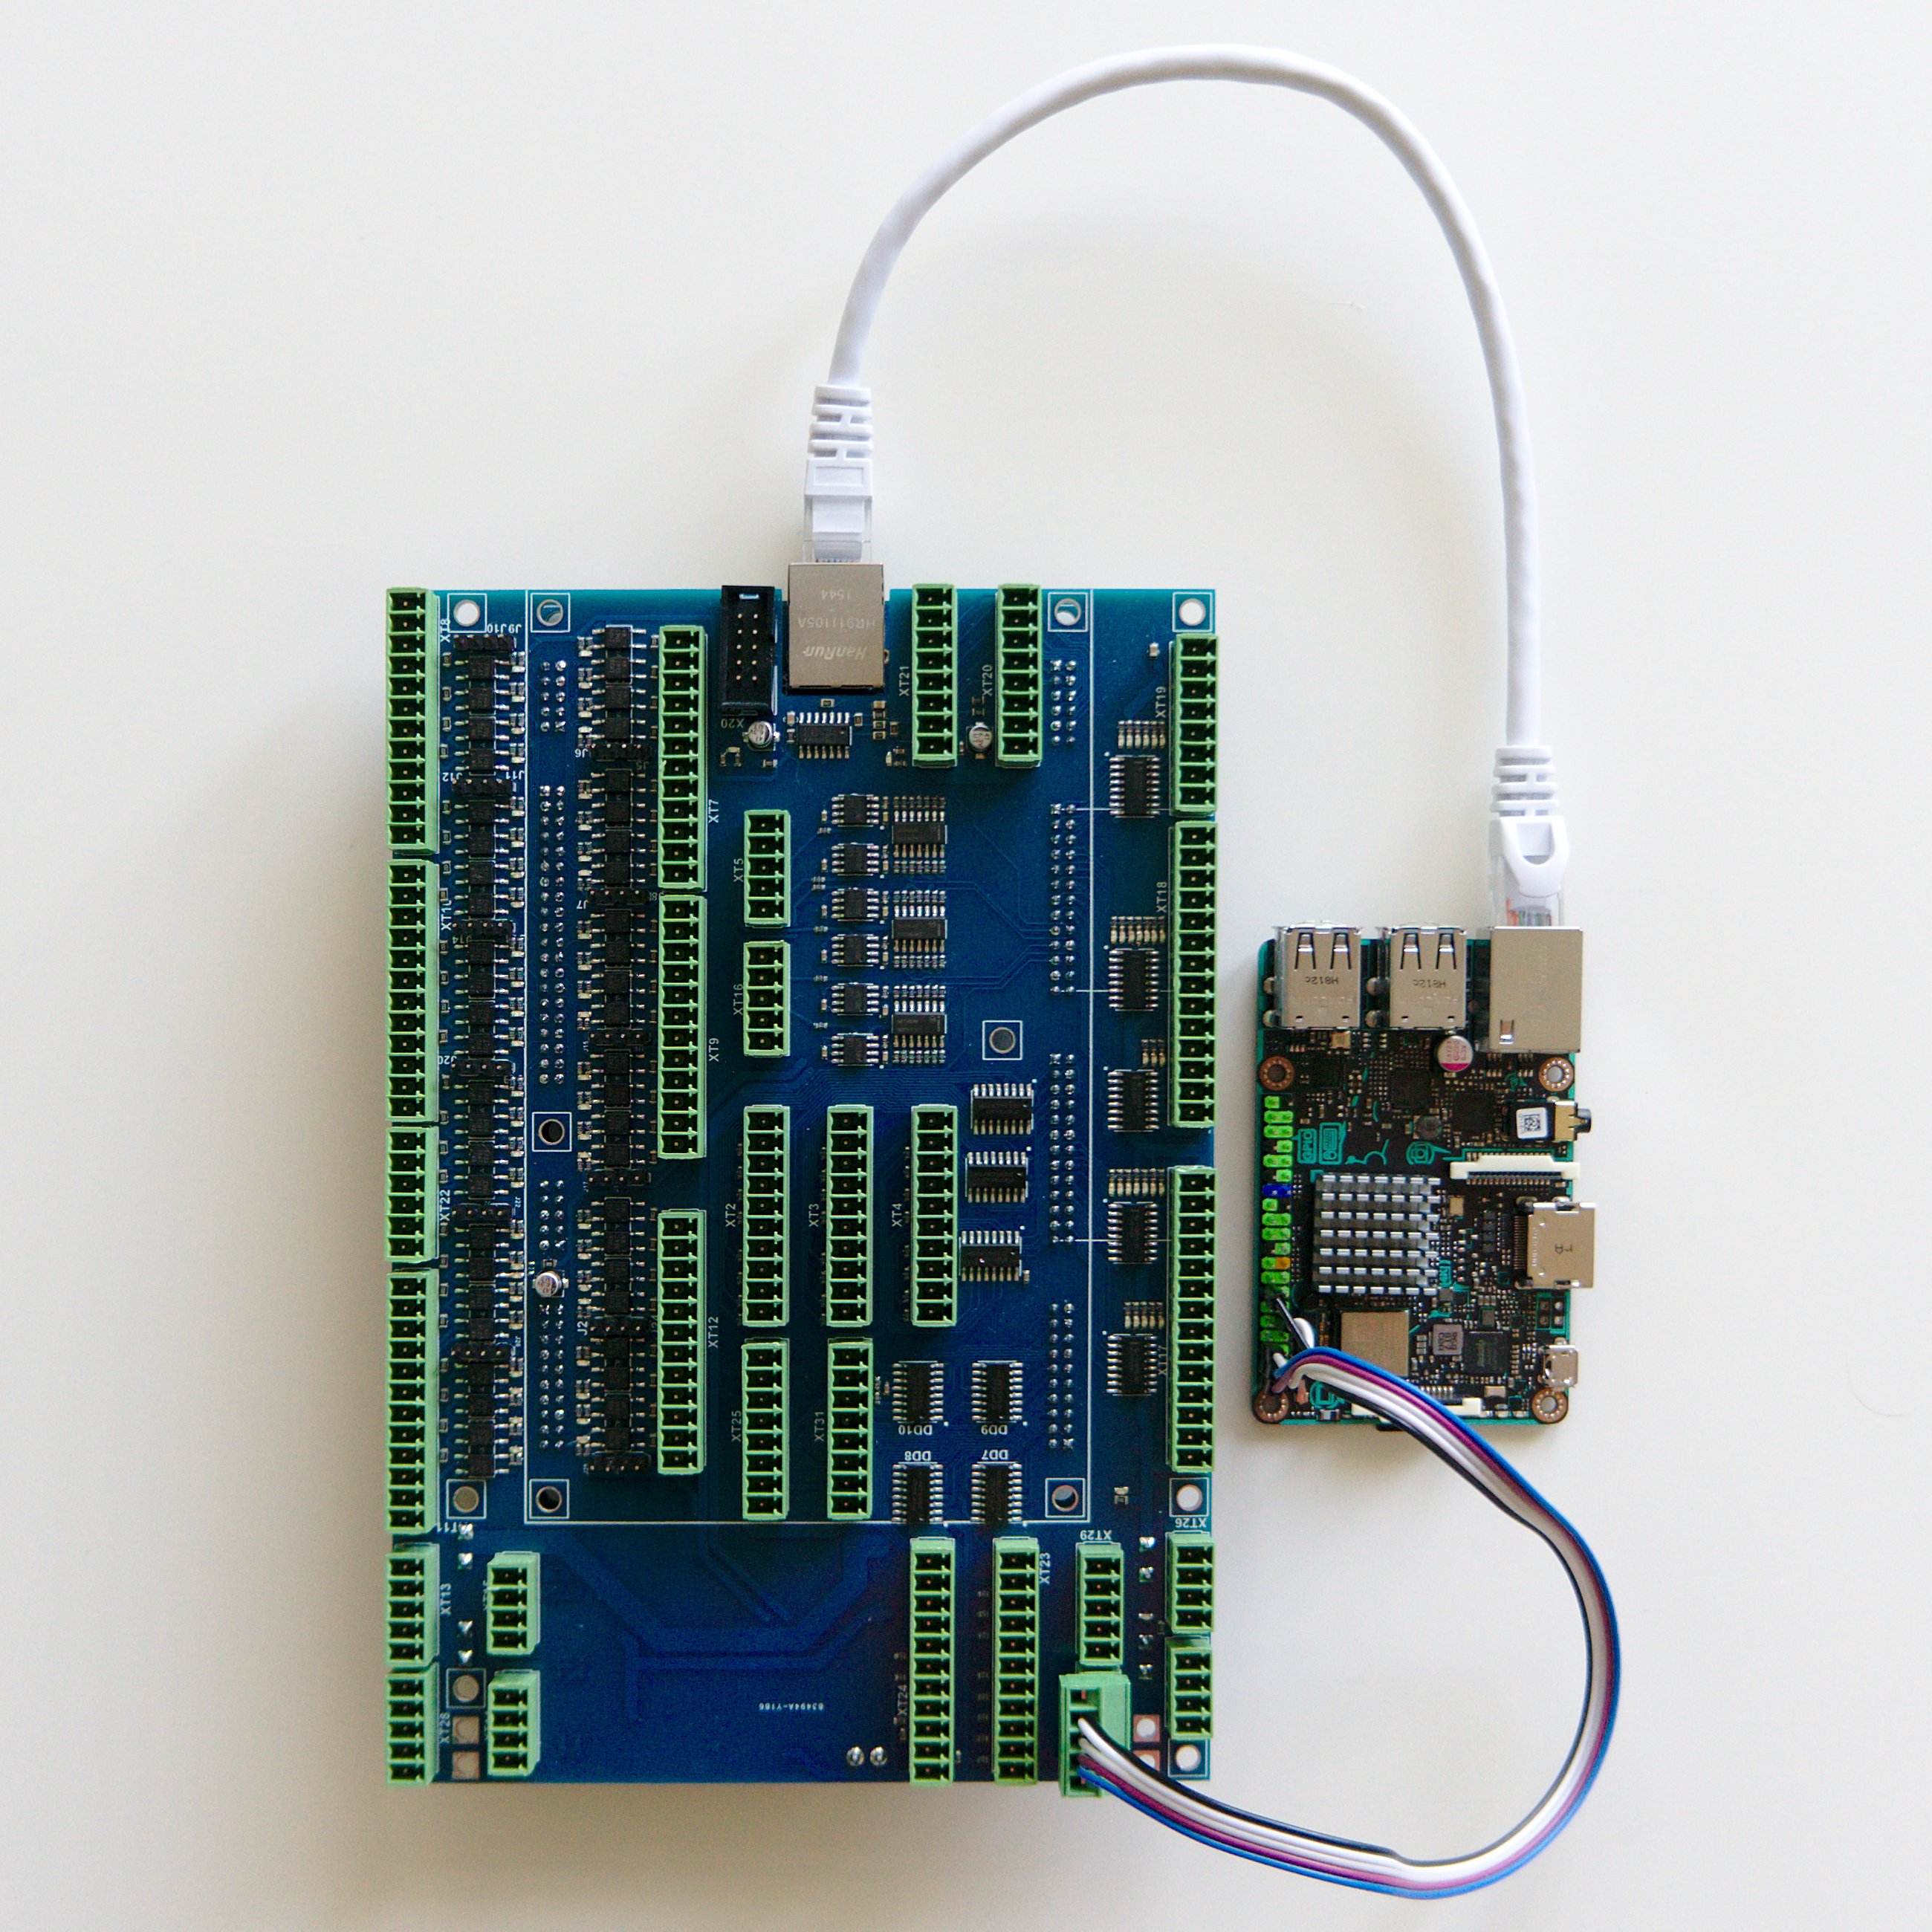
The single board computer (such as a TinkerBoard) should be connected to the myCNC-ET10 controller board in a way shown in the photo below:
Note that the connection MUST be done to the 5V/GND ports of the XT30 connector block and not to the 24V ports of the XT29 block which is located right next to it. Incorrect connection of the power supply may cause damage to the computer.
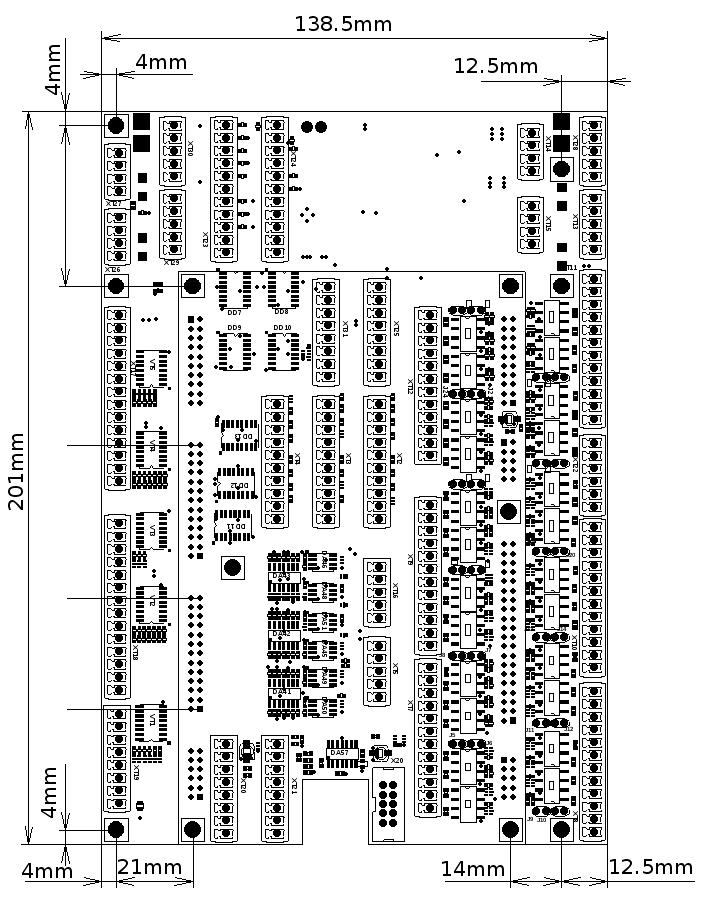
Board dimension
myCNC-ET10 breakout board dimension
PDF: http://cnc42.com/downloads/et10bb-r9.pdf
ET10 Firmware Reflash
WARNING: Unlike updating the myCNC software, the firmware CANNOT be downgraded after a reflash. The myCNC team recommends reflashing the control board firmware as a last resort only, and recommends seeking an explicit confirmation from the support team that the firmware reflash is warranted in order to avoid issues.

To reflash the board
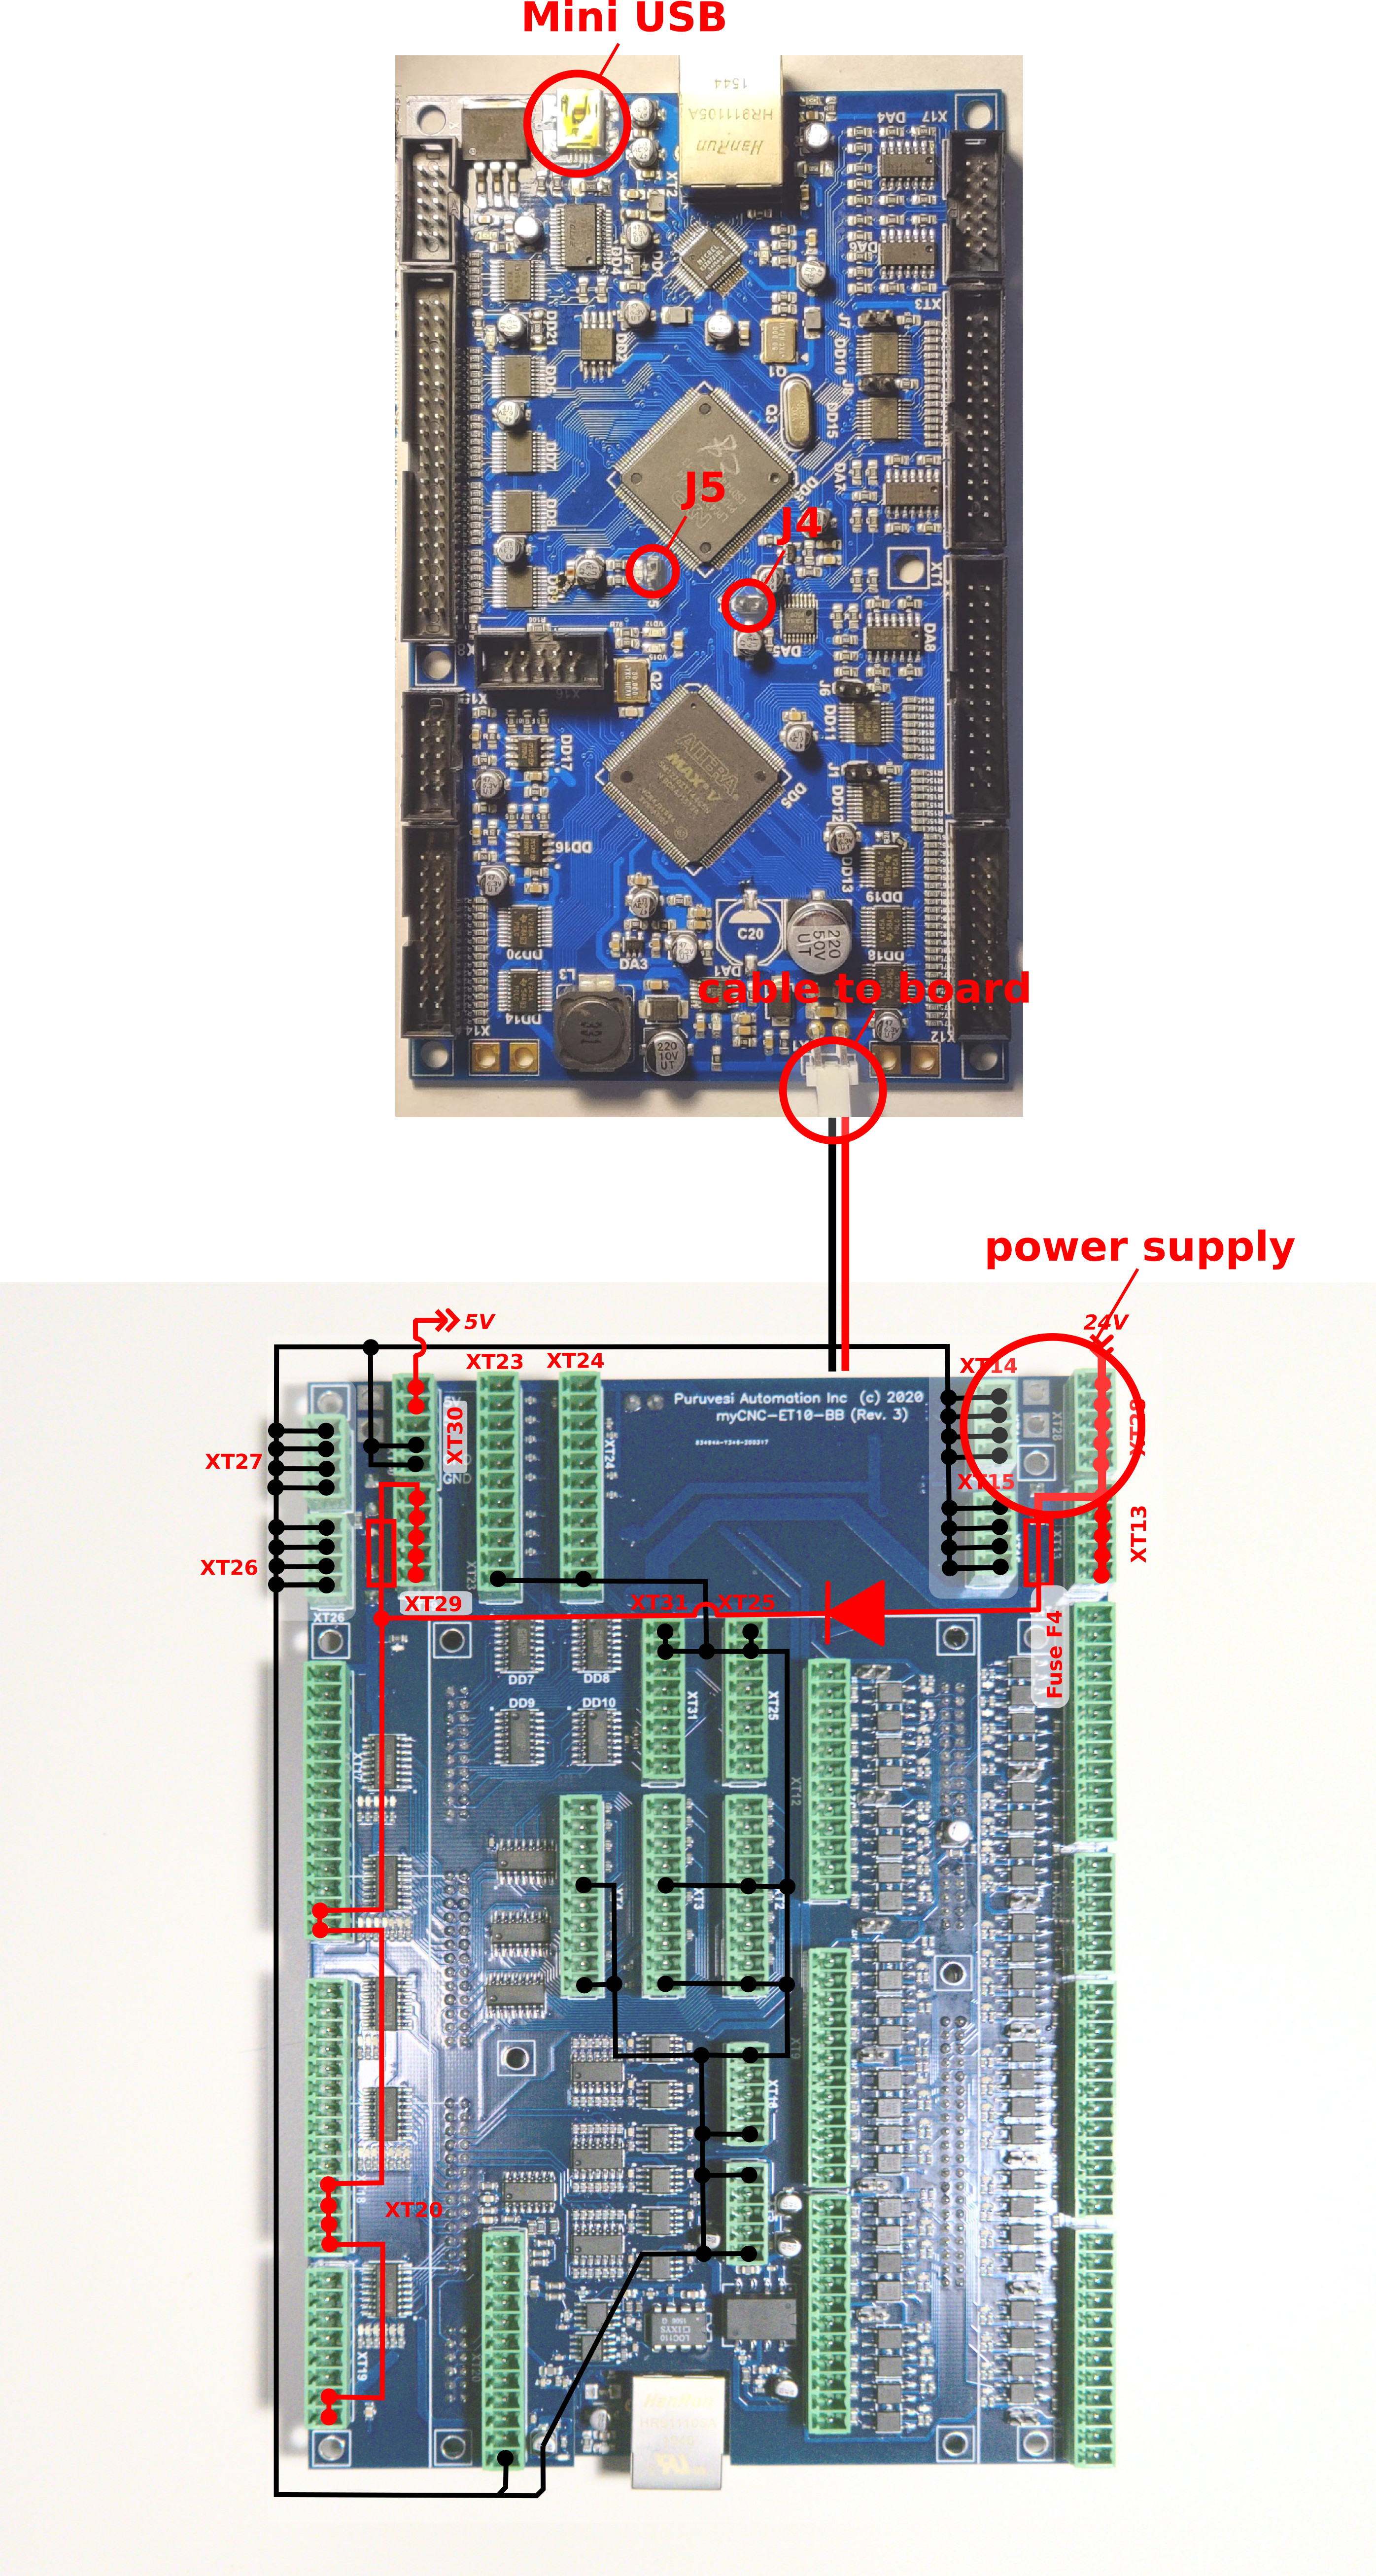
1. Unplug the 24V DC power supply and detach the ET10 controller from the Breakout board
2. Plug 24V DC supply
3. Short power cable between ET1 and Breakout leave connected.
4. Plug in the mini-USB cable to ET10 & Host Computer with myCNC installed
5. Close jumpers J4(reset) & J5 (programming) on the myCNC controller board
6. Open (remove) the J4(reset) jumper.
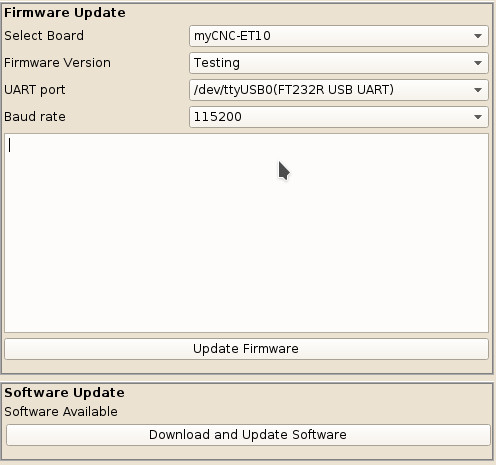
7. Open myCNC software on the Host computer, then go to Settings > Support Tab
8. “Select board” set to “myCNC-ET10”. Make sure to select the correct revision version.
9. Select “Firmware version” from “Release”, “Night build” or “Testing”
10. “UART port” select port with FT232 attached
11. Baud Rate set to “115200” for ET10; other baudrate can be selected in case of issues with the 115200 speed
12. Press “Update Firmware” button, Firmware download and the reflashing process will be started.
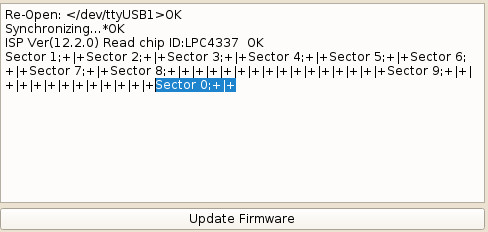
13. Sector 0 will be written at the end of process, so message in debug window “Sector 0; +” means reflashing process was completed successfully.
14. Remove all jumpers (J4, J5), assemble TE10 and Breakout and restart the board.
If the reflashing process has failed, please repeat the process from Step 5.

